Filling large plaster holes

Joined
12 Jun 2011
Messages
37
Reaction score
0
Location
Northamptonshire
Country
United Kingdom
Hi

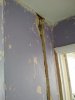
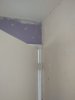
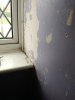
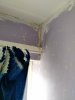
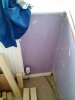
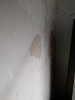
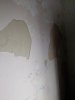
Have stripped wall paper and with it came a lot of plaster in some areas... See photo below!

Looking for any advice on filling the gaps and 'refinishing' the wall for painting... I'm all ears! (y)
IMG_20150904_070630624.jpg
 
Sponsored Links
If the rest of the plaster is sound I would PVA the patches and whole wall then give the patches a skim once its picked up a bit skim the whole wall "buuuuut" looks like the existing plaster needs to come off because you can see its not attached at the edges or at least take it back to where its sound
 
A solid point on the plaster, hadn't got round to finishing chipping off the rest of the loose stuff - bit worried how much more will be coming off!

Any recommendations on products to use? I wasn't sure whether the patching would need a different approach to general skim

Cheers
 
You didn't use one of those silly steamers did you?
 
Sponsored Links
Ahem... Urm... Might have started with one... Until realising the plaster was bad enough without steaming it off the wall too!
 
Just use multi, if that was my wall I would take the steamer to the rest of the wall and take the lot off looks like you have a really good base coat.
 
The base is very sandy, a pleasure to just scrape out for wiring channels! Not sure if that makes it particularly good or not, this type of wall is a bit new on me (1970s lightweight clinker, with this sandy base and naff/old skim - plus two or three layers of horrible wall paper...)

The base coat is also quite deep. I keep wondering if going back to block and boarding over would save me hassle in the long run - my skimming is amateur level at best, "keen to improve" category ;)
IMG_20150905_070718156.jpg
IMG_20150905_070831009.jpg
 
Just board over it as it is.

I do keep coming back to this... I think my problem is not knowing how that works around the door frame, window and radiator?! Can't seem to find a good description of how to deal with those bits which makes me a bit wary
 
Many pics attached!
 

Attachments

  • IMG_20150905_131630610.jpg
    IMG_20150905_131630610.jpg
    69.9 KB · Views: 274
  • IMG_20150905_131840966.jpg
    IMG_20150905_131840966.jpg
    32.1 KB · Views: 280
  • IMG_20150905_131723964.jpg
    IMG_20150905_131723964.jpg
    67.5 KB · Views: 286
  • IMG_20150905_131657299.jpg
    IMG_20150905_131657299.jpg
    70.6 KB · Views: 276
  • IMG_20150905_131742311.jpg
    IMG_20150905_131742311.jpg
    108.7 KB · Views: 270
  • IMG_20150905_131911371.jpg
    IMG_20150905_131911371.jpg
    44.1 KB · Views: 287
  • IMG_20150905_131904081.jpg
    IMG_20150905_131904081.jpg
    52.5 KB · Views: 268
Take all the architraves off around the door frames, take all the window trims off , but I would not stick it on that loose plaster I would take it off.
 

DIYnot Local

Staff member

If you need to find a tradesperson to get your job done, please try our local search below, or if you are doing it yourself you can find suppliers local to you.

Select the supplier or trade you require, enter your location to begin your search.


Are you a trade or supplier? You can create your listing free at DIYnot Local

 
Sponsored Links
Back
Top