
You are using an out of date browser. It may not display this or other websites correctly.
You should upgrade or use an alternative browser.
You should upgrade or use an alternative browser.
Bosch Condenser Dryer "Clean Container" (secret flap door)
- Thread starter klaani
- Start date
Sponsored Links
- Joined
- 23 Jul 2015
- Messages
- 1
- Reaction score
- 0
- Country

Thank you so much the stop start issues were driving me batty! As others have said, found the "secret" flap, cleaned out the slimy liquid, and now my dryer is back to as new performance. So pleased I found this site!
- Joined
- 10 Aug 2015
- Messages
- 1
- Reaction score
- 0
- Country
Hi
I have a Bosch Avantixx WTW86360SN/15 and the same issue with the container light problem.
This dryer have a self cleaning condenser and I have problem to get it out.
Does anybody know how I should do to get it out.
I´m thankful for any help I can get.
I have a Bosch Avantixx WTW86360SN/15 and the same issue with the container light problem.
This dryer have a self cleaning condenser and I have problem to get it out.
Does anybody know how I should do to get it out.
I´m thankful for any help I can get.

Sponsored Links
- Joined
- 15 Sep 2015
- Messages
- 1
- Reaction score
- 0
- Country
I found and cleaned/dried the 'hidden' pump compartment and everything worked well for a few months, but it again needed to be dried. I left the cover off as the drier worked without it and it was a pain to remove.
The compartment contains about 1cm of water level when the drier is shut down by the "Container Full" alarm and the problem has now got to the point where the drier stops when the empty compartment fills to that level with condensed water.
Manually adding more water to the compartment causes the pump to operate when re-starting the drier to reduce the water level back to 1cm, with the drier stopping soon after.
So - the pump and its level control switches appear to work - perhaps it is just an additional high-level protection switch that is failing. Any suggestions?
Has anyone resolved this problem above. I have cleaned this secret compartment, and filling it above 1cm the pump operates and clears water but then just shuts off at 1 cm. I have removed the side panel and cleaned inside the pump. With the tank completely dry, the dryer now just switches off after 10 seconds, if you start it in time it will heat for a few seconds and switch itself off. I phoned the Bosch help line, who wanted £95 to send an engineer. I asked how much an LCD board is and the quoted £250. I have a BOSCH avantixx 8 condenser dryer, 4 years old, time to buy a cheap indesit?
Hi,
I am trying to get to the secret flap. I understand where it is likely to be but I am stuck at the first hurdle as when I pull down the white flap on the very fron of the machine to access the condenser to remove it, all I have is a grey panel with no screws or any signs at all hoe I can get it out (to even get close to the secret door).
Could someone help ?
I have been on you tube and watched people cleaning out the secret flap but everyone I watched had either clips or twist hinges to move to pull out the condenser. I don't have that at all.
Hellllllllllllpppppppp meeeeeee !!!!!
Hi. did you manage to resolve this problem? We have same problem - model WTW84360. thanks in advance
Hi, I have a Bosch WTW863S0 which also intermittently comes up with the clean container error. I've read this thread which talks about removing the air cooler unit and cleaning out under the hidden flap. But when I remove the left hand panel under the dryer door there is no obvious way in to remove the air cooler unit. There is a single torx headed screw in the bottom left corner but removing this doesn't seem to release anything? If anyone can help I would be very grateful. Many thanks.
- Joined
- 6 Nov 2015
- Messages
- 1
- Reaction score
- 2
- Country
At last I feel sane again,many many thanks
Just managed to sort the issue out. I had container full light coming on all the time on Classixx 7. I guess most models have same setup so good luck.
You need two torx bits or torx screwdrivers size tx15 or tx20.
Remove top cover removing two back screws, slide backwards and lift out.
Next thing is to remove the left hand panel (as you are facing the machine) or the nearest to the wastage tank. Remove screws from top, rear, one screw at bottom and then remove waste tank, u'll find 3 screws, remove and pull the plastic panel towards you and let it rest on screw on right. you'll hear uncliping noise but it's fine. U'll reveal couple more screws holding left panel. Remove them.
Once all screws are removed you have to slide the panel backwards by prying off from front side. Remove panel.
Now u'll see a black hose and a white plastic pipe connecting the pump at bottom rear corner. Firstly remove the plastic pump cover to gain access to pump(one screw and press clips from sides, lift up). Then disconnect two wiring connections to pump. U'll find a clip retaining the pump next to wiring securing clip. Unclip and slide pump forwards. Remove the pump and clean all dirt and also clean thoroughly the two metal pins which make container light flash. Also remove the water trap and u'll see another cover to access more dirt.
Once all clean refit in reverse order.
Takes about 20 minutes
Hope this helps, please let me know
For those of you that are finding that their dryer is set up different and there doesn't seem to be a panel to open up, I think I have the same model, which has a "self cleaning" condenser. I have had to completely pull this thing apart and it turns out the water pump and sensor are on the right side, not the left. To pull it out for cleaning, requires just about pulling everything apart, including the tumbler, due to access restrictions in getting the sensor and pump out. I will tell you how it goes in terms of if the problem was fixed, but I can tell you I will NOT be doing this again. It's way to time-consuming and you'd have to pay a technician top dollar just to pull your dryer apart just clean out a little mess.
I may be cynical, but I think Bosch designed these specifically so they would run okay until the warranty expires. Designed to fail. I also wonder why these things don't just have a drain hose that goes to the sink so you don't have to keep emptying the water? What an unnecessary hassle. Perhaps they have models with a drain hose. I know the water needs to recycle to clean the condenser, but come on!
One thing is for sure, I am turned off by this poor design. I am getting rid of my dryer (if I can put it back together) and getting one of the new heat pump models. I hope my research will uncover a more serviceable design!
That's interesting Supahcupah... I removed a blockage from my Bosch Exxcel dishwasher (I guess 7 or so yrs old) a wee while ago - it was really quite straightforward. For a start easy to check the pump is clear -undo one screw from inside - but if it is something else (mine was the 'water intake valve' I think it is called ) it is a simple matter of taking the side off (4 or 5 screws) and all the likely culprits are there and visible to check by eye and easy to remove.
Then I had an issue with something else and short of time I decided to call out our local repair man ...when he saw it he said you are lucky you have got one of the good ones...the later ones are all sealed up - to even look at the pump you have to tip it up and take the bottom off...
Then I had an issue with something else and short of time I decided to call out our local repair man ...when he saw it he said you are lucky you have got one of the good ones...the later ones are all sealed up - to even look at the pump you have to tip it up and take the bottom off...
- Joined
- 7 Feb 2016
- Messages
- 1
- Reaction score
- 0
- Country
We would also like to say thank you to the person who share the information about the secret compartment, and those who also shared photos and advice about getting it open. After an hour of excruciating grovelling around on the floor we got it open cleaned it out and, touch wood, our towels are fluffily drying as I type. Saved us a bunch of money and a big hassle. Thank you
Thanks for all the advice and the pictures. Just saved at least $200 - $300.
My Bosch dryer (WTW86560AU) had the same issue where it stopped with beep sound that the condensed water in the container need to be emptied. The water was empty and I had cleaned all the filters multiple time. After reading so many posts I got the confidence to dismantle the dryer
I was not that lucky as many others here as I had to remove the entire dryer including the drop to do the cleaning as the cleaning compartment was just below the steel drum.
I am adding below the steps I followed so that if somebody else have issue with the similar model it would be easy.
Total time spent: 3.5 hours.
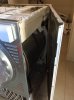
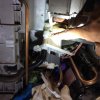
1) First remove the front door, remove both the side panel followed by the back outer panel (The inner panel can be removed later).
2) Tilt the dryer so that it rests on the front panel (As the door is already removed the dryer can rest nicely. I placed a bed sheet, plastic to avoid getting scratches especially considering that the new one cost $1850/- )
3) The spring connected from the bottom of the dryer to the motor part needs to be removed. I used a plier and removed the spring(the one connecting the motor. First tried the end that connects to the bottom of the dryer but couldn't do it)
4) Remove the belt.
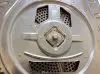
5) Remove the screws from the back of the dryer inner panel which connects the steel drum to the panel. After the screws are removed you can see a small lock kind of thing which can be easily removed using a screw driver.
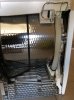
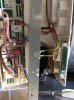
6) The plan is to clean the area where the water is pumped up from the bottom of the dryer. So follow the black tube, which connects to, the top left water container. The water is supposed to drip from this tube to the container. The other end of the tube is what needs to be cleaned.
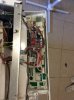
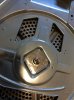
7) Identify the above location and remove the screws. You can see that there are two parts once removed. One is kind of a small transformer and the other one has two small steel pieces(may be it is some sort of sensor).
8) The steel piece and the small container need to be filled. I used wipes to clean both.
9) Now the most difficult part which is to put everything back together. You need to follow the steps in opposite order. I am not sure whether the steps I followed to fit the drum, belt, spring and the inner back panel is right. May be somebody can confirm. I fitted the drum, belt, then spring and then the back inner panel. When the drum was screwed to the back panel I could feel the tension due to the belt. I just pulled the drum and tightened the screws.
10) Most of the time was spend in fitting everything back.
11) Remember to fit the different tubes properly and try to rotate the drum and make sure it does not touch the drum. It was a little tricky to fix the control panel and the condense water tray back in. Anyway I managed to do it.
12) It is a week since I did all this and I have 4 cycles of cupboard dry till now and the dryer is all working as new. Very happy with my decision to dismantle the dryer myself.
13) I know that I might need to do this again after 4 years. Bosch should have at least kept this compartment easily accessible which would have made all this much easier. Bosch makes great machine but the decision to have this compartment below the drum needs to be looked at.
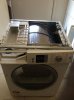
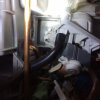
14) I have taken a lot of photos during the process. Attaching some of them here.
My Bosch dryer (WTW86560AU) had the same issue where it stopped with beep sound that the condensed water in the container need to be emptied. The water was empty and I had cleaned all the filters multiple time. After reading so many posts I got the confidence to dismantle the dryer
I was not that lucky as many others here as I had to remove the entire dryer including the drop to do the cleaning as the cleaning compartment was just below the steel drum.
I am adding below the steps I followed so that if somebody else have issue with the similar model it would be easy.
Total time spent: 3.5 hours.
1) First remove the front door, remove both the side panel followed by the back outer panel (The inner panel can be removed later).
2) Tilt the dryer so that it rests on the front panel (As the door is already removed the dryer can rest nicely. I placed a bed sheet, plastic to avoid getting scratches especially considering that the new one cost $1850/-
)3) The spring connected from the bottom of the dryer to the motor part needs to be removed. I used a plier and removed the spring(the one connecting the motor. First tried the end that connects to the bottom of the dryer but couldn't do it)
4) Remove the belt.
5) Remove the screws from the back of the dryer inner panel which connects the steel drum to the panel. After the screws are removed you can see a small lock kind of thing which can be easily removed using a screw driver.
6) The plan is to clean the area where the water is pumped up from the bottom of the dryer. So follow the black tube, which connects to, the top left water container. The water is supposed to drip from this tube to the container. The other end of the tube is what needs to be cleaned.
7) Identify the above location and remove the screws. You can see that there are two parts once removed. One is kind of a small transformer and the other one has two small steel pieces(may be it is some sort of sensor).
8) The steel piece and the small container need to be filled. I used wipes to clean both.
9) Now the most difficult part which is to put everything back together. You need to follow the steps in opposite order. I am not sure whether the steps I followed to fit the drum, belt, spring and the inner back panel is right. May be somebody can confirm. I fitted the drum, belt, then spring and then the back inner panel. When the drum was screwed to the back panel I could feel the tension due to the belt. I just pulled the drum and tightened the screws.
10) Most of the time was spend in fitting everything back.
11) Remember to fit the different tubes properly and try to rotate the drum and make sure it does not touch the drum. It was a little tricky to fix the control panel and the condense water tray back in. Anyway I managed to do it.
12) It is a week since I did all this and I have 4 cycles of cupboard dry till now and the dryer is all working as new
. Very happy with my decision to dismantle the dryer myself.13) I know that I might need to do this again after 4 years. Bosch should have at least kept this compartment easily accessible which would have made all this much easier. Bosch makes great machine but the decision to have this compartment below the drum needs to be looked at.
14) I have taken a lot of photos during the process. Attaching some of them here.
Attachments
-
 IMG_0444.JPG86.4 KB · Views: 3,528
 -
 IMG_0445.JPG89 KB · Views: 3,169
 -
 IMG_0446.JPG104.8 KB · Views: 3,270
 -
 IMG_0447.JPG109.3 KB · Views: 3,087
 -
 IMG_0448.JPG113.4 KB · Views: 2,921
 -
 IMG_0449.JPG178.6 KB · Views: 3,113
 -
 IMG_0450.JPG110.9 KB · Views: 2,926
 -
 IMG_0461.JPG127.1 KB · Views: 3,143
 -
 IMG_0462.JPG88.2 KB · Views: 3,171
 -
 IMG_0471.JPG119.5 KB · Views: 3,605
- Joined
- 10 Apr 2016
- Messages
- 1
- Reaction score
- 0
- Country
Brilliant! Saved us buying a new dryer. Bosch Customer Services, if you read the, please listen up! We like Bosch products - we have your dryer, washing machine, dishwasher, kettle and toaster! BUT!!! We feel really let down that we had to search the web for a solution to an easily-fixed and common problem that is not even touched upon in the user info supplied. Why put that 'secret door' there and then not mention it?! Secret info for service engineers who can then charge a large fee for an easy DIY fix? Hmmmm....
- Joined
- 28 May 2016
- Messages
- 1
- Reaction score
- 0
- Country
I too found the secret flap after reading your post. Thanks a million. It fixed my bosh WTS84516GB tumble dryer.
The flap is hard to see. Its on the bottom of the cooler block area.
The flap is hard to see. Its on the bottom of the cooler block area.
Ref Bosch tumble dryer WTE84107GB, we had the same problem of the container light flashing, tried all the usual things which didn't work. The we found your tip about the "secret" compartment under the air cooler towards the rear of the machine, lifted up the flap, removed a pile of sludge, and hey presto ! It fixed the problem. Great post, thanks very much.
DIYnot Local
Staff member
If you need to find a tradesperson to get your job done, please try our local search below, or if you are doing it yourself you can find suppliers local to you.
Select the supplier or trade you require, enter your location to begin your search.
Please select a service and enter a location to continue...
Are you a trade or supplier? You can create your listing free at DIYnot Local
Sponsored Links
Similar threads
- Replies
- 1
- Views
- 7K
- Replies
- 4
- Views
- 6K