2 incorrectly plumbed storage tanks in loft. Advice please?

Joined
8 Sep 2010
Messages
985
Reaction score
23
Location
South West Wales
Country
United Kingdom
Hi all

To avoid confusion, I'll just add first of all that this topic was partially covered in this thread here:

//www.diynot.com/diy/threads/cleaning-fe-header-tank-adding-cleaner-to-heating-sys.421342/

but because that topic split into two very different topics, I thought it best to start afresh on one of them here.

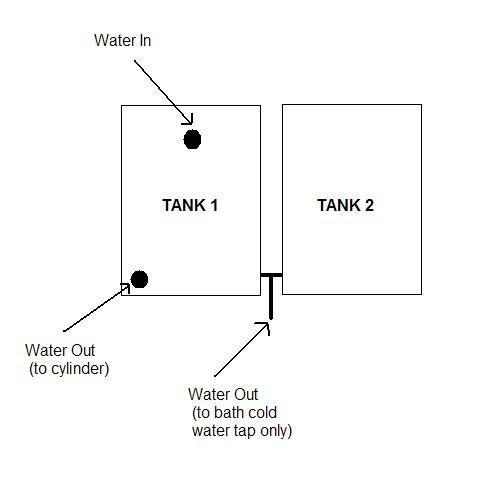
There are two 25 gallon tanks in my loft, linked together. The water goes into and comes out of the same tank. There is a second out pipe which feeds just the cold water tap in the bathroom. The outlet from this comes from the link between the two tanks (forming a "T"). Here's a diagram of the set up:
1. I understand that the inlet should be on one tank and the outlet on the far side of the other so that all of the water flows. For what ever reason they have not done that here. Does that definitely need changing? Or does the second out pipe on the link pipe to the cold water bath tap mean that there will be enough flow/movement in Tank 2 as it is now (to prevent stagnation)?

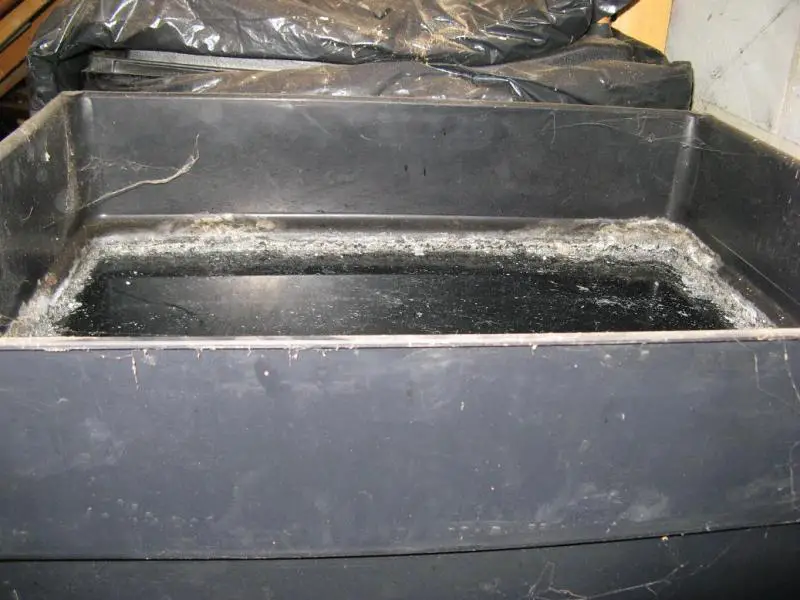
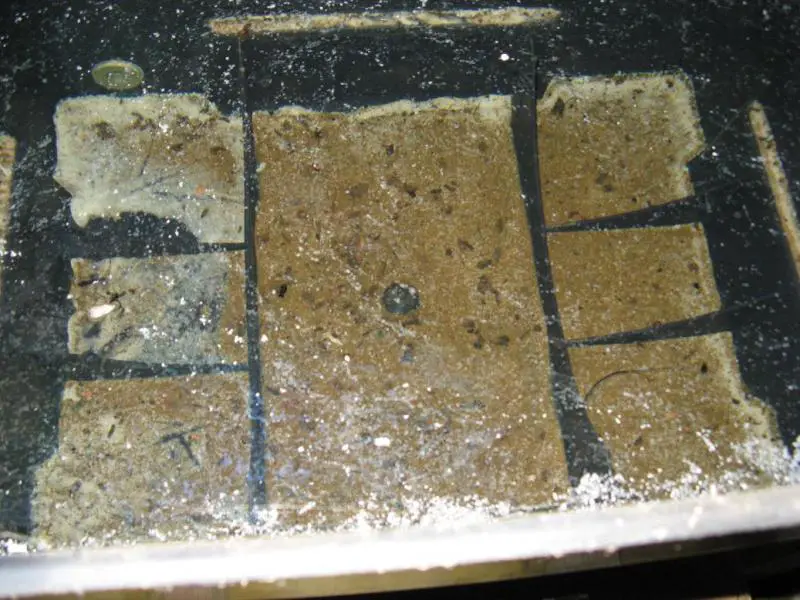
2. Apart from the strange set up, the idiot who did it chose not to put a lid on the tank. No insulation either. Here's some pictures from a a while ago:
When I went up yesterday I was unpleasantly surprised to find a DEAD BIRD in there!

Apart from draining the tank, cleaning it, getting a lid and a jacket, what else should I consider doing? Do I need to test for bacteria / diseases or anything else? Any treatment needed?

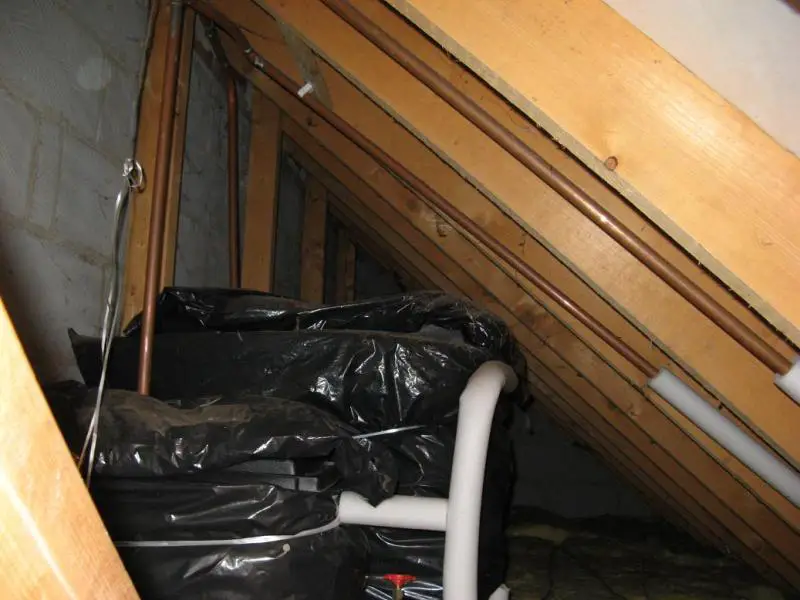
3. There is a vent pipe going into Tank 1. Does that need to be lagged or is it OK as it is?
Huge thanks to anyone who can offer any help with this balls up!

Cheers

Max
 
Sponsored Links
It will help keep the water wholesome if you change the inlet to the other tank.....especially if your water demands are small.
Drain the tank water away, remove the crap from the tank bottoms (sure to be a fair bit there).
Definitely fit lids, and lag the expansion pipe. Don't lag the underside of the tank.
Don't worry about nasties afterwards, once the tank is covered.
John :)
 
It will help keep the water wholesome if you change the inlet to the other tank.....especially if your water demands are small.
Actually, that's a good point... Our water demands are VERY small.
Is it the same difference to change the outlet instead of the inlet?
Drain the tank water away, remove the crap from the tank bottoms (sure to be a fair bit there).
Definitely fit lids, and lag the expansion pipe. Don't lag the underside of the tank.
OK, great. Thanks for that. For curiosities sake, why do the expansion/vent pipes need lagging?
Don't worry about nasties afterwards, once the tank is covered.
John :)
That's damn good news. I thought the dead bird and stagnation might have led to all kinds of dangers!

Thanks ever so much for the help.
 
while working, don't use the hot taps, as that would draw your cleaning stuff into the cylinder.

Drain them both, using the cold bath tap; sweep out what dirt you can with a dustpan and soft brush, scrub out with household cleaner; rinse with plain water, spay or scrub with bleach, rinse with clean water. You can drain away all the cleaner, bleach and rinsings using the cold bath tap. Probably some grit, spiders and limescale will come out as well. When I did something similar they did not clog the tap, though you may need to unscrew the aerator from the tap spout.

Afterwards you may need to dismantle the WC cistern valve as it may be clogged.

On final fill I would be tempted to add some bleach to wash through the pipes and the cylinder overnight. When the chlorine smell has gone from the taps it will be safe to wash your face with. However I don't know the concentration that is used to sterilise suspect drinking water. You could use Milton if you prefer though it is much the same thing.

It is useful to know that a hot water cylinder kept at about 60C will pasteurise the water and kill most bugs.
 
Sponsored Links
The thing is Max, you can change the inlet much easier than the outlet.....no heaving about with 22mm pipes, just 15mm.
You can also do this with the tank comfortably where it is, without a full drain down. I like to leave outlets undisturbed where possible!
The water level in the expansion pipe is the same as the level in the tank, and you don't want it to freeze!
It could be a good move to fit a full bore isolating valve to the new inlet, just for ease of maintenance in the future.
Allow the system to flush well.....it's amazing how much crap can accumulate in a header tank, and a copper cylinder isn't much prettier either, sometimes!
Hope your project goes well
John :)
 
The WORST smell I ever smelt was in a big posh country house in Herefordshire. They didn't have mains water but a bore hole that pumped water up to four big tanks in the loft. All the tanks were fitted in line.
The supply and demand came from the first tank. The second tank smelt a bit fishy but the third and fourth ones were full of brown stinking liquid that looked and smelt like a mixture of gravy, milk, fish guts and a rugby team's ****.

It took weeks for the smell to leave my a) nose b) tools c) hose pipe c) nightmares!

While I was there the lady kindly made me a cup of tea... using the water from the tanks. I advised her not to drink it but she said she was used to it. I never did drink the tea.

Change the outlet as advised earlier to get a continuous flow of water though both tanks.
 
@JohnD.
I don't think a cape would look out of place on you :)
Great advice fantastically explained.
The only thing I was not sure about was your point about drinking water. I wouldn't ever have a need to drink anything from them tanks.

@Burnerman
Many thanks for that. I think I'll leave it for the plumber when we book him to change the inlet. What kind of price roughly will I be looking at for that do you think?

RE: the water level in the expansion pipes. Bearing in mind I am new to all this, I have been scratching my head as to why those pipes are only partially lagged (see photo above). Now it makes sense! They've lagged it to just above the water level then left the rest. Not sure if that's lazy or clever. But I'll lag the higher parts of the pipes just to be on the safe side.

Good idea RE the isolating valve.

@leakydave
'NUFF SAID!!!!!

That made me chuckle.


@Everyone
Bonnie Tyler needed a hero. I don't... I've got you guys!

Thanks a million.
 
The only thing I was not sure about was your point about drinking water. I wouldn't ever have a need to drink anything from them tanks.

you brush your teeth in it, and wash up your cups and utensils.
 
you brush your teeth in it, and wash up your cups and utensils.

Mostly not. Only the bath tap is fed from the tank. The sink tap in the bathroom is fed from mains directly.

As for washing up, we mostly use the kettle. Hot water is almost only ever used for showering (and occasional washing up if there is some left).
 
Drain down . Undo tank connector to tank 2 . Shove tank along a bit . Replace connector with cap . Leave tank to dry out and then forget it :p . As long as the vent and overflow are on tank 1 - that`s it . Simples- If you find out that one day you run out of water - come back here and tell me I was wrong ;)
 
I must admit, the same thought has crossed my mind several times... But I know naff all about this kind of stuff. So I presumed:

- That because it was there it must be there for a reason.
- That you maybe need more water to produce more pressure.

If I can get rid of Tank 2 and it will make no difference at all, then I'm definitely up for doing that. Oh, and they are 25 gallon tanks.

Ok, so...

1. When you say "Shove tank along a bit" - why is that needed?

2. The other thing is, it will be easier to address the problem with the base if I do it like this. I've been told it is a bad idea having a chipboard base and I can totally see why. If I do replace that, should I remove the chipboard entirely or just put a more suitable sheet of wood on top of it?

3. I am going to have to attach the outlet which feeds the bath tap to the tank. Should that be joined to a new hole? Or could I use the hole which currently has the join pipe in it (that way I would not have to cap the hole either).

Huge thanks

Cheers
 
Some excellent advice there Max....if your water requirements are low, one tank is all you need.
My house was exactly the same, but on the odd occasion someone filled the bath full, the water supply wasn't enough. On that occasion, my bathroom hand basin hot would airlock, for reasons unknown to me.....so, I put another tank in parallel.
If you replace the chipboard base (bad idea, leak wise), use the same thickness of ply.....saves altering the inlet and outlets.
Using the bath tap to the existing connector is fine.
John :)
 
'mmmm

a bath uses about 100 litres

...oops

you said 25 gallon

which (if that is "actual" capacity) is enough to run a bath
 
Hmmm... As I'm sure you know by now, this is all new to me. So please excuse me if I'm being really stupid here. What I don't understand is why more volume is potentially needed. When water comes down from the tank, isn't it instantly topped up again (as the float valve falls)? And if so, isn't there any endless supply of water form the tank (in theory)?

I'm certain I've missed something obvious. I'm just not sure what!

Cheers
 

DIYnot Local

Staff member

If you need to find a tradesperson to get your job done, please try our local search below, or if you are doing it yourself you can find suppliers local to you.

Select the supplier or trade you require, enter your location to begin your search.


Are you a trade or supplier? You can create your listing free at DIYnot Local

 
Sponsored Links
Back
Top