neco Shutter remote control box wiring diagram

Joined
10 Dec 2014
Messages
2
Reaction score
0
Location
Manchester
Country
United Kingdom
hello all, first time post. after spending 2 weeks trawling the internet for answers i gave up and tinkered with the box and have thought to post it here for anyone in the future to find useful.
you will need to zoom ion to picture to see what its referring to
!!!!!!!!!!!!!!!!!!!!!!!!!!!!!!!!!!!!!!!!!!!!!!!!!!!!!!!!!!!!!!!!!!!!!!!!!!!!!!!!!!!!!!!!!!!!!!!!!!!!!!!!!!!
REMEMBER ONLY USE THIS AS A GUIDE AND IF COMPETANT TO CARRY OUT THE TASK.
THIS IS JUST FOR INFORMATION DONT MESS WITH ELECTRICS IT CAN LITERALLY KILL OR CATCH FIRE ETC
!!!!!!!!!!!!!!!!!!!!!!!!!!!!!!!!!!!!!!!!!!!!!!!!!!!!!!!!!!!!!!!!!!!!!!!!!!!!!!!!!!!!!!!!!!!!!!!!!!!!!!!!!!!

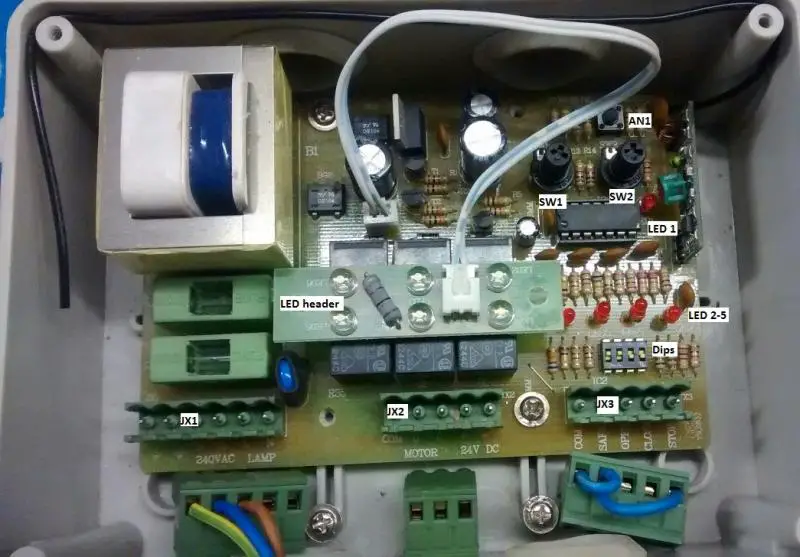
LED 1 = used for programming new remotes
LED 2 = on when safe is connected to common
LED 3 = on whilst open on JX3 is linked to commmon
LED 4 = on whilst close on JX3 is linked to commmon
LED 5 = unknown at moment

DIPs 1 = enable open function on jx3
DIPs 2 = enable close function on jx3
DIPs 3 = dead man open on jx3
DIPs 4 = dead man close on jx3

AN 1 = press once will flash LED1 during the flashing period press a button on remote until LED1 changes pattern

AN 1 = Keep pressed for 5-10 seconds to wipe all stored remotes

SW 1 = adjust the time open on jx2 is activated for...not applicable when using the dead man ioption on jx3 but still timed on remote

SW 2 = adjust the time close on jx2 is activated for...not applicable when using the dead man ioption on jx3 but still timed on remote

JX1 pinout (please note this is how it is labeled and it is up to you to verify its the exact same as mine)

pin= . . . . . .
Earth [Earth Neutral Live] {Live Neutral}
[ MAINS in ] {Light }

JX2 pinout (please note this is how it is labeled and it is up to you to verify its the exact same as mine)

pin= . . . . .
[Com Open Close ] {+ - }
[Motor ] {24V DC }

JX3 pinout (please note this is how it is labeled and it is up to you to verify its the exact same as mine)

pin= . . . . .
Com Safe Open Close Stop


JX1 Mains in = 240v power from mains
JX1 Light = activates 240v mains out to power a light (check the rating of fuse)

JX2 motor = wiring to motor
JX2 24V DC= aways on outputting 24v DC to power sensor for JX3 SAFE/STOP

JX3 = common to activate the SAFE/OPEN/CLOSE/STOP if no sensors are connected then you still have to wire the common to safe and common to stop

!!!!!!!!!!!!!!!!!!!!!!!!!!!!!!!!!!!!!!!!!!!!!!!!!!!!!!!!!!!!!!!!!!!!!!!!!!!!!!!!!!!!!!!!!!!!!!!!!!!!!!!!!!!
REMEMBER ONLY USE THIS AS A GUIDE AND IF COMPETANT TO CARRY OUT THE TASK.
THIS IS JUST FOR INFORMATION DONT MESS WITH ELECTRICS IT CAN LITERALLY KILL OR CATCH FIRE ETC
!!!!!!!!!!!!!!!!!!!!!!!!!!!!!!!!!!!!!!!!!!!!!!!!!!!!!!!!!!!!!!!!!!!!!!!!!!!!!!!!!!!!!!!!!!!!!!!!!!!!!!!!!!!
 
Sponsored Links
I am guessing this is the controller for a roller shutter door? I am sure the information will be useful to some one. Clearly from the picture some radio control is involved I can see the aerial wire.

May be a little more information as to what the box does would be helpful! But at £33 for a new box from Ebay I would not attempt to repair.

It would seem there are many similar boxes. Not sure what can be done with your description as there are so many variations?
 
Sorry.

Yes this is a shutter controller. The reason I needed the above info was to be able to add manual controls to the shutters as they only work of remote key fobs.

I didn't couldn't work out what to do so after adjusting different switches and toggles I now know what each control does.

Since I couldn't find a link my self to a manual for this particular model I decided it may be useful for someone else.

I know there's many variations of these controller box's and they start from £33 used but I didn't want to buy another box just to get a copy of the manual.
 
I have this unit and need to re set the top and bottom limits using the standard fob - is this done by adjusting the SW1/SW3 knobs, if not, how is it achievable?
 
Sponsored Links
I have this unit and need to re set the top and bottom limits using the standard fob - is this done by adjusting the SW1/SW3 knobs, if not, how is it achievable?

I have the absolutely identical unit controlling my garage roller shutter door. SW1/SW3 are just maximum run time adjusters - a final safety if the limits built into the unit they are controlling fail completely, from memory they should be set to give just enough time for a full up/down, plus a bit. The actual limits are built into the motor itself and adjusted by an alan key.

Mine uses what is called a tube motor - motor, gearbox and limits are all in one, like a sausage in the middle of the roll, fixed at on end. The limits are operated by toggles which run up and down a very fine brass thread inside the unit and they can be very precisely set. The motor shaft has a deliberate built in weak point, intended to snap, if the motor is over loaded. Breaking it means the entire unit is scrap and needs to be replaced - don't ask me how I know.. Complete replacements can be had on ebay for around £60.

Mine came with two radio remote controls, one I mounted in the car, the other I fixed by the house back door. I decided to add a wired set of controls inside the garage would be handy, so found a small box to which I fitted three buttons - up, down and stop.

I also added an IR beam across the door opening, so the door could not be set to close with something in the way. I set the beam height to that of my car's tow ball, so car is properly clear of the door, before the door will close. I then later added a bright LED mounted at the back of the garage, which would light up once the beam detected it was clear, by hacking into the beam unit's own LED. That unit got soaked and wrecked by blown in rain, but I happened to have a new, spare unit already on the shelf, but of a different make and not hackable for the LED.

I replaced that failed unit just yesterday, but decided I would miss not having that 'clear of the door' LED, so delved a bit deeper.

That door close inhibit circuit appears to run on 12v dc, rather than the 24v dc of the main unit and is high impedance. Input needs shorting to output, to get the door to close. So I added an NPN, base connected to the output via an 18k, collector to the 24v by a 1k, with my LED between emitter and ground - that works fine so far.
 
My father-in-law had one, now ripped out by new owner and garage turned into a room, many times I would have to knock on his door and tell him garage door was open, as smallest stone under door would cause it to re-open.

Also he managed to trap a cat, and the people who fitted it had to be called back as no emergency assess included, the consumer unit was in garage, and there was no alternative door.

Clearly fitted by cowboys.

For powered gates there are laws so people are not trapped, or crushed, but it seems these to not extend to garage doors. And there was no paperwork left as to how everything worked. But I still feel there should be a time limit as to how long treads are kept, it is very likely regulations have changed since 2014 and for all I know the gate regulations may now apply to garage doors.
 
Also he managed to trap a cat, and the people who fitted it had to be called back as no emergency assess included, the consumer unit was in garage, and there was no alternative door.

Clearly fitted by cowboys.

Mine has a manual cranking handle socket on the inside, with the handle hanging close to it. Having tested manual cranking, it would need lots of patience, it is very slow. The manual crank turns the motor, but if that deliberate link breaks, then cranking the motor with not raise the door.

I have had the control crash and fail to respond a couple of times. Not a problem I have two small doors to get in to reset it by power cycling, or I could simply drop the main supply MCB to it in the house.

I must say it has been well worth while installing, I can just trigger it to open or close from the end of my drive. I put it in myself and single handed. Bit of a struggle managing the actual door roll into place - I ended up making a timber frame, to get it up in the air, before lowering the bottom edge into the guide slots. The roller replaced an up and over, the up and over replaced a pair of heavy timber doors.

I have never trapped a cat in there, but have trapped our dog in many times. It's a garage, with a separately built workshop extension at the back, originally built to house my motorbike. When ever a door to the garage is left open, in she goes and curls up in a corner out of the way. Lots of places around the property and house for her to hide away, so searching for her hiding place has become quite a regular pass-time.

She's (border collie) a bit timid and likes to hide out of the way, in the bath is another hidy place and one time after searching high and low I found her asleep in a built in wardrobe, which had been left door open.
 
The mod was a pin which could be pulled out, the lock on door allowed one to pull out the pin, but was really heavy to lift, would not really want to open door that way.

Same firm fitted double glazing and that was OK, and fitted DHW solar panels, complete load of rubbish, when they fitted them they used the supply for the immersion heater for the pumps, and removed the immersion heater, the central heating also heated DHW and it was not until he had a smart meter fitted did we realise the panels did not work, his bill for electric had gone down, but that was because he was using gas, he had turned off the immersion heater in the kitchen, so solar panels had no pump feed, when smart meters fitted the pilot flame went out, so no DHW.

Since we found he had turned it off, labels had not been changed so he thought he had switched off the immersion heater, we thought it had over heated, since no circulation, so we had it all recommissioned, it hardly got water even tepid in summer months, new owners ripped it all out.

It seems they had identified him as gullible, and kept returning to sell him some other useless bit of hard ware.
 

DIYnot Local

Staff member

If you need to find a tradesperson to get your job done, please try our local search below, or if you are doing it yourself you can find suppliers local to you.

Select the supplier or trade you require, enter your location to begin your search.


Are you a trade or supplier? You can create your listing free at DIYnot Local

 
Sponsored Links
Back
Top