Nest V3 install possible and how difficult?

Joined
27 Oct 2016
Messages
4
Reaction score
0
Country
United Kingdom
Hi all,

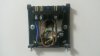
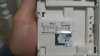
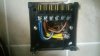
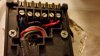
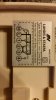
Just looking into either trying to get nest installed or do it myself and I have tried to use the nests compatibility checker and my system doesn't seem to have any of the wires it mentions. I have attached a couple of pictures of the wiring from my programmer and wired thermostat wiring and wondered if anyone could tell if the nest is compatible with my system. Also if it is how difficult it would be to self install. My boiler is an ideal Icon HE15 and I do have a hot water tank.

Any help would be great.
 

Attachments

  • 20161016_151822_resized.jpg
    20161016_151822_resized.jpg
    72.7 KB · Views: 360
  • 20161016_151838_resized.jpg
    20161016_151838_resized.jpg
    75.8 KB · Views: 369
  • 20161016_152014_resized.jpg
    20161016_152014_resized.jpg
    96 KB · Views: 330
  • 20161016_152020_resized.jpg
    20161016_152020_resized.jpg
    90.1 KB · Views: 513
Last edited by a moderator:
Sponsored Links
Your system has all of the correct wires, but you're looking in the wrong place - you need to find your wiring center
 
Oh I thought the nest heat link took the place of the programmer and the nest thermostat took place of the wired thermostat.
 
Afraid not - the Heat Link needs wiring into the wiring centre and the existing programmer needs the wiring altering to bypass it
 
Sponsored Links
Oh I think they will be an issue as the wiring centre is two floors away from the boiler. I think I shall opt for someone to install it or maybe go for hive as the install looks quite straight forward in comparison.
 
You can fit the Nest in place of your Invensis programmer, all of the control wires you need are there, but you will still need to decommission your RTS1 wired room thermostat which will be connected to the wiring centre or a junction box. You would still have to do this with Hive.

In the case of the Nest Heatlink:

The wire now connected to your programmer terminal 3, is the hot water 'on'. This would go to terminal 6 on the Nest 'Hot water call for heat'
The wire now connected to your programmer terminal 4, is the central heating 'on'. This would go to terminal 3 on the Nest 'Heating call for heat'

The Live and Neutral are self explanatory.

As far as I can see from your photo there aren't any connections presently going to your programmer terminals 1 or 2. Post back if this is not the case.

Now at the Nest Heatlink, the Live terminal also needs linking to the 'Heating COM' (terminal 2) and the 'Hot water COM' (terminal 5)

Then (unless you are using a separate power supply for this purpose) run a wire from the Heatlink to the Thermostat for its 12V power supply. Use terminals 11 & 12

So now we come to the existing RTS1 room thermostat. Trace the cable back from the thermostat to the wiring centre or junction box. Note where the brown wire, and the back wire are connected. Remove all three wires that presently go to the thermostat from the wiring centre. Then link the terminals that previously contained the brown wire, and the back wire together.
 
Last edited:
Hi stem,

That's great thanks for taking the time to explain the wiring, its much appreciated and makes everything a lot clearer. I shall try and have a better look at it this weekend.

Thanks again
 
Hi Nilesh welcome to the forum.

From your photo of your existing wiring, I can see wires going to terminals L, N 3 & 4. From the wiring diagram for the RWB-9 programmer they are identified as:

L = Live (Goes to Nest Heatlink Live)
N = Neutral (Goes to Nest Heatlink Neutral)
3 = Hot water call for heat (Goes to Nest Heatlink 6)
4 = Central heating call for heat (Goes to Nest Heatlink 3)

Then at the Heatlink you also need to link the Live terminal, to terminals 2 and 5

If you don't already have an existing room thermostat, that is the Heatlink wiring done. If you do have an existing room thermostat because the Nest has both programmer and thermostat functions built in, any existing one will need to be removed from the system and its switching wires linked together. If you need any further help with that post back.

For future reference, you should have started a new thread with your question, not tagged it on to someone else's, this is known as hijacking and is against the forum rules.
 
Hi Stem, Thank you for your response and sorry for hijacking someone else post but I was not aware how to start so I just posted here.
Yes I do have existing room thermostat which is other side of the wall. I think those wire will go to heat link T1 and T2 as those are direct connection. Am I right? Also please help me where you stated that I also need to link live terminals to 2 nd 5. How to link this? I mean do I need to take extra connection from L or how? If you can show me some sketch or something for those 2 & 5 connection only, will be helpful.

From your advise above, it looks pretty simple to me.

Thank you very much for your help.
 
Yes I do have existing room thermostat which is other side of the wall. I think those wire will go to heat link T1 and T2 as those are direct connection. Am I right?
No, the T1 and T2 terminals are there to provide an optional 12v supply to the Nest thermostat. These connections are not required if you use a plug in power supply for it.

The Original thermostat should be removed and the wiring modified, because the Nest takes over its functions. Send a photo of the existing thermostat wiring and its make / model and I will tell you what to do.

Also please help me where you stated that I also need to link live terminals to 2 nd 5. How to link this? I mean do I need to take extra connection from L or how? If you can show me some sketch or something for those 2 & 5 connection only, will be helpful.

Wiring.jpg
 
Last edited:
Hi stem here it is, I have attached photos of thermostat
IMG-20170130-WA0003.jpg
IMG-20170130-WA0004.jpg
IMG-20170130-WA0006.jpg
which is other side of the wall. There are two connection to it. Now if you can help me where to join these cables. I hope this will sort out my problem.

Many many thanks for your help. Can I ask you a question? Are you an electrician?
 
Now if you can help me where to join these cables. I hope this will sort out my problem.

Thanks for the photos, so now you have some choices. They are in order of preference.

1. Find the other end of the thermostat cable and disconnect it. Then join the terminals where the red and black wires came from together. The thermostat and the cable going to it can then be removed.

2. Remove the existing thermostat and replace it with a junction box, connect the red and black wires together inside.

3. Leave the existing room thermostat in place and put both of the two wires into terminal A. This is the simplest option, the thermostat will remain in place, but it will no longer do anything.

Can I ask you a question? Are you an electrician?

I did a 4 year apprenticeship in electrical engineering in the 1980's and qualified to HNC. I now work for a company that design and manufacture control systems for the automation of factory processes. My knowledge of heating comes from my father who was a plumber, and a friend who is a heating engineer that sometimes asks me for help with the controls when he gets stumped with a tricky installation. Thanks for asking. :)
 
Hi Stem thank you very much.
One question here. If those two wire (red and black) which connects the wall thermostat (honeywell), are no longer required, can I not just simply disconnect it and get rid of it rather put it into junction box? I m sorry if I am wrong, but I m not getting your point here because you said in point 1 that I can get rid of thermostat and cable going to it.
In point 3 you said leave the existing thermostat there and put both wire in terminal A. Which terminal you talking here?
what if I just find the other end of that cable and just disconnect it if not required? I thought I need to connect it to T1 and T2 terminal to get 12 V power out of it and connect other end to nest thermostat.

So If I am getting you right, the figure you have drawn in the reply before, is the final wiring I need to do in heat link and connect nest thermostat with using the cable I got with it to plug it. Please correct me if I m wrong.

Many many thanks for your help. You just made my day. I will do this job as soon as I get 1 hour time free at home.
 
If those two wire (red and black) which connects the wall thermostat (honeywell), are no longer required, can I not just simply disconnect it and get rid of it rather put it into junction box?
No, because it would leave the system 'open circuit' and nothing will operate. It would be like the thermostat being permanently switched off.

I m sorry if I am wrong, but I m not getting your point here because you said in point 1 that I can get rid of thermostat and cable going to it. In point 3 you said leave the existing thermostat there and put both wire in terminal A. Which terminal you talking here?

See the drawing below showing all 3 of the options as I described them. The thermostat terminals are labelled A B & C shown in the photo of the thermostat base you posted.

Drawing1 Model (1).jpg


what if I just find the other end of that cable and just disconnect it if not required? I thought I need to connect it to T1 and T2 terminal to get 12 V power out of it and connect other end to nest thermostat.
You can do this. Most DIY installers seem to use the plug in power supply for the thermostat because it is easier instead, but as you already have wiring then you can connect terminal T1 at the Heat Link to T1 at the Nest thermostat and T2 at the Heatlink to T2 at the Nest thermostat.

Drawing1 Model (2).jpg


the figure you have drawn in the reply before, is the final wiring I need to do in heat link and connect nest thermostat with using the cable I got with it to plug it. Please correct me if I m wrong.
That's right. The Nest Thermostat needs 12v to operate, and you can get this by wiring it to T1 & T2 at the Heatlink, or by using a plug in power supply. Whichever is easiest for you. Which ever method you choose, you will still need to make the changes to the existing thermostat wiring.
 

DIYnot Local

Staff member

If you need to find a tradesperson to get your job done, please try our local search below, or if you are doing it yourself you can find suppliers local to you.

Select the supplier or trade you require, enter your location to begin your search.


Are you a trade or supplier? You can create your listing free at DIYnot Local

 
Sponsored Links
Back
Top