Temporary Radiator Removal

Joined
30 Oct 2013
Messages
10
Reaction score
0
Location
West Glamorgan
Country
United Kingdom
Hi All,

Long time lurker first time poster.

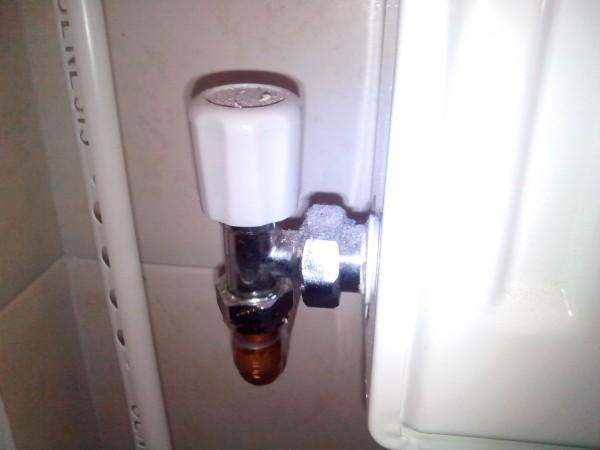
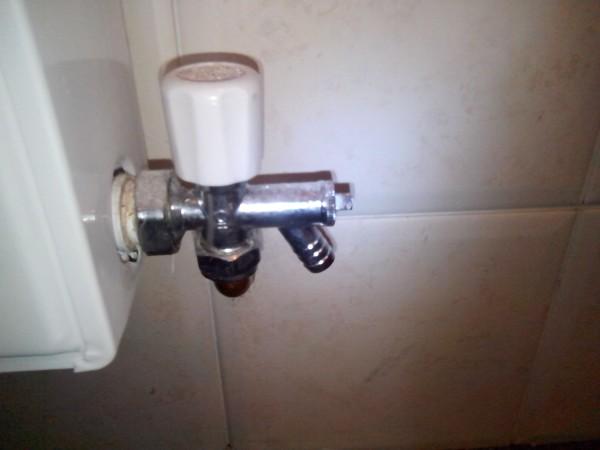
I am renovating our bathroom and we have a small radiator on a tiled wall. I was hoping the tiles would pop off cleanly - they ain't.

Long story short, I am going to need to bond and skim this wall before tiling. The radiator needs to be off.

I don't know a great deal about heating systems/plumbing. I know it is possible to isolate, drain and remove the radiator. But, in the interim, will the heating to the rest of the property have to be off?

Also, is adding inhibitor when the radiator is put back on a simple procedure?

Ta
 
Sponsored Links
As long as you are able to turn the radiator off fully, i.e. if it has a TRV and it has a 0 after the frost symbol when turning down then you will be OK. If it doesn't you will need to cap that valve to stop water leaking out. If it's just 2 normal turn down/lockshield valves then you can turn this off fully. The CH can be run as normal.
Yes, adding inhibitor is as easy as removing one of the top plugs of the radiator you have removed when empty and after refitting just pour it in. Make sure when refitting the plug the rubber seal is in good condition or if it doesn't have a rubber seal then a few turns of PTFE tape on the thread will be needed.
 
Turn the valves off either side of the radiator drain the rad and remove.
You can still use the heating when it has been removed.
When you re-hang the rad before you open the valves remove the vent plug on the rad and add the inhibitor through that via a funnel.
 
Thanks for the replies -really appreciated.

I think it is just basic valves the other rooms have thermostatic ones - but these are smaller:


I guess this means we are good to go? Is that a drain tube on the right?
 
Sponsored Links
Good to go there, but that drain won't drain the rad.....crack the nuts open, open the bleed valve and collect the water in a shallow dish.
John :)
 
Cheer John,

Appreciated. At least she'll stop nagging me now I can get that wall sorted without her having to sit in her coat for a few days :p

I'm a bit wary about the putting it back on though. I guess you just do the reverse - that much I get. But the other steps with the inhibitor etc I am a bit lost on.

Do I have to let more water into the system?
When the rad is filling do I leave the bleed valve open for the air to escape?
Is the inhibitor necessary every time a radiator is removed and put back?
By the vent plug, do you mean the bleed valve?

Might seem like daft questions but it's all voodoo to me.

It is a new system (March) so the seals etc should all be good.

Thanks again.
 
Check the state of the water you drain off....if its black, then take the rad into the garden and flush it through with a hose until its clean. (The black magnetite within can set like concrete).
With the rad back on the wall, this is when I like to add the inhibitor and I use Fernex F1 concentrate...its injected through the rad bleed valve hole. Obviously leave one of the connection nuts loose so air can escape!
Connect the rad fully. Opening the valves one at a time will allow water in (from the loft tank if its a vented system) or if you have a combi you'll have to keep filling via the filling loop....allow air to escape via the bleed valve (which may incorporate a blanking plug) or may not.....often newer rads ahave a blanking plug at the top, one on either end.
When the heating is turned on, you may need to bleed for a while afterwards.
As to whether you need inhibitor really depends on how much is in there....personally I go for over dosage a bit as it does no harm.
Finally if you have a loft tank, check that its not full of gunge, as that will be drawn into the system when the rad fills.
John :)
 
The vent plug is where you bleed the rad from.
Inhibitor is necessary on this occasion as you cannot be sure if there is any in the system and you can't overdose on the amount anyway.
When you are in a position to re-hang the rad remove the vent plug on the floor and then re-hang,pour in the inhibitor through the vent plug opening first,re-fit the plug(do not over tighten), open valves either side of the rad with the bleed valve closed when the water has settled bleed the rad to release the air and if you have a combi boiler you will need to top the pressure up to a out 1.2bar then bleed the rad again and if the pressure drops top it up again.
Re-filling all depends on what type of system you have.
It is always a good idea to make a note of how many turns the lockshield valve takes to close so you can open it the same amount this wil help with system balancing.
 
Thanks again John and Armo74 Really helpful.

There is no tank, it's a new Combi system. We only had gas piped in to the property in March.

I know there are some vent things in the loft - not sure what they do. The guys did explain but it's all a blur.

So I have to work out what the feed loop is and how to use it. I'm guessing 2 person job? One person on the rad with a key and the other at the boiler feeding water in? I've got a few days to work all that out while the plaster sets and then I've got the new tiles are on!

It's a Worcester Greenstar 29 CDi. They used Sentinel x300 and then x100 when it was installed.
 
A bit of inhibitor won't do any harm as you cant really over do it, a small bottle should suffice.
As it's a sealed system, there will be a filling loop underneath the boiler. Just check the boiler manual and it should explain how to use the filling loop
Put radiator back on
Remove bleed valve and plug from the top of the radiator, empty inhibitor into the radiator through that. You can, if you wish, fill the radiator up at this point with water too which will minimise the amount of bleeding and filling loop work you need to do.
Replace bleed valve and plug and give a good nip up.
Open up one of the valves and you'll hear the radiator start to fill, if you haven't filled it with water already, open up the filling loop a little until the pressure on the gauge reads 1.3 bar, close filling loop.
Go back to radiator and open bleed valve until air stops coming out.
Repeat this step until all air removed and just water is coming out.
Tighten bleed screw and set final pressure to 1.3 bar, open the other valve and fire up the central heating. Wait until all radiators are fully hot and allow to cool, bleed all radiators and then check pressure is at 1.3 bar.
Job's a guddun
Keep an eye on the pressure over the next week. If it drops then repeat bleeding on all radiators and top up, it should settle down after a while.
 
Thanks again for all the replies.

Managed to get it orf, though I had to be careful to pack around the valve one side to stop movement as it was on so tight.

Worked out how to re-pressurise the system and bled the other rads. Will give this rad a rinse through with the hose.

So all being well I should be able to work out how to do the reverse in a week or so.

Merci beaucoup.
 

DIYnot Local

Staff member

If you need to find a tradesperson to get your job done, please try our local search below, or if you are doing it yourself you can find suppliers local to you.

Select the supplier or trade you require, enter your location to begin your search.


Are you a trade or supplier? You can create your listing free at DIYnot Local

 
Sponsored Links
Back
Top