Changing 2 gang light switch to 3 gang and adding new light.

Joined
25 Jan 2006
Messages
492
Reaction score
1
Location
Manchester
Country
United Kingdom
We recently moved into a an oldish property (approx 1950) and it needs a fair bit of work. Fortunately (as we are a family of five - 3 young children) it was an ok state (lining paper on every wall to give the impression all was ok!). The electrics (compared to some of the places we viewed) are not too bad either (relatively modern, a couple of lights have been added with the latest colours) and there is sufficent sockets for the time being (not reg complient mind you!).
I'm slowly carrying out a rewire (will post seperate questions as and when!) and endeavour to comply with the regs etc...will also be adding networking/AV feeds whilst 'channeling' away. I have a couple of electrician friends who will complete the job (consumer end)...

...I digress...
I currently have a 2 gang lighting switch on the wall which feeds a downstairs and upstairs light (upstairs light is single switch on seperate lighting MCB - upstairs and downstairs).
I'm adding a porch light and want to add the switch into a new 3 gang.
So far I've channeled/fed the 1mm/1.5mm twin and earth from the outdoor light outside in the floorboards above and chiselled out the channel from the existing cable and switch (to add the switch cable from the new light/junction box.)
I am attaching a 4 way junction box from the existing cable and...that's where I'm up to.

I've opened up the existing light switch and have been confronted with this:

IMG_0166.jpg


IMG_0165.jpg


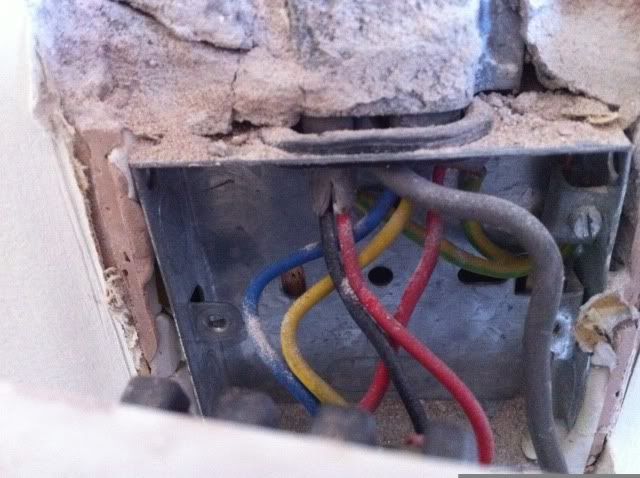
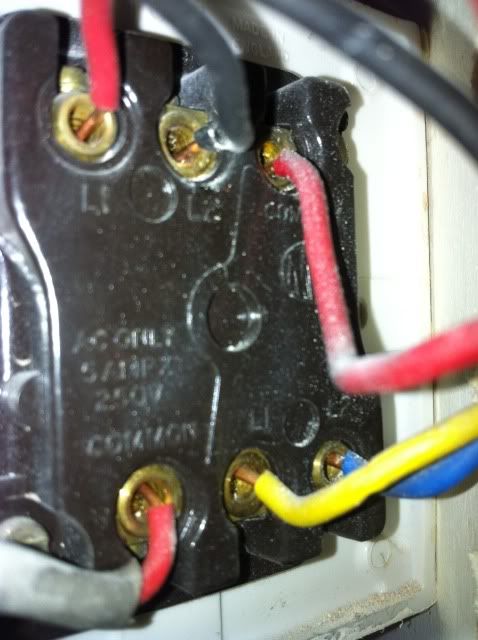
Initially a little bewildered, it looks like the the 3 gang switch I have purchased has a 'third' section seperated by a diagonal line I can use for the new switch - no common listed but I presume L = common and L1 = L2 and L2 = L3?

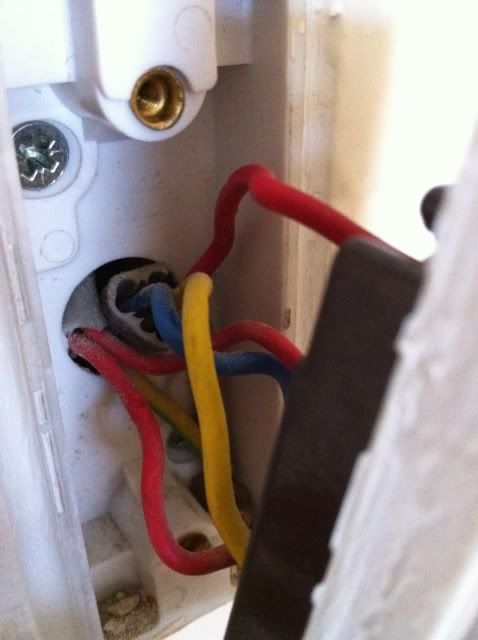
I can make out the three core and earth (yellow, blue and red) and twin and earth (the red and black) but there is also a red single cable in a thicker grey sleeve?? Is this the link between the downstairs switch and the upstairs light? The upstairs hall light does not control the downstairs hall light - pic of that switch here:

IMG_0158.jpg


IMG_0162.jpg


^^ Struggling to find where that grey sleeved cable terminates - the ceiling rose for the downstairs hall light?

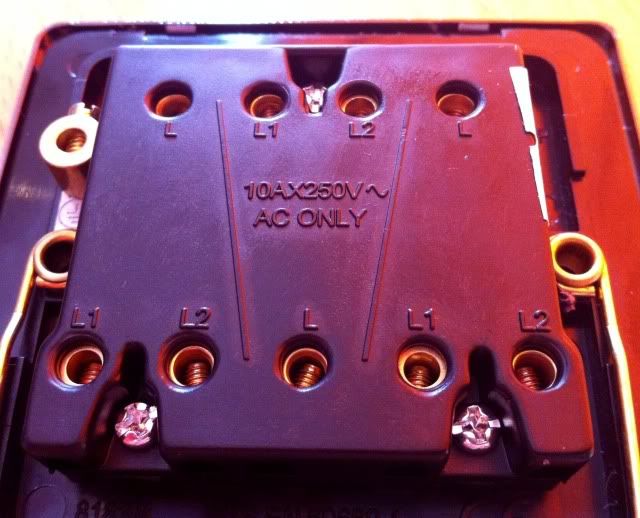
Here's the new light switch - I'm hoping I can attach the new cable from the new junction box to the 'third' L, L1 and L2 on this switch and replicate the wiring from the old switch (I always take a pic when I open up switches...they're just spaghetti otherwise). Sound about right?

I've yet to open up the floorboards above so not sure how the cables are connected to the ceiling rose (will this evening and post a pic if needed), but given what I've seen in the existing switch I'm a little unsure which cable I break into for the new light/junction box.

Cheers.
 
Sponsored Links
I'm guessing that the red yellow blue in the first switch is the landing light?
Is that right?

So the other switch is that for the hall light? That switch is wired in the 'old' way and there will/should be another switch that also contraols that light.
The double insulated grey cable will be either the permanent live or the feed to the light. (see diagram 6 in the WIKI link below).
What you have is a mix of older and new wiring types but nothing out of the ordinary.

Have a look (and learn) HERE to see how lighting circuits work.

SO...turning to your new light.
You do not have a neutral at your light switch, so where will you get a neutral from for your porch light??

Also. this "junction box" why have one at all,? If you have one, it has to be accessible, so do not think of hiding it under the floorboards.

Finally
re
I presume L = common and L1 = L2 and L2 = L3

Correct, different makers have different ways of marking up their switches.
 
Thanks for getting back so quickly Taylor.

I'm guessing that the red yellow blue in the first switch is the landing light?
Is that right?

Correct.

So the other switch is that for the hall light? That switch is wired in the 'old' way and there will/should be another switch that also contraols that light.
The double insulated grey cable will be either the permanent live or the feed to the light. (see diagram 6 in the WIKI link below).
What you have is a mix of older and new wiring types but nothing out of the ordinary.

I probably didn't make it clear enough in my op (I tend to waffle).
The first two pics are the hall light (box and plate).
The second two the landing light (seperate 'upstairs circuit). The hall light switch controls the hall and landing light. The landing light switch controls only the landing light (single switch...and a crappy thin 'finger' one at that).

Are we talking a mix of older and old rather than 'new' new (blue, brown, grey for three core for example)? Glad it's nothing too extraordinary...you never know in this house.

SO...turning to your new light.
You do not have a neutral at your light switch, so where will you get a neutral from for your porch light??

I've changed various lights and sockets over but never added a new one light and switch to a network (have done a couple of spurs etc on the ring mains). Reading those lighting circuits at the moment, so please bear with me whilst it sinks in!

I was going to take the power from the ceiling rose, add the junction box then feed the twin 1.5mm cable into the the new 3 gang (replacing the old 2 gang) and the new light outside...I asked at the electrical supply shop whether this was method was good and a couple of electricians I know: granted they hadn't seen the set up close up.
I haven't carried any work out yet (aside from fitting the light outside and channeling for new cable) and won't be till I'm 100% sure I'm doing it correctly.
Might there be a 'correct' way therefore, that does not require a junction box - take a neutral feed from the existing switch?

Many thanks.
 
The method to use is as follows:

Take live and neutral (and earth of course) from the ceiling rose to the outside light location. That's your feed.
Run twin and earth from switch to outside light position.

At the outside light position, you now have TWO cables. Connect the live feed to the brown to the switch in a single piece of term (choc) block. This can be tucked inside the light itself.

Now at the light you have two wires:
The neutral feed. That goes on your light's neutral.
and
The blue wire back from the switch. That is your switched live. You need to brown sleeve that conductor at both ends to show its a live. This goes on to the live terminal on the light.
At the light the two earth conductors need sleeving green&yellow and terminating on the light's earth terminal.

At the switch. The brown conductor goes onto L on your new switch. The blue (sleeved brown) goes on L1. Earths are sleeved and attach to the back box, or the switch's front plate if you are having a metal one.

Job done.
 
Sponsored Links
sufficent sockets for the time being (not reg complient mind you!).
What do you mean by not compliant?


I'm slowly carrying out a rewire (will post seperate questions as and when!)
You really shouldn't do a rewire in that way. It's not a trivial job, and I can assure you that it involves knowing far more than you think it does.

Asking questions here can be a useful part of a learning process, but they are not a substitute for proper structured studying. The key term there is "learning process" - you cannot learn all the things you need to know just by asking questions here. It isn't structured enough - it won't provide you with a way to progress where each step builds on what you learned before.

You can't carry out a job of this magnitude by asking whatever random questions happen to occur to you. You've already shown that you have some dodgy misconceptions - what if you get something wrong because you have no idea your knowledge is wrong? What if you miss something because you simply have no idea it even exists, and just don't realise you don't know it?
 
Take live and neutral (and earth of course) from the ceiling rose to the outside light location. That's your feed.
Run twin and earth from switch to outside light position.

Essentially, this is the same as using the junction box...hence no need to use one (plus the ceiling rose is accessible)...for the time being - I'll be getting rid of any existing roses (there are only a few left) when I change to inset spot lights (presume I won't use a junction box in that case anyway?)

At the outside light position, you now have TWO cables. Connect the live feed to the brown to the switch in a single piece of term (choc) block. This can be tucked inside the light itself.

The light (up/down lighter) has a neat inbuilt choc block on clips...bit of a pain to get the wires into the small holes, but with two cables it should take easier.

The blue wire back from the switch. That is your switched live. You need to brown sleeve that conductor at both ends to show its a live. This goes on to the live terminal on the light.
At the light the two earth conductors need sleeving green&yellow and terminating on the light's earth terminal.

Blue with brown (switched live) into same terminal as the live from the rose right (so brown and blue with brown sleeve from switch - switched live - into same terminal). Brown from ceiling rose into live - so three wires into one terminal - correct? Pretty sure I've seen that when replacing old lights - black with red sleeving in the same terminal as the red lives.

Will pick up sleeves. Had already earth sleeved the new earth cable (the cable which was coming from the junction box.

At the switch. The brown conductor goes onto L on your new switch. The blue (sleeved brown) goes on L1. Earths are sleeved and attach to the back box, or the switch's front plate if you are having a metal one.

This is the 'third' space on the new 3 gang switch - if I replicate the connections from the old switch I should be ok.

IMG_0154.jpg


Whilst researching the problem this evening, it became clear I didn't actually know what the neutral is (always understanding it's use for a switched live in a network)! From what I've gathered, it balances out the circuit...still reading up on it :)

BTW - was that double insulated grey live what's know as a 'borrowed neutral' (even though it was on a red live wire)?

Hey - many thanks for the help Taylor. I'm surprised so many people have advised the junction box route - just how 'accessible' do they have to be? Is it the very latest regs? I'll be honest, I was all set to place, securely, the junciton box on a joist under the boards...!

Thanks again - will let you know how I get on. There's a few more issues I'll need to post up - 'haunted' halogen lights anyone? :)
 
Just follow the drawings on the WIKI.
What I have described is as shown there except most show the live and neutral feed going on to another light too.

With respect, and I echo BAS's response above.
If you need to ask questions like this - about a very very simple thing like setting up and additional light - then you have less than a snowball's chance in hell of rewiring your house.

I suggest you engage with one of your electrician mates and let him work out the technicalities and logistics of the electrical work.
You can do the grunt.


Best of luck.


PS Friendly tip. Don't come back and ask about downlight installation - its not the favourite topic around here - unless you enjoy ridicule, of course ;)
 
sufficent sockets for the time being (not reg complient mind you!).
What do you mean by not compliant?


I'm slowly carrying out a rewire (will post seperate questions as and when!)
You really shouldn't do a rewire in that way. It's not a trivial job, and I can assure you that it involves knowing far more than you think it does.

Asking questions here can be a useful part of a learning process, but they are not a substitute for proper structured studying. The key term there is "learning process" - you cannot learn all the things you need to know just by asking questions here. It isn't structured enough - it won't provide you with a way to progress where each step builds on what you learned before.

You can't carry out a job of this magnitude by asking whatever random questions happen to occur to you. You've already shown that you have some dodgy misconceptions - what if you get something wrong because you have no idea your knowledge is wrong? What if you miss something because you simply have no idea it even exists, and just don't realise you don't know it?


  • Hi Ban.

    Apologies - didn't see your reply before I posted my reply to Taylor and then duly logged out of the ether...

    I think, perhaps due to lackadaisical dialougue on my behalf, I may have led some to believe I have a pack of Aldi screwdrivers, some old coathangers and duct tape and I'm about to add 300,000 watts of bulbs from the mains water conduit - hey presto Las Vegas in my living room.

    When I say 'I' am carrying out a rewire (this was a little side story to my main dish) in reality I mean I'm overseeing a bit of a refurb in this house we've recently moved into. Snipping the story a it short, a rewire (either partial or full) is on the cards. The current (see what I did there?) set up isn't really up to the job of a modern household. In saying that, some of the other houses we were looking into at the time, had 50+ year old single sockets (if lucky) in each room, so this is practically space age.

    What I meant I about reg compliant - the sockets (replacing single sockets of an older age) are but an inch or so above the faux pine forest flooring...no idea when they were put in.

    So - I have an idea what requirements I'll need with regards to new sockets, lighting and almost certainly networking (A/V, Cat5 etc). I'm drafting a floorplan (not a true design in the eletrical design sense) which I'm passing onto my friend (an electrician) who will in turn create what would be the 'design'.
    I may not post on this sub forum often, but i read up a fair bit and appreciate the level of expertise and attention to detail. I will question professionals if I'm not convinced about certain aspects of the work, as it's clear some of them will neglect either their own quality control or are indeed missing certain sandwich fillings. I understand I'd have to take into account such things as insulation in loft floors with regard to rating/cable size etc and total wattage on certain networks (there is a dimmer thread I've just read on here).
    This friend lives some miles away now, so it's possible he won't be able to carry out any of the trickier tasks. So once I have a design which suits what I want, and has been checked over - I'm sure I'll run a couple of things by on here, then I can draft in a qualified pro to complete the job. In the meantime, yes - I'll be carrying out the donkey work...although donkey work not done well, is well, sub donkey (my OCD wouldn't allow me to sleep with a 1mm drop from one to socket to the next :eek: ).
    So, channelling etc (following the aforementioned design) if I feel confident enough - otherwise I'll walk awat. I was fairly confident of this new light/switch (have replaced many light fittings and added spurs to a ring main, but this one was new to me). I won't be going anywhere near the consumer unit (which in fairness is relatively new and large enough to add a couple more circuits if required).
    Same with anything near/connected to the bathroom (plumbing and earthing leaves me at nerves end - I had to equipotential bond the boiler as soon as we moved in - rest checked by an electrician at the time.

    Any road....thank you very much for those linkies, I feel I've already gained some knowledge over the last day or two - more than confident (now I've got my head around the circuit/cables) to sort this light - I was nearly there and surprised I've been given different methods by different people.
    I was thinking of a night school course too, but financial reasons have put those on hold for the time being.

    Cheers.
 
Just follow the drawings on the WIKI.
What I have described is as shown there except most show the live and neutral feed going on to another light too.

With respect, and I echo BAS's response above.
If you need to ask questions like this - about a very very simple thing like setting up and additional light - then you have less than a snowball's chance in hell of rewiring your house.

I suggest you engage with one of your electrician mates and let him work out the technicalities and logistics of the electrical work.
You can do the grunt.


Best of luck.


PS Friendly tip. Don't come back and ask about downlight installation - its not the favourite topic around here - unless you enjoy ridicule, of course ;)

Cheers Taylor. That makes complete sense now...as I mentioned in the other reply, surprised nobody else mentioned this method - junction box was suggested (although, to be fair, they hadn't looked into as much as mentioned on this thread). Clearly no need (in this situation) for the junciton box. I've take the ceiling rose off and all looks ok to me (pic below) - enough room to slot a couple of more wires, as described in your post, into the terminals. There is a bit of a fly in the ointment in that this ceiling rose/light will be taken out in the near future and replaced with *something else* (not sure yet).

Aha - the downlight tip - still? I remember reading this forum a good few years back (10?) and they were not exactly loved, and were mooted to be out of favour within a year or two...but they seem to have settled well enough in peoples homes...and with the new gen LEDs parking themselves into the market place, I guess they'll be around for a good few more years. I personally really like them, but understand (for many reasons) why they are considered a pain in the back wheels. In saying that, I have a set a few feet above the head from which I'm typing this now....and they're pretty foul and I'd hazard a guess at cheap tat on a next to useless dimmer switch. They'll be out very soon and new solutions will be sourced. I won't discuss them any further :)

Cheers Taylor - will let you know the outcome of the outdoor light scenario.

Ta.

ceilingrose.jpg
 

DIYnot Local

Staff member

If you need to find a tradesperson to get your job done, please try our local search below, or if you are doing it yourself you can find suppliers local to you.

Select the supplier or trade you require, enter your location to begin your search.


Are you a trade or supplier? You can create your listing free at DIYnot Local

 
Sponsored Links
Back
Top