Bathroom Fan, light wiring problem.

Joined
15 Jan 2012
Messages
11
Reaction score
0
Location
Sheffield
Country
United Kingdom
Hello everyone, I have come here in the hope someone can help me solve my problem.

I decided yesterday to replace my ceiling rose in my bathroom. I looked at the wiring before i removed the old one, and thought that looks easy. I then removed the old rose and replaced with the new.

I remember thinking it looked easy because there were just black and red cables, but after removing the old rose i got confused because there appeared to be a black cable with the red ones.

I wired the system back, but got some unexpected results. Now the lights in the last 2 rooms in my flat flicker :(

The setup is like this. breaker box > kitchen light > hall light > bathroom light / fan > bedroom > lounge.

Now the new rose is wired up the bedroom and lounge flicker and don't work at all if the bathroom is switched off.

batroomwire.jpg


I also changed the light switch just before the rose, but i tested with the old rose and it worked fine (did not try the other rooms)

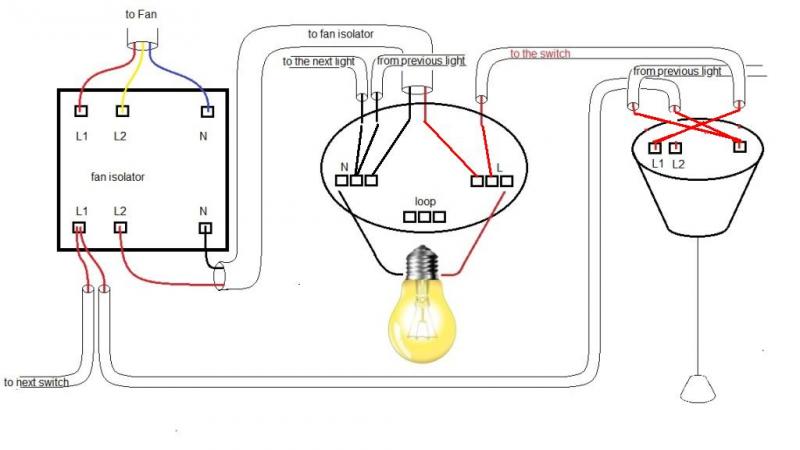
I know that i probably need a qualified electrician now, but i was wondering if anyone knows what may be happening and why? All the guides i have seen have 6 wires. and excluding 2 earth wires i only have 5 wires. Also in not sure if this is relevant but before this happened the fan would only work when the light was on in the bathroom.

Thanks in advance... can anyone draw where the connections should be?
 
Sponsored Links
What cables do you have at your switch?
Do you have or can you lend any electrical testing equipment (multimeter/continuity tester)?
The circuit will be designed so the fan operates when the bathroom light is switched on, that is normal.
 
Thank you for the reply :)

at the switch is 3 red wires.

one into com. one into L1 and one into L2

i have a multimeter. but i am not sure how to use it effectively, to solve my problem. :(
 
And what cables do you have at the fan?
You need to check for continuity using the low Ω setting on the multimeter.
Test between pairs of reds and earth cores to start with.
Link on using multimeter http://www.wikihow.com/Use-a-Multimeter

Is there not another red core in the sheath of the one shown on right hand side of your diagram?
 
Sponsored Links
I also changed the light switch just before the rose, but i tested with the old rose and it worked fine (did not try the other rooms)
I don't think it would have worked 'properly'
at the switch is 3 red wires.
one into com. one into L1 and one into L2
That is definitely not correct.
You need to determine which red wire at the switch goes to the rose.


When you disconnected the rose, were there ANY wires in the loop connector?
Surely you would remember if it was empty.

Also, you state there appeared to be a black with the reds.
Were not all the blacks in one terminal and all (both) the reds in another?
 
Ok the cables to the fan isolator from the light fitting are just the red and black from the same sheath, they are wired red to L2 and black to N.

here is an updated photo. I thought it would be obvious where the wires go, but im stumped. Admittedly im no electrician !

batroomwire2.jpg
 
looking at that photo, and assuming it IS a correct depiction of your installation,

The pull switch is wired incorrectly.

Only two of the contacts should be in use, com and L1. The wire thats currently in L2, should also be in L1, and L2 should be empty.

At the light fitting, all the neutrals should be connected together, and all the reds should be connected together.
 
That drawing is wrong - Just exactly what are you trying to do?
Are you trying to turn the fan on at the same time as the light? And does your fan have an timer overun.

If so and assuming that the live loop, neutral loop and earth loop are going into and out of the ceiling roses and not both them and the switches in your diagram you need to...
Bring the 1mm T&E from the from the lights ceiling rose or equivalent to the pull switch. This means that the brown(red) goes in the loop at the ceiling rose and to common at the switch. At the ceiling rose, the blue(black) (with brown/red sleeving) goes to the live on the light and at the switch goes to the L1. That means your light will turn on when you pull the cord. Don't forget the earth.

For your fan to work at the same time you will need a three core & earth cable running from the ceiling rose to the fan isolator. New/Old wiring(brown=red, black=blue and grey=yellow)
At the ceiling rose connect the brown wire to the live loop (This is your permanent live) connect your black wire (with brown sleeving) to the switch live (it will have the blue wire with brown sleeving in as well) This is your switch live to the fan. Connect your grey to the neutral at the ceiling rose. Connect the sleeved earth as well.

At your isolator the permanent live goes to L1 your swith live to L2 and your neutral to N - also you need to continue the earth.

From the isolator to the fan connect your L1 to the fans permanent live, L2 to the fans switch live and neutral to the fans neutral. Most fans do not need earth so put it in a terminal block and tape up.
 
riveralt: his diagram suggests that the live loop only visits the switches.

Hence mine and EFL's suggestion.

Given he didnt alter the wiring, he shouldnt need to run any new wiring.
 
Thank you :) it worked..

I will update the photo, for any future people with the same problem.

once again thank yo to everyone who helped me sort this problem.


edit... looked like tho photo has already been done for me !!


:cool:
 
I will update the photo, for any future people with the same problem.
That problem being, unquestionably, that you didn't see why not understanding how something works should in any way be a bar to you fiddling with it.

But if you can stop other people from having that problem in the future you'll be a hero.
 

DIYnot Local

Staff member

If you need to find a tradesperson to get your job done, please try our local search below, or if you are doing it yourself you can find suppliers local to you.

Select the supplier or trade you require, enter your location to begin your search.


Are you a trade or supplier? You can create your listing free at DIYnot Local

 
Sponsored Links
Back
Top