Floor under shower tray

Joined
28 Feb 2010
Messages
220
Reaction score
0
Location
Dorset
Country
United Kingdom
I ripped out the old shower, as there were leaks, etc. SOme of the floorboards were a bit rotten, so I replaced them. Alas! The new boards have curved across; and they are fractionally thinner (metric rather than imperial, I guess) and there are gaps between them 3-4mm wide. On top goes a sheet of ply, and on top of that the shallow shower tray.

I'm short of headroom, too - part of the shower is under a sloping ceiling.

Once I screw the floorboards down, I need some substance to put between them & the ply. Sand cement has been mentioned, but that would just a) ooze through the gaps, and b) crack and disintegrate.

My inclination is to run three fat beads of "Gripfill" along each floorboard, cover most of it with polythene sheet (for later easier removal) and then drop the ply on top, and screw it down. And then the same for the tray itself - the edge is a couple of mm proud of the flat(?) base.

Suggestions, please ?
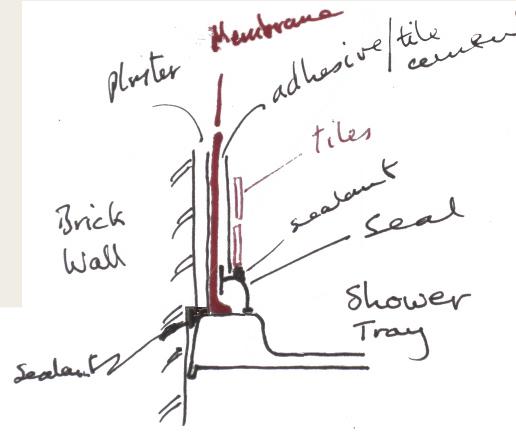
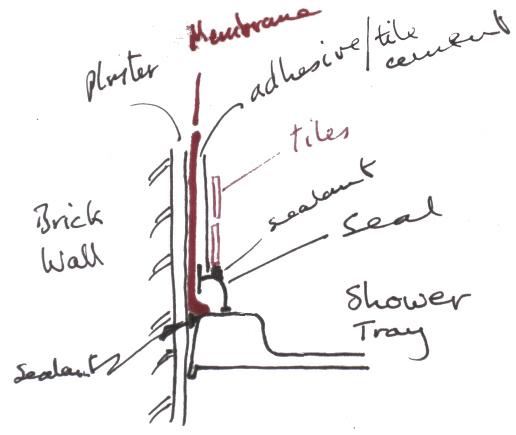
 
Sponsored Links
Thanks, Adam for your response - sorry for the delay (I've been away). Do you mean just remove the floorboards and put the ply (that I'm going to use anyway) straight on the joists ? i.e. instead of the floorboards, rather than as well as ?

And what would you suggest I put between the ply and the tray ?
 
Yes, I mean cut out the floorboards. If you need to raise the level then another layer of ply or cement tile backer board would do it.
 
Sponsored Links
O.K., thanks, And what "jam in the sandwich" would you suggest, between ply & tray ? The edge of the tray is 2 to 3 mm lower than the floor of the tray.
 
A cement based flexible (bagged not ready mix) tile adhesive will probably do the trick. Something like Weber SPF Rapid.

Make sure the cement is flexible & okay for wood. If you use a cement board, stick the cement board to the ply with Weber SPF and screws and then use Weber SPF to stick the tray to the cement board.

If the tray's thin/flexible then make sure the floor is solid and that the tray is fully bedded on adhesive (no voids).

Make sure the ply is exterior & structural if your using it for the floor onto joist and seal bottom & edges with primer - something like Weber AD250.

Make sure it's all level or it won't drain - easier to level the ply than try to level the tray onto an surface that isn't level. Chase it into the walls so that the tiles overlap onto the tray and use tanking tape between the tray & walls and tanking membrane/liquid to tank the walls.
 
Thanks, Adam.

The two walls are not perpendicular - the angle is about 110 degrees, wider at the front. So I have cut away some of the brickwork so that the front edge of the shower tray touches the wall, while the rear edge is tucked under. The seal is Homelux Ultra Seal Pro.

Here's what I propose to do - your comments would be much appreciated.
(Click on a pic to enlarge)

__________BACK OF TRAY______________FRONT OF TRAY
 
RobinClay,

I extensively advised you in the Tiling Forum on Sept 3, yet you do not acknowledge or thank me for my various suggestions.

I also advised you that your posts were double postings.
 
I wouldn't use a plastic seal - it will leak. You'll be better off using a good quality silicone (Dow Corning / Otto Seal). Leave a 3mm between the tiles and tray so the silicone gets a good seal.

You'll probably find a paint on tanking solution (Weber do a very good one) easier than a fleece membrane - check with the manufacturer's help line / web site to see if they have a better way than just silicone to make the join between wall / tile & tray but don't use plastic seals.
 
Sorry, ree - a) I was away for a few days and mail built up; and b) I have not seen a notification either. I'll go & have a look....
 
Thanks again, Adam. Mr. Topp recommended the membrane as "the best" (probably also the one he makes the most profit on!), so I bought that (a while ago).
 
It probably is best but not as easy to apply as paint on tanking.

You'll need a 3/4mm notch trowel and don't try to use rapid set adhesive - use slow set, mix it on the wet side, pick a cool day and prime the wall to stop moisture being sucked out. And make sure you don't trap air pockets.
 
All good points. Thank you.

One more re-assurance, please ;) I fix the tray, with silicone sealant round the top edge that will be in contact with the plaster on the walls, then squeeze more silicone sealant all round the top edge against the wall, and THEN (when that's dry) I apply the tanking membrane, and run it say 3mm out over the top lip of the tray. Then tile, leaving a 3mm high gap between the bottom of the tiles and the top of membrane / top of tray, and THEN I fill this gap with more sealant. Instead of the moulded plastic sealing strip. Is that right ?
 
Installing jointing tape to the wall & tray:
http://www.youtube.com/watch?v=vOxmDKMWDec

I'd follow this for fixing the tape to the wall/tray and wall corner and then switch to:

Installing membrane:

http://www.youtube.com/watch?v=NkaJ0dRhY0g
http://www.youtube.com/watch?v=L9eirjftU0c


Note thin set is American for tile adhesive. They're butt jointing the membrane & using a jointing band with Kerdi waterproof adhesive (Kerdi Coll) to make it good. The alternative is to overlap the joints 100mm.

There are lots of sealing bands - Kerdi, Durabase, Mapei

You can get Kerdi Coll from:
http://lilleytileandstone.co.uk/sch...erdi-coll-membrane-sealant-adhesive-425kg-tub

The first video are using the tanking liquid to bed the tape but Kerdi Coll would work with you using membrane.

When you put the tiles on leave a 3mm grout line at the bottom. Make sure it's clear of adhesive/grout and fill it with silicone. Do the same in the wall corner. Silicone is used rather than grout as it will allow some movement without cracking.
 

DIYnot Local

Staff member

If you need to find a tradesperson to get your job done, please try our local search below, or if you are doing it yourself you can find suppliers local to you.

Select the supplier or trade you require, enter your location to begin your search.


Are you a trade or supplier? You can create your listing free at DIYnot Local

 
Sponsored Links
Back
Top