Wall switch security timer installation

Joined
29 Sep 2014
Messages
13
Reaction score
3
Location
Aberdeen
Country
United Kingdom
I currently have a two-way switch with 7 wires going into 4 terminals, but I intend to replace it with a security timer switch with 3 terminals. Please advise, if you know how I should proceed.
Thank you.

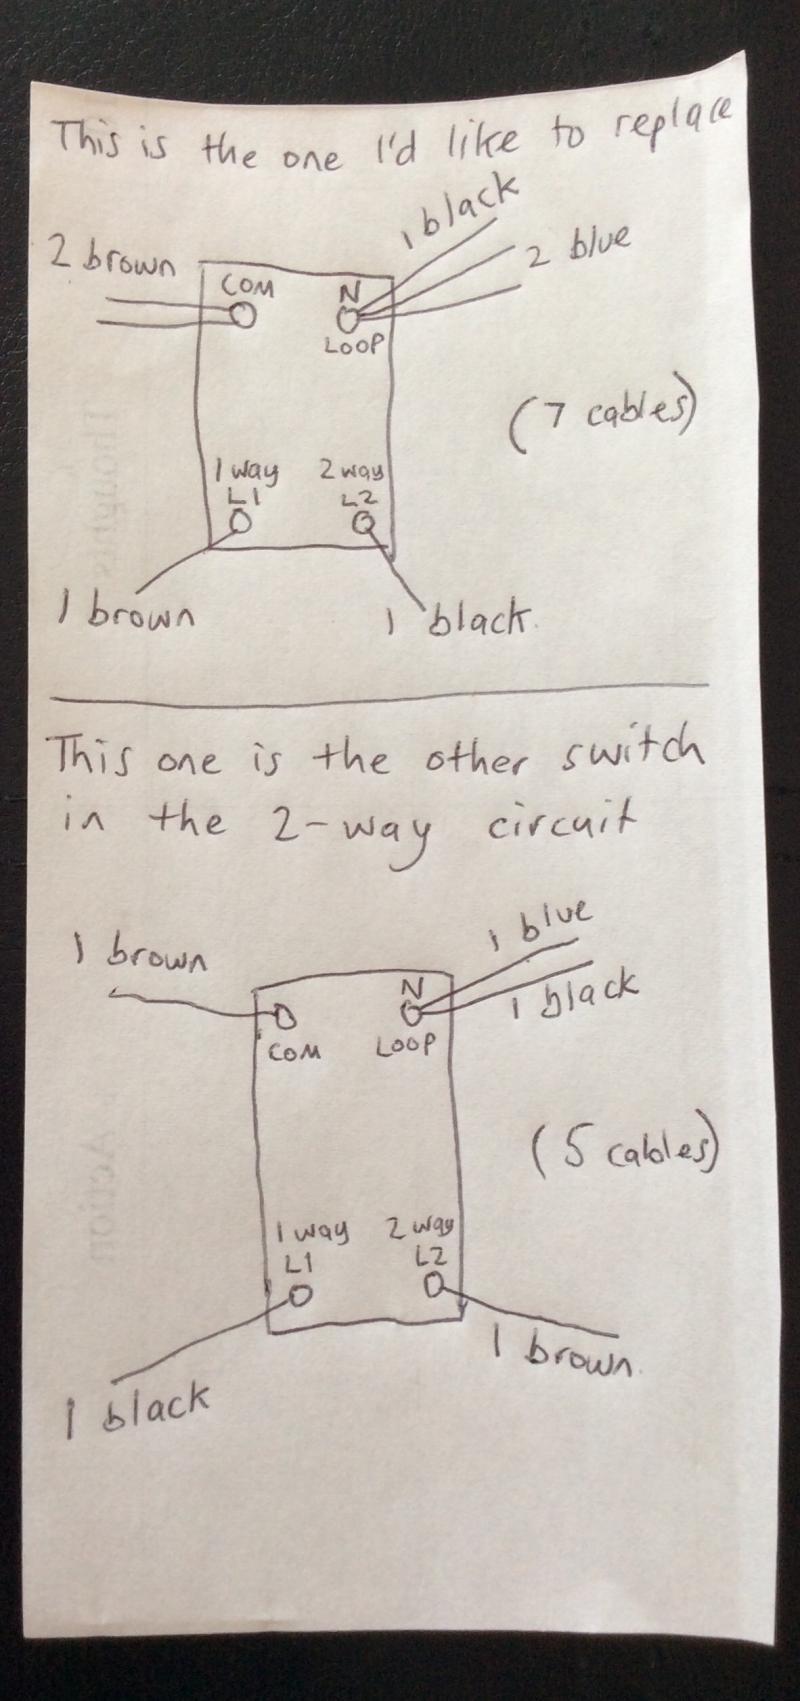
Here is how it is currently wired:
(a) 2 brown cables in "COM"
(b) 1 black and 2 blue cables in "N - loop"
(c) 1 brown in "1-way L1"
(d) 1 black in "2-way L2"

The 3 terminals on the security switch are as follows:
(a) load
(b) live
(c) 2 way
 
Sponsored Links
Thank you for your quick response Lectrician :)

T40S-C (Greenbrook Electrical / KingShield)
 
Sponsored Links
These timers do need to be wired specifically depending on which end of the two way circuit they are.

Can you post a photo of the switch it's replacing, and the other switch controlling the same light(s). A photo behind the switch.
 
Thank you Martin.
I've uploaded an image that I drawed with the coloured cables going into each terminal.
I've posted it into my album.
Sorry, I'm not familiar with how to transfer it from there to here.
Are you able to see it?
 
Are some of your blacks actually grey?

Need to know what sheath the individual cores come out from. Photo may help.

You have a non standard arrangement.

Do you have a multimeter, or someway of identifying a terminal as live? How many lights are switched?
 
Going with that assumption a couple of blacks are actually greys. (blue over-sleeving looking very dark?)

I'm guessing the feed is looped through the first switch, the 2 way is wired as the conduit method, with the 6243Y taking the strappers and a neutral to the far switch, where a twin is run up to the lamp
 
It looks like your three core and earth carries two strappers and a neutral.

In the switch you are replacing:
- Put the cores from the N LOOP into a terminal block, not to your switch.
- Put the two browns from the COM into the LIVE on the timer switch.
- Put the brown from the L1 into the L1(2way) on the timer switch.
- Put the black from the L2 into the LOAD on the timer switch.

And then......

In the other switch your retaining:
- Move the black from the L1 into the COM with the other cable.
- If you find this switch operates upside down, either turn it around or move the brown from L2 to L1.
 
Are some of your blacks actually grey?

Need to know what sheath the individual cores come out from. Photo may help.

You have a non standard arrangement.

Do you have a multimeter, or someway of identifying a terminal as live? How many lights are switched?

1. Sorry, you are quite correct (with better lighting) the one cable going into "2 way L2" is grey.

2. Only 1 light is switched.

3. The 2 brown cables in "COM" are live.

I'll post a photo, so that you can see the sheaths too, but for now, I'll clarify what we have:
2 cables (blue, brown and earth) go into the top two terminals:
- the blue ones into "N - loop"
- the brown ones into "COM"
- the earth into the metal casing holding the switch
1 cable (brown, grey, black and earth) go into three terminals:
- the brown one into "1 way L1"
- the grey one into "2 way L2"
- the black one into "N - loop" (with the blue of the other cables)

With regards to non-standard arrangement- is that because I'm now living in Scotland? My home is only just over a year old, and I am the first to live here from new. (Perhaps things are different here???)

I'll post that pic next...


//www.diynot.com/network/user_album_update.php?album_id=22236[img][/img]
 
It looks like your three core and earth carries two strappers and a neutral.

In the switch you are replacing:
- Put the cores from the N LOOP into a terminal block, not to your switch.
- Put the two browns from the COM into the LIVE on the timer switch.
- Put the brown from the L1 into the L1(2way) on the timer switch.
- Put the black from the L2 into the LOAD on the timer switch.

And then......

In the other switch your retaining:
- Move the black from the L1 into the COM with the other cable.
- If you find this switch operates upside down, either turn it around or move the brown from L2 to L1.

Thank you very much, that does make sense to me. I'm very impressed by the help you've given me, and the support from others.
As its gone dark now, I'll try it out tomorrow, and I'll check back in to let you know how it goes.
Thanks again.
 

DIYnot Local

Staff member

If you need to find a tradesperson to get your job done, please try our local search below, or if you are doing it yourself you can find suppliers local to you.

Select the supplier or trade you require, enter your location to begin your search.


Are you a trade or supplier? You can create your listing free at DIYnot Local

 
Sponsored Links
Back
Top