bath drops about 5mm when full

There is only one way to do it if you want to do it right,
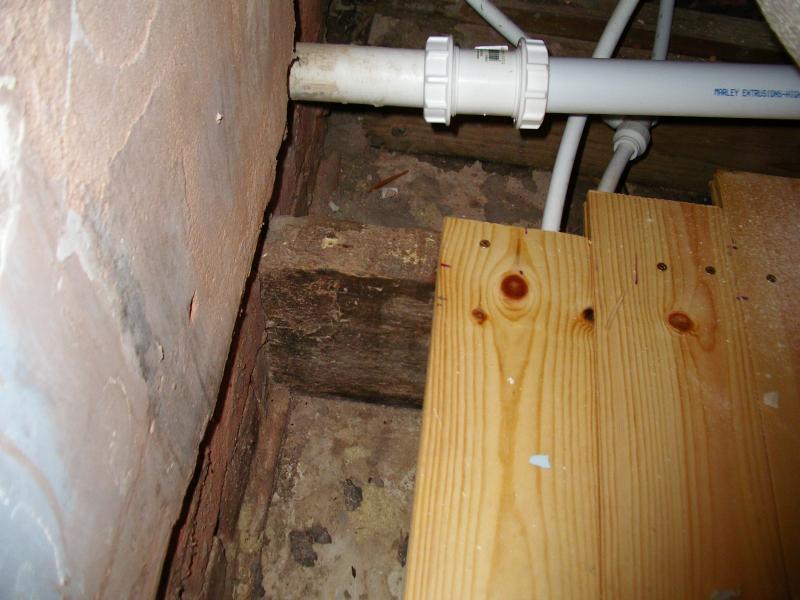
Have you checked for wet rot / dryrot at the joist ends?
Is it a nine inch solid wall?

Remove the first few floor boards,
Clean out the joist socket in the wall,
Rap the end of the joist with damp proof membrain
Pack the joist up with pieces of slate untill all are leval
Then point around the joist .

If the joist end are rotted the look up "Bower beams"
 
Sponsored Links
Crumbs, what have I got myself into!
Not sure what dry rot even looks like!
I'll see if I can get hold of a camera and take some pics.
I'm mid wallpaper stripping at the moment so it may be a few days before I get my act together.
I really appreciate the contributions everyone has made so far, hopefully there's an easy solution in the end!

Dave
 
Right, I've done the wallpaper stripping and have borrowed a camera, what pics do I need to take? Please don't make me move the bath :)
 
How the joists enter the wall, some more joists, your bath's skis, yourr bath etc. As much detail as you can muster
 
Sponsored Links
Buck is right; the only proper way to do the job is to make sure joists are solid, and connection to wall is sound.
Screwing the bath to the wall is good as extra support/stabilising, but not as a remedy for a wonky floor.
It is unlikely that the problem is just with one or two joists, so you should get the whole floor up and inspect all joists at both ends.
Followed by repair of any problems found of course.
 
I don't like the prospect of taking up the entire floor, I've been without a bathroom for long enough as it is :(
I suspect all the joists in the entire house are dodgy, but one room at a time....
I've uploaded a couple of pics.

//www.diynot.com/network/weird_dave/albums/3187

The first is just the bath to get an idea of how it is in relation to everything.
Next is one of the skis
Then we have the joist nearest the wall (no laughing at the pipework!)
4th is the same joist. as you can see, it's been braced once already. I then took up the floorboard you see on the left.
5th is the 2nd joist, runs about midway down the bath.
6th is the end of that joist.

Not too sure how much help these pics will be, but I appreciate all the support (no pun intended!)
 
In this picture


it looks like the joist at the very back, beyond the waste pipe, doesn't actually go into the wall! If this is the case it will need repairing.

Is there any way of monitoring whether this joist moves as you fill the bath?

What about the ceiling in the room below?
 
The joist is braced with another piece of wood, which is mostly what you can see and doesn't go into the wall. If you look to the right, you should see the joist behind it.
I may be able to point a laser at it to look for movement, but it will have to be in the same room and therefore subject to movement in the floor itself. Unless I can attach it to the wall.... I'll give it some thought!
The ceiling is quite difficult to monitor for movement. I could try using a tape measure, but the accuracy won't be great.
 
is it a cheap bath, i.e. 3mm plastic, it may be that it is flexing badly?
 
I do think the bath is flexing a little. I did manage to measure one of the 2x4 skis only moving by 2mm (the one nearest the room corner), so the floor is flexing too, maybe just not as much as the bath.
I think I'll try wall brackets to start with as it's the easiest solution, I'm not into 'heavy' DIY (yet).
So much for this being a weekend job, it's taking me weeks!
Thanks again for the input.
 

DIYnot Local

Staff member

If you need to find a tradesperson to get your job done, please try our local search below, or if you are doing it yourself you can find suppliers local to you.

Select the supplier or trade you require, enter your location to begin your search.


Are you a trade or supplier? You can create your listing free at DIYnot Local

 
Sponsored Links
Back
Top