what to do with fireplace?

Joined
30 Sep 2010
Messages
4
Reaction score
0
Location
Leicester
Country
United Kingdom
Hi all

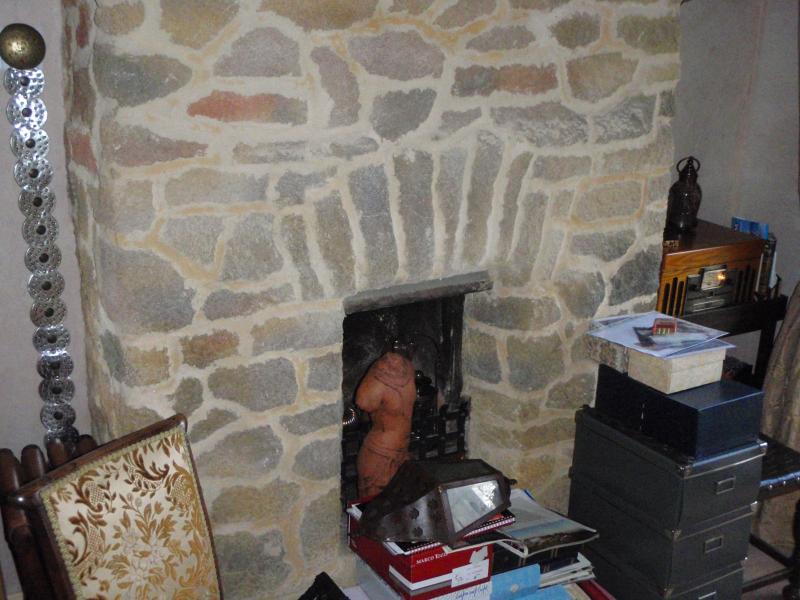
New to this forum so bare with me. After much deliberation we have opted to install a multifuel stove in our main hallway, which is right in the centre of the house. I have opened up the fireplace and intend to install a 6" flue liner. Hopefully this should be fairly straight forward as the brick flue is only 6m high to the top of the chimney, and dead straight. The main thing I am unsure of is what to do with the rough uneven internal walls of the fireplace recess. I have attached a couple of photos so you can see what I mean. My original intention was to lime render this area as I understand it withstands the heat well. Another alternative would be to fix some sort of heat resistant board to line it out, but not sure whats best to use. If anyone has any suggestions please feel free.

FYI we have gone for a 6kw Fireview stove which has cost us the thick end of a grand with the VAT!! :eek:

...and yes I know I have uploaded this into the wrong forum, but not sure how to move it now. Maybe a moderator would be kind enough to move it to"Your Projects"

Thanks
 
Sponsored Links
Firstly, you need to be aware that fitting a stove is controlled building work & unless you use a HETAS registered installer, you should submit a Building Notice to your LABC who will inspect & possibly require to witness a smoke test before issuing a compliance certificate which you will need in future; if you cant produce a compliance certificate it could stall any future sale & in the event of an accident, you could invalidate your insurance; you could also gas yourself if it’s badly installed! The installation must also comply with several building regulations concerning a permanently open ventilation grill (above 4 Kw), hearth construction (both the constructional & decorative hearths) use of non flammable materials & a notice concerning the suitability of the flue.

Now that’s out of the way, here are some links that should tell you all you need to know about the materials to use in & around your fire; come back if you need more info;

//www.diynot.com/forums/viewtopic.php?t=241295&highlight=
//www.diynot.com/forums/viewtopic.php?t=211524
//www.diynot.com/forums/viewtopic.php?t=224751
//www.diynot.com/forums/viewtopic.php?t=227100

Decent stoves aint cheap; my Stovax Riva cost well over £1300 (on line), & the flue, register plates, insulation, sundries & installation (self employed HETAS fitter) cost £900; but I did all the building works. ;)
 
Thanks for that Richard.

I was aware of the building regs and have a HETAS fitter coming round this evening to discuss the work. I just wanted to do some of the building work myself to try and save a bit of money. My idea was to sort out the fireplace opening and the hearth and maybe get the lining down the chimney. I would then get the fitter out to install the register plate and hook up the stove to the flue. Hopefully he will then sign off the work and issue the cert?

Not had a stove fitted before so not sure how much the fitter will be happy for me to do, so will play it by ear.

Thanks for the links

ian
 
It’s very important you check how much work your fitter is prepared to accept you doing & go from there but make sure you get several quotes. Some are more cooperative than others & don’t go near the stove shops; their fitters tend to be “tied” & they will, erm, well, erm, I’ll leave that to you to work out ;) . You can download a list of independent HETAS installers in your area from the HETAS website;
http://www.hetas.co.uk/nearest_member
You can certainly knock a hole through the wall in a suitable location (but check it is suitable with him), line it & fit a 110mm pipe & the vent (more than enough for your stove) but check what else he is happy for you to do. I did all the building, hearth & prep work but left him to install both the liner & stove. Rates will vary but my fitter charged £450 & that included 8 bags of Vermiculite but he was very honest to give a refund on the 2 bags he didn’t use; but I’d counted them anyway. It might sound a lot but you’ve got to ask yourself if you really want to be climbing up on the roof with a 8m stainless steel snake strapped to your back, trying to stuff it down the chimney in god knows what weather this time of year & then have all the hassle of fixing the register plates, pointing around the chimney & fitting the pot, probably all things you’ve never done before! Most importantly, he’ll give you that all important certificate of compliance & for me it was a no brainer but it depends on your age & how confident you are up on the roof. My installer hit a big problem when the liner stuck solid about 4ft from the top of the stove & even with my help we couldn’t get it any further. Luckily the room was in such a state it didn’t matter as he had to knock out 2 bricks at the appropriate jam; it turned out to be a lump of render that had been sitting on the bend since 1968 when the house was built. Once cleared he replaced the bricks but as the room was being totally re-plastered (by me), I agreed to finish it off. It added 3 hours to his day & he finally left after a smoke test & a beer, well after 8PM. He didn’t ask for any more cash, after all, he had surveyed the flue; but just make sure your guy does the same! I gave him a bonus for his honesty about how many bags of insulation he used & to compensate for the extra hours work which, TBH, he could not have foreseen; he left very happy & so was I; that was 18 months ago. ;)
 
Sponsored Links
Richard

I take your point about installing the liner and would not normally go near such a job, but we live in a cottage with low ceilings and consequently not a very high roof. The chimney is dead straight up from the fireplace opening and measures exactly 5.87m (laser measure) from the lintle to the top of the chimney pot.
I've shone a good torch up there and it seems free from any obstructions, so I'm thinking, with a little help from a friend, it should be fairly straight forward (famous last words). I'm going for a suspending cowl for the chimney top which connects straight onto the liner without the need to remove the chimney pot https://vault1.secured-url.com/chimney/acatalog/chimney_liner_6.html#a3_2fSCB_2f6. The fitter came out this evening and we had a chat about what was involved. He was happy for me to carry out as much work as I like, he said that he didn't mind giving out advice because he got a lot of referal wok from the place we bought the stove from (A.R Peet at Hickling) and was in the business of keeping their customers happy, regardless whether he did the install work or not. Aparently he has been installing stoves for this particular companies customers for over 23 years and has built up a good reputation. He even gave me his mobile number if I had any questions while carrying out the work. I must admit he didn't mention the vent and I forgot to ask, his main concern was over the grade of the flue liner which he insisted should be the higher 904 grade for multifule stoves. Anyway I think I'm going to give it a go and get him out to sign off the work as he seems happy to do that.

Out of interest did you look at the pictures of the open fireplace I uploaded? The fitter thought I should just tidy up the brickwork and then paint it but I'm not convinced. I think its too rough and should be rendered. Do you think you could you run through the stages for rendering the brick and the mixes I should use and I might give it a go.

I've never done it before so if you could make it idiot proof I'd appreciate it

Cheers, and thanks for the help.

ian
 
Anyway I think I'm going to give it a go and get him out to sign off the work as he seems happy to do that.
So is he not going to fit the stove & still sign it off? I’m surprised at that as, if he gets caught out, he could risk loosing his HETAS registration. As well as a visual inspection, he should commission the stove with a smoke & spillage test & fit a reference plate (usually next to the consumer unit) stating the type & suitability of the flue & hearth & give you a compliance certificate.

I must admit he didn't mention the vent and I forgot to ask,
At 6Kw output you definitely need a permanently open vent to comply with Building Regs. The size of the open grill, depends on the output but if you make it using a lump of 110mm soil pipe as I did & fit an 11” x 7” oak slatted grill, you will be well within what you need. For the hearth & other BR requirements, have a look here;
http://www.planningportal.gov.uk/uploads/br/BR_PDF_ADJ_2010.pdf

It’s revised & only came into force today but I don’t know what’s changed as I haven’t read it yet

The fitter thought I should just tidy up the brickwork and then paint it but I'm not convinced. I think its too rough and should be rendered.
It rather depends on what sort of look your after; if you décor & furniture is all “cottage’y” a rough rustic look would blend in nicely but if your all modern like us, it will just look rough & unfinished.


Do you think you could you run through the stages for rendering the brick and the mixes I should use and I might give it a go.

I used a 5:1:1 sand/cement/lime render; as I didn’t need much at the time, I bought a couple of bags of premixed. Do it in 2 coats, mix up the initial “scratch coat” fairly wet which makes it weaker & less likely to crack. Brush off any loose dust/soot etc & damp it down well (I use a hose on fine spray); don’t use PVA.

One the first coat has firmed up, lightly scratch all over the surface to provide a good key for the second coat & Leave overnight. Damp down again & apply a slightly dryer top or “float coat” to finish off. If you’ve not done any plastering before, getting the render to stick could be a real challenge for you!

The render/plaster must be allowed to dry out thoroughly before you expose it to the heat of the fire or it will crack; minimum 2 weeks but could take up to 4. If you want a smoother finish, use heatproof plaster; Gypsum plaster or plasterboard will just crack & fall off in a very short time.

I don’t know what ‘s been used on the wall around the fire & over the chimney breast but I hope it’s not just gypsum plaster or it will fail very quickly; I found out the hard way & had to completely redo the lot.

What’s that at the bottom looks like some sort of board?
 
Richard

I'm affraid the picture I posted wasn't great, the material at the bottom (the hearth) is actually ceramic floor tile which was laid when we had the main hall tiled and sealed up the chimney a few years ago.

Out of interest where did you get your pre mixed render from? I found this which seemed suitable, if a bit expensive.http://www.lime-mortars.co.uk/lime-mortar/hydraulic-lime-mortar/NHL2
I assume you can just pick it up from a builder merchants, have you got details of who produces it?

Just another thought you maybe able to shed some light on. I am planning to fit angle iron round the inside of the chimney to take the register plate. But am at a loss to know how i can possibly drill the holes along the long edges as I can't get the drill anywhere near at right angles to the wall as its too narrow. how do others manage this part of the install? I was planning to fix the angle iron with masonary screws which I used before and they work well. You drill a pilot hole and then use a star shaped screwdriver bit on the battery drill to cut the screw staight into the brick.

Anyway i could go on,

Cheers ian
 
Out of interest where did you get your pre mixed render from? I assume you can just pick it up from a builder merchants, have you got details of who produces it?
It was a Hanson product as far as I can remember & I got it from one of the DIY sheds or Wickes I can’t remember.

Just another thought you maybe able to shed some light on. I am planning to fit angle iron round the inside of the chimney to take the register plate. But am at a loss to know how i can possibly drill the holes along the long edges as I can't get the drill anywhere near at right angles to the wall as its too narrow. how do others manage this part of the install?
One of these perhaps;
http://www.screwfix.com/cats/101448/Power-Tools/Angled-Drills;jsessionid=GUTD1H2YVHEVMCSTHZOSFFI
 

DIYnot Local

Staff member

If you need to find a tradesperson to get your job done, please try our local search below, or if you are doing it yourself you can find suppliers local to you.

Select the supplier or trade you require, enter your location to begin your search.


Are you a trade or supplier? You can create your listing free at DIYnot Local

 
Sponsored Links
Back
Top