broken plaster on wall corner

Joined
3 Apr 2011
Messages
11
Reaction score
0
Location
Glasgow
Country
United Kingdom
Hi folks,

First time here so if I miss anything/detail, please let me know.

I have damage to the plaster on the corner of one of my walls. All the plaster has came corner after it was accidentaly bashed with a chair (about 10 inches of plaster from top to bottom) and from the edge there is about 1.5 "" wide of plaster removed from each side.

I've looked at how to fix holes etc and it seems to be relatively easy, however, as I can't find anything specifically on damage to a corner, I thought I'd make sure and ask some people.

What would be the best and easiest way to fix this problem?

Any help would be much appreciated.

Thanks
 
Sponsored Links
Is it an external or internal corner?
If it's an external corner is there a angle bead in place, this is normallly wooden or metal?
If you could upload a or two picture of your damaged area, it would help us to be able to tell you the best way to repair it.
Any existing loose plaster should also be removed a base coat may need to be applied depending on the extent of the damage, prior to your finishing coats or it could just need to have a couple coats of finish or could be filled out with easifill and sanded down.
So pictures would be nice, we like pictures ;)
 
Hi, thanks for the reply PrenticeBoyofDerry.

It's an internal damage. I've uploaded two photos to my album to help clarify.

It's seems that there is wallpaper under the plaster and under that is more plaster.

The plaster is quite brittle on most of the corners. The wallpaper seems to be slightly raised of the surface of the wall due to the damage I expect.

I hope this helps

Thanks again for any help given
 
That to me looks like flex corner beading, these are a combination of paper tape and two metal strips, this type of corner beading wrap around the angle, the two metal strips will run vertical in this case and the paper tape will act as you corner nose.
Can you confirm where it bulges out a little, if there is a metal strip?
If so, to get a good repair the thing needs to be ripped off top to bottom, I am not a big fan of them, they are not over protective of the corner.
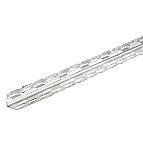
They are best replaced with a thin coat bead, as pictured
Before fitting the bead, any loose filler or plaster should be removed.
For good measure I would prep the damaged area with PVA two coats at 4-1 water-PVA. First coat left to dry then apply second coat and allow to go tacky, this will give good adhesion and reduce suction.
Then you could either fill out with a jointing compound such as easifill, this can be sanded down to smooth, could need two or three application, each being allowed to dry prior to sanding down.
Or fill out with multi-finish plaster and feather the joint in again two coats should be applied.
first coat should be laid on, feathered out on joint between new and old plaster then flatten and filled.
second coat as above but the mix should be slightly wetter than the first.
Leave it to take, do a wet trowel then leave about 30mins to do a dry trowel if needed.
The dry trowel polish is not often needed especially if the wall is to be primed and painted.

If plastering is not your thing I would recommend going down the easifill route, as this can be sanded and errors are easier to rectify.
Easifill is the brand name of a joint cement compound and the stuff I use, you can buy others wickes have their own brand and I think B&Q do too, it can be bought ready mixed aswell.
ready mixed
Sand down using 150-180 grit paper
If you need any more info don't hesitate to reply!
 
Sponsored Links
Thanks again for your help with this.

I looked closer at the corner and there is indeed two metal strips and they are slightly bulging out at the damaged part.

When you recommend stripping the metal strips off from top to bottom, would the strips be as long as the wall? And, you definetely recommend taking them off and
not
repairing over the strips?

Cheers
 
The strips if when installed were fitted correctly, should go from top to bottom.
I personaly don't like the things and would rip them off, they don't offer enough protection to angles from bumps and knocks.
But this could well be an over re-action on my part and may not help you with a quick easy fix.
I will just take another look at your photos and see what could be done, it will be a bit of bodge up!
 
Righty!
Remove any loose debris!
The beads should be fixed on to plasterboard underneath, so we need get some joint compound (we will us this as you need to get some anyway)
This needs to be forced behind the damaged bead, filling the void behind it, careful mind, we don't want to tear or damage it anymore than it already is!
Then I would tack the metal strips of the bead back to the plasterboard so the beads are no longer protruding and are flat to the wall.
Use clout headed nails, pin the bead back placing the nail at the edge of the strips and gently hammering in, three or four nails each strip should be ample.
The joint compound, should now ooze out from behind the bead.
When the need some joint repair tape.
This needs to be cut stuck over the nose of the angle and flattened down, to form you corner angle. I would double up and stick two tapes on.
Once you have flattened the tapes, fill out the damaged area with the compound, so the tapes are recessed slightly, not showing and covered, then leave to dry, give it at least over night. It needs to be completely dry, so the longer the better.
Then a gentle sand down with 150-180 grit paper re-apply compound filling out again, we are aim for a even, level, smooth surface.
It can be slightly proud as we will again sand when dry.
It may take two or three applications before we get our desired finish so be prepared for that.
You may find it easier to do one side at a time, offering a straight edge to the corner and letting it dry, then doing the other side, so get a nice straight corner edge.
 
Thanks a lot for the help! I'll give this a bash (pardon the pun) at the weekend and let you know how I get on!

never done anything like this so wish me luck:D
 
Good luck with your repair, if you feel the need for any more info. Do it before the weekend as I'm off to the Grand National and will be ill on Sunday, so wish me luck too!
 

DIYnot Local

Staff member

If you need to find a tradesperson to get your job done, please try our local search below, or if you are doing it yourself you can find suppliers local to you.

Select the supplier or trade you require, enter your location to begin your search.


Are you a trade or supplier? You can create your listing free at DIYnot Local

 
Sponsored Links
Back
Top