damp wall, advice needed on sealing and plastering please.

Status
Not open for further replies.
Joined
30 Jun 2012
Messages
14
Reaction score
0
Location
Leicester
Country
United Kingdom
Hi.

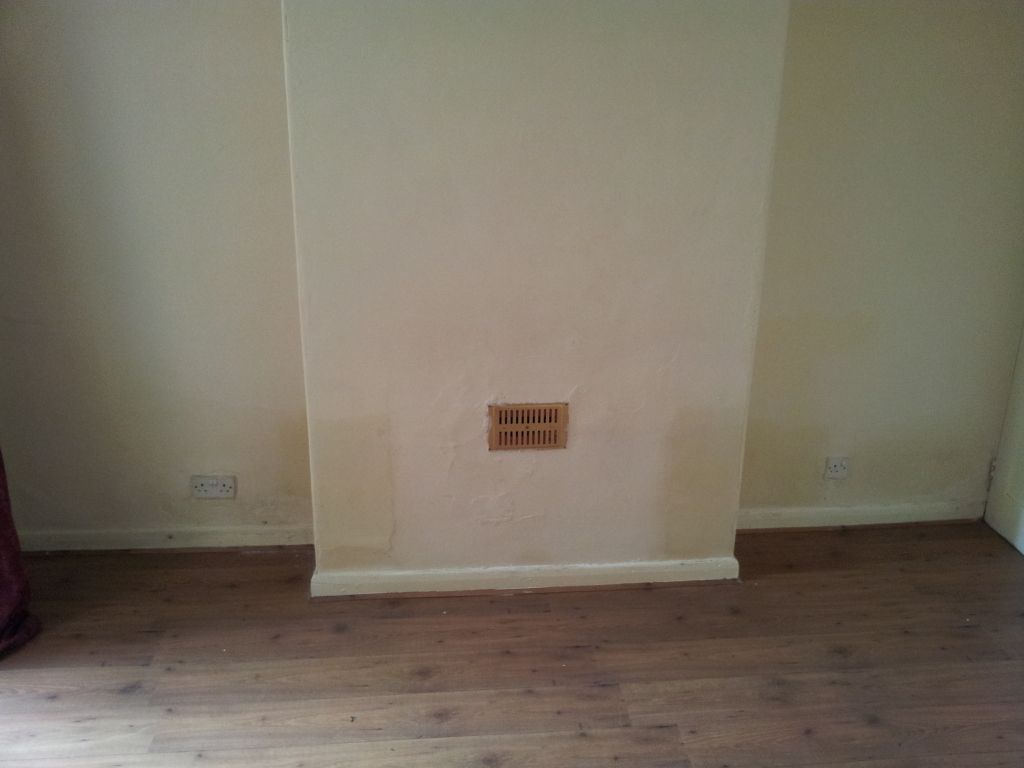
We have recently moved into a 1900s terraced house and we have this damp wall.

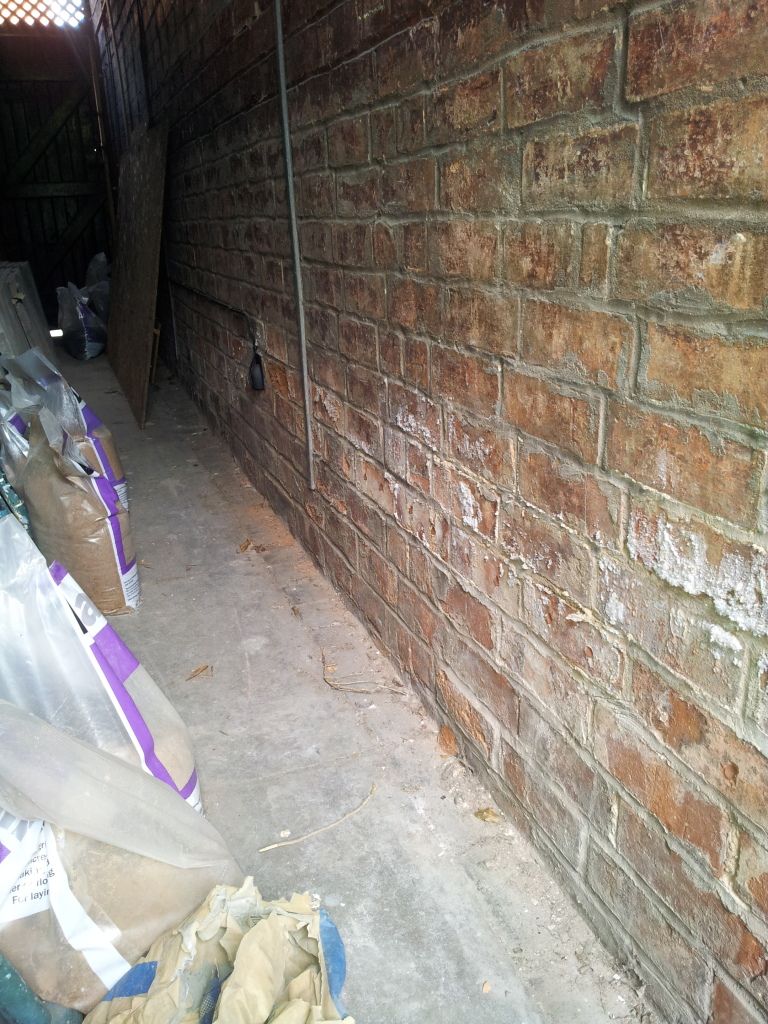
This wall is the only obviously damp wall in the house and it is the wall that corresponds with the entryway to the back garden outside, where there is visible white effloresence on the bricks.

We had an independent survey that said it is a combination of hygroscopic salts when it had an open coal fire and the chimney which needs repointing and capping. He also said it needs concrete tanking and finishing with renovation plaster.

The building work has been done and now i want to sort this wall.

So, after much reading and speaking to experts and "experts" i have come to understand that everyone has their own opinion so the combination of all this has led me to this plan.

Remove manky plaster and 300mm of good plaster back to the bricks, give a good clean and leave to dry out.

paint with either a bitumen based sealant or damp proofing slurry.

2 layers of render of 3 sand and 1 cement and waterproofer. then the finishing layers which was in the sticky of this forum.

Does this seem viable? i take it concrete tanking is essentially the same as the cement render with waterproofer? I've done plenty of plastering work patching up and repairs before but not tackled anything of this scale.

many thanks

alex

here are some pics of the offending wall.
20120630_092434.jpg

20120630_092449.jpg
 
Sponsored Links
any pics of the outside wall?

are the walls solid or cavity?

you have been given the wrong advice about solving this.
 
They are solid walls 9 inch thick according to survey. It has a slate damp course and 2 chemical although i dont know when.

20120630_151342.jpg

is the outside.

Thanks for the quick reply by the way.
 
If you look at he last pic you posted you can see the line of salts is on and above the chemical damp injection. Chemical is not recommended for solid walls constructed with lime. The walls has also had a re-point with sand/cement at some point, this is also a bad idea with Victorian built brick houses.

I would look at the stack first off, making sure the lead work, pointing and cap is sound (if it has a cap if not cap it). If you have a look to see if the pot is bedded in right, you may find a crack in it as it's common and a source of water ingress.

Second I would make sure the lean-to is water tight.

Then you need to remove the internal plaster, looking at the wall I would go with taking the lot off, it looks to be in poor condition. Then I would remove the cement based pointing from the outside, neutralise the salts with 50/50 white vinegar and water then leave both areas for a few days.

Re-point with lime render using a good clean sharp sand 3.1 and NHL 3.5.

Internal plaster should be 3.1 sand and lime with a mix of good clean sharp and fine sand. Wet the clean wall down before you apply a scratch coat, little is more with lime render so don't try to put it on thick, it will crack like mad if you do. Leave the scratch coat as long as you can, if must be firm, then apply the float coat. You need to leave the float coat for 4/6 weeks before you add a skim. You may find the wall will begin to show hairline crack, this is normal with lime render, you can spray water onto the wall and rub-up with a plastic float from day to day. Lime is self healing and the crack will fill during the calcification process.

If you want to apply a gypsum based skim then use thistle board finish adding a good handful of lime every 25kg bag. This will give it some breath ability and allow it to flex a little and ****** the mix giving you plenty of time to get it on the wall.

I can assure you this will fix the problem, don't use modern plasters on these old buildings, you will regret it in the end. These brick can't take it and if you seal the walls moisture will soon destroy them.

If you need any more help just ask.
 
Sponsored Links
Wow, now thats a comprehensive answer, great stuff thank you.

A quick google showed a few companies that make premixed hydraulic plaster which is good and to be fair it looks like it is going to be cheaper than modern stuff! As a diy person i would prefer premix as i now i have to add water and away i go.

how come the modern plasters are used if lime based plaster is better and cheaper?
 
If you look at the fireplace you see it has little damp - that is because it has good ventilation. If you cap the chimney you will have bad ventilation.

Get under your floor and look to see if the air-bricks are clear. If not then that will be the major part of your problem.

Get yourself a damp meter and check the levels yourself. If the reading is lower below the damp course than above it - then suspect 'Interstitial condensation'.
 
"Unfortunately, most British plasterers are familiar with only two types of material: sand-and-cement render and pink gypsum plaster. So if you ask one to simply "plaster this wall", without specifying which material, then those are what he will use. On older properties, this can have unfortunate effects. Sand-and-cement is effectively impermeable to water, and will tend to trap moisture in the brickwork behind it. Gypsum plaster, on the other hand, draws moisture out of walls (and from humid air) and then dissolves. Neither is ideal for plastering the inside faces of solid brick walls, but there is scarcely a Victorian house in the country on which they have not been used - often as part of so-called "damp-proofing" work.

The ideal material for the repair and restoration of older houses is traditional lime plaster, to match the original. But you'll be lucky to find a plasterer who knows how to use it. A compromise is to use a pre-mixed renovating plaster such as Tarmac's Limelite. This does contain cement, but also lime, and a lightweight mineral aggregate, giving it good insulating qualities. For repairs to ceilings, and other internal work, British Gypsum's Universal One-Coat is soft and chalky, similar to original lime plaster. These are both unlikely to scare off the average plasterer, and both stick to the wall considerably better than hemp."

http://www.telegraph.co.uk/property...On-the-level-which-plaster-should-I-use.html#
 
"The promotion of modern gypsum-based plasters has led to the almost complete demise of lime plastering, and of many of the traditional skills associated with the craft. This has been exacerbated by the plastering trade being divided into flat and decorative work, with new 'fibrous plasterwork' being made in workshops. Many youngsters entering the trade are now just taught the basic skills to enable them to stick up plasterboard and skim plaster onto it. We are told that it is all down to 'supply and demand'; if this is the case, those of us involved in work on old buildings need to be more demanding.

There is a real need for skilled plasterers who can plaster with lime, and also turn their hands to repairing and reinstating dado and cornice mouldings in situ. The current training system works against anyone gaining this set of skills.

An article like this cannot resolve this skills shortage, nor attempt to even describe the range of skills that a traditional plasterer should have. There are, however, some general principles which anyone involved with lime plastering should be aware of. Sadly there are too many cases of lime plasters failing because the people who have specified the work or the people carrying out the work don't have adequate knowledge or experience.

THE RIGHT MATERIALS?

Most people using lime in old buildings have a vague understanding of the benefits of a 'breathing' mortar or plaster, but if they perceive that lime is too difficult to use they may decide not to bother with it. We need to make it clear that the revival of the use of lime is not some 'airy fairy' idea dreamt up by a bunch of idealists. On the contrary, it is driven by the realisation that buildings are suffering because they have been coated with inappropriate materials, and the people living in them may be less healthy as a result. There is compelling evidence that modern gypsum plasters encourage condensation and consequent mould growth if used on walls that are supposed to 'breathe'. We are beginning to see a revival in the use of lime plasters and we need to encourage a revival of the skills required to use them.

Having bemoaned the lack of proper training for anyone wanting to learn traditional plastering skills, it has to be said that lime plastering is not rocket science. With a basic understanding and a willingness to learn, most plasterers can pick up the skills required to produce a reasonable job in a few days. This is not the same as the skill required to repair plaster in a fine quality country house, or the experience required to match a range of historic finishes, but these things come with time, and we can hope that as more plasterers learn to use lime they will be inspired to develop their skills and understanding further.

There are two characteristics that differentiate lime plasters from modern plastering materials. The first is that they set slowly by absorbing carbon dioxide from the air, in the presence of moisture. The second is that they will shrink as they dry.

Although hydraulic limes, which set more quickly than white/fat limes, are occasionally used for plastering in damp conditions, they are less flexible and breathable than the latter, and their use internally should generally be avoided. All the evidence on old buildings and in written documentation indicates that for centuries, if not millennia, plasterers have chosen to use white/fat limes for internal plastering.

There is some debate about whether we really need to use traditionally slaked lime putty, or if bags of dry hydrated white lime from the builders' merchant are just as good. Although chemically they are the same (both are calcium hydroxide), a traditionally slaked lime, which has been matured for three months, will have broken down into much smaller particles and started to form crystal chains. This gives it better adhesive qualities, helping it to grip the wall more tenaciously. The difference seems to be in the maturing process; so if recently hydrated lime from a fresh bag is left to soak in water for three months, it should be as good as a traditionally slaked and matured lime. However, in practice most of us find it is easier to buy the matured stuff from a specialist supplier."

http://www.buildingconservation.com/articles/internallimeplast/internallimeplast.htm
 
"Many factors may cause false positive readings with the moisture meters that measure electrical resistance. Metal structural components or finishing materials will read positive, including such common materials as metal framing, drywall corner metal, and foil wallpaper. Accumulations of certain salts due to efflorescence can also read positive, despite being dry."

http://www.icsmag.com/articles/moisture-meters-and-thermography
 
Peaps likes to play at living in the last century. Not many people play his daft games. The building regs were changed because families were getting ill. Do it his way if you like - but you'll have a house with high humidity (damp) that puts your family at risk. Ask yourself why no-one else out there does it his way.

"caring for health

- lime is considered to be less harmful to human health than many of its modern counterparts:

■ lime plaster is hygroscopic (literally means ‘water seeking’) which draws the moisture from the internal to the external environment, this helps to regulate humidity creating a more comfortable living environment as well as helping to control condensation and mould growth which have been shown to have links to allergies and asthmas. The American College of Allergies suggest that 50% of all allergies are aggravated or
caused by our ‘polluted’ internal environment, thus lime creates a healthier living space.

■ lime plasters and paints are non-toxic, therefore they do not contribute to indoor air pollution unlike many modern paints."


"- lime products are vapour permeable - this is important in solid wall buildings as it means that any moisture is allowed to escape from the walls, this helps to control condensation and damp within the building (most modern renders, plasters, mortars and paints are impervious, trapping moisture leading to problems such as condensation, mould growth and even degradation of the fabric of the building such as timbers rotting, bricks/masonry crumbling)."

http://www.lime.org.uk/lime-producrs/
 
It doesn't matter how many times you post, Peaps - it doesn't make you right.
I lived in this house when it was natural lime - just as when it was built in 1895. It was nightmare, damp cold and unhealthy. It was then renovated using modern methods - it's great now. No damp, no high humidity.
Your way doesn't work mate - keep the damp out - then you won't have a damp house will you? Inviting it in and then hoping it will find a way out is a mugs game - that's why the building regs changed.

The OP should note that no other plasterer posts in here now - they are sick of Peaps and his 'alternative' views. They've all gone. I'd check out a different forum if I were you - this is Peap's soapbox forum.

And if you are wondering why he is Peaps2 - it's because the original Peaps banned for talking rubbish and giving out bad advice. He's at it again Mods.
 
Since you are not a trained plasterer and are just a DIYer you would be in a better position if you were able to support your assertions with credible data in the field, you never have and can't because you are wrong ;)

I on the other hand have gone through 5 years of an apprenticeship and I spent an extra years study of fibrous casting. I'm a traditional wet plasterer and have restored old houses for the past 28 years.

My posts are backed up by the industry who are trying to save old buildings from people like you ;)

You are giving out very bad advice that will cost in the long run, you should be banned.

So please do post something that remotely supports your claims ;)
 
If you look at the fireplace you see it has little damp - that is because it has good ventilation. If you cap the chimney you will have bad ventilation.

If you look at the fireplace you will notice the only area free from damp is where the fireplace was blocked in and if I'm not mistaken you can see brick through the vent. This tells me it was bricked up and no doubt rendered with sand and cement..... The chimney circulates air from top to bottom and I suspect there will be a vent upstairs also. The idea of capping is to stop rain water adding to the damp since the fire is no longer doing the job.

Get under your floor and look to see if the air-bricks are clear. If not then that will be the major part of your problem.

You can see from the outside wall there are no vents probably because the floor inside is stone or concrete laid onto dirt as was common at the time....

Get yourself a damp meter and check the levels yourself. If the reading is lower below the damp course than above it - then suspect 'Interstitial condensation'.

Since salts are present you can expect false readings and if this was a condensation problem you would expect mould to be seen since the conditions for condensation are ideal condition for mould growth...
 
i am here.

i pulled the plaster off the wall today and there was new plaster at the bottomad lime at the top. so i found a lead coated wire and distubed it which has removed everything up to the ceiling. was not amused. i think while the walls are in this state i will just do the lot which i think would be better done by a pro.

there is damp above the dpc and it stops roughly a foot below the new plaster, i think this has been a problem before.

our independent damp surveyor mentioned limelite plaster in his report as it allows the wall to breathe. i do think there is a lot of sense in this. there is a lot of modern information about this plaster out there. its not like its mega expensive at 12 quid for 25 kg.

so i will post on how this goes when we get it done.
 
That was in a bucket of water mate. :rolleyes:

...and why did it stop before it reached the top?

capillary action ;)


Capillary action brought the water up, but it is then gravity that stops it. Ie there is a point where gravity is too strong for the effects of capilary action.

Otherwise you could have capillary action taking water up capillary tubes to an infinite height/length of tube and we would have no need to pump water uphill

(Air pressure and other factors are also involved)

The point I was making is that modern brick are a far better quality than older bricks, Victorian etc You won't get this with modern brick.
 

DIYnot Local

Staff member

If you need to find a tradesperson to get your job done, please try our local search below, or if you are doing it yourself you can find suppliers local to you.

Select the supplier or trade you require, enter your location to begin your search.


Are you a trade or supplier? You can create your listing free at DIYnot Local

 
Status
Not open for further replies.
Sponsored Links
Back
Top