Bathroom Refurb

Joined
28 Mar 2011
Messages
107
Reaction score
1
Location
London
Country
United Kingdom
Refurbing the upstairs bathroom and wanted to check if I had everything correct:

1. Strip out everything (Done)
2. Level floor - add strips over the joists, screw down and glue to get a level surface.
3. Run new pipework with isolation valves for toilet, sink and bath
4. Fit soil pipe between joists
5. Relay floorboards and screw down (every 150mm). Any specific screw recommendations?
6. Lay 12mm WBP ply
7. Apply thinset and 6mm hardibacker boards except under bath and units
8. Fit bath with baton under the lip for support
9. Set out floor tiles
10. Lay floor tiles
11. Set out wall tiles
12. Lay wall tiles

Any thoughts / comments would be appreciated.
Specifically any tips on how to run the pipework up through the floor and lay the ply over it as I can see that being quite tricky.

Thanks
 
Sponsored Links
why overboard with ply then overboard again with hardie, if your floor boards are secure, trowel out thinset, lay hardie backerboards into thin set, screw down using hardie board screws, lay the haride boards staggered. set the floor out then tile away,

remember if you are going to use ply and backer board you will have a canny sized step, 12 mm ply, 6mm backerboard, adhesive, tile, going to be approx. 30mm step up.

If you are definitely wanting to use ply, why not take the old floor boards up and replace with 25 mm wpb, then tile directly onto that
 
There is some deflection at the sides which is why unwashed going to overboard.
there is going to be ply in the hall aswell so the step won
t be that great
 
There is some deflection at the sides which is why unwashed going to overboard.
there is going to be ply in the hall aswell so the step won
t be that great

you seem to have everything covered then. you say deflection at the sides, can you not screw these boards down or do you mean very minimal deflection ?
 
Sponsored Links
There's no joist at the side so there is about a 10cm overhang
 
Just to add, not sure what bath panel you are using but if its a fixed size acrylic I tend to tile the floor first, going under the bath edge, then set the bath to the correct height allowing for the acrylic panel.

When you say units do you mean vanity units? I tile all the way to the back for these too and sit the units on top of the tiles.

Also when screwing the floorboards down make a note of any piperuns underneath, and mark these out on the floorboards.

Finally test your waste pipe before boarding over it.
 
Seem to have encountered a rather substanial problem.
The floor slopes not only side to side but also front to back.
From the high point in the bottom left corner it drops by about 5cm over 1.6m. I have thought about levelling it but it would then mean a large tapered step into the hallway.

These are the units I was going to use
http://www.bathroomcity.co.uk/product.asp?pid=2092

Any thoughts on how to proceed?

Thanks
 
rip your floorboards up, run a spirit level over the joists, pack them with ply to level them up if necessary, then replace floorboards with 22 -25mm wbp ply, nice level floor to tile onto, jobs a good un
 
But what do I then do about the step into the hallway?
Do I level that up as well?
Part of the problem is the stud wall into the bathroom runs across all the joists and one of the floorboards.
 
How big is this step going to be?

You can get angled/ramped trims to overcome this. Also you can raise the carpet a little in front of the "step".
If your talking about a step of around 20mm trust me once you put a ramped trim in and lifted the carpet in front of it a little you won't notice it.
 
But what do I then do about the step into the hallway?
Do I level that up as well?
Part of the problem is the stud wall into the bathroom runs across all the joists and one of the floorboards.

if you are just replacing the floorboards with 22-25mm ply its just like tiling straight onto your floor, only the height of adhesive and tile to contend with, not a step as such
 
But if I'm levelling the floor won't the ply will still end up being 5cm higher than the hallway as a starting level before tiles etc are added?
 
But if I'm levelling the floor won't the ply will still end up being 5cm higher than the hallway as a starting level before tiles etc are added?

I must be reading your posts wrong mate, I thought you said floor was all over ( sloping here there and everywhere )

Have you checked the joists to see if they are already packed out ?, 5 cm Is a big difference across such a small area, are you sure your measurements are correct?
 
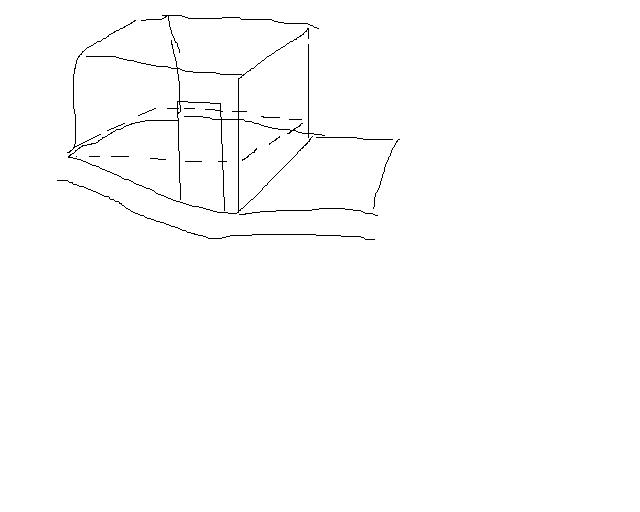
Excuse the crudeness of the drawing - I've over exaggerated the slop for clarity. Basically what's happened is I think the previous owner put up a stud wall (rhs of the bathroom) and that has pushed down the floor (it is a Victorian house so i'm not expecting things to be level anyway).

I ran a self-levelling around the room and there is definitely a drop of 5cm.
Currently there is no packing on the joists.
So assuming bottom left of the bathroom is the high point the bottom right is the lower point (approx 5.5cm lower). Top right corner is about 5cm lower.
The hallway outside the door follows the slope of the bathroom. The bedroom to the right of the bathroom slopes down from right to left i.e. into the stud wall between the two rooms.

Thanks
 

DIYnot Local

Staff member

If you need to find a tradesperson to get your job done, please try our local search below, or if you are doing it yourself you can find suppliers local to you.

Select the supplier or trade you require, enter your location to begin your search.


Are you a trade or supplier? You can create your listing free at DIYnot Local

 
Sponsored Links
Back
Top