
You are using an out of date browser. It may not display this or other websites correctly.
You should upgrade or use an alternative browser.
You should upgrade or use an alternative browser.
House Renovation diary
- Thread starter DeadBeat
- Start date
Sponsored Links
thanks George a few more small updates to come when ive taken a few more photos, and ill put a few up of how i installed the drop down screen
Forgot to take any photos of the new floor i put down in the bedroom, by the time id ripped up all the broken boards and all the boards in the way of running cables and fitting the projector screen, there weren't many left that were of any use, so i decided to pull them all up in favor of a new 22mm floor, i can use the good ones left to repair floors in other parts of the house if i want to.
here is the projector screen going in.
.jpg")
.jpg")
I screwed some batterns into the joists, allowing me to support a thick piece of plywood on top at both ends, the screen was hung from these and i left plenty of forward and backward movement available. I created removable panels in the floor so the screen could be adjusted without lifting the whole floor, although you would need to do this to remove the screen.
The screen and projector are plugged in in the room, to allow me to power them completely off when required.
.jpg")
.jpg")
.jpg")
.jpg")
.jpg")
here is the projector screen going in.
I screwed some batterns into the joists, allowing me to support a thick piece of plywood on top at both ends, the screen was hung from these and i left plenty of forward and backward movement available. I created removable panels in the floor so the screen could be adjusted without lifting the whole floor, although you would need to do this to remove the screen.
The screen and projector are plugged in in the room, to allow me to power them completely off when required.
The screen which cost £90 on amazon (106" screen) comes with a radio frequency remote control with a hardwired receiver with additional up/down buttons. I cut this out. The motor is a three wire motor with adjustable limit switches, which means it can be wired to any 3 wire motor controller. I purchased a fibaro roller shutter controller that works with my smart things home hub, this was about £50, i then wired the controller to the screen and voilla i can control the screen through my phone, and i can also wire in some fairly ordinary uk light switches (all be it they need to be momentary) which can also move the screen up and down. ill do this when icome to gut the living room for decorating.
.jpg")
.jpg")
.jpg")
.jpg")
I sealed the above electronics into a box for protection and placed them under the removable hatch in the floor, where they can easily be maintained.
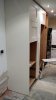
I forgot to take a photo of the finished floor other than this
.jpg")
although it doesnt really help picture the setup at all.

above is the room as it is now with carpet. I need to paint the window sill, purchase and fit, blinds, a light fitting, some furniture and also i need to fit the door and the radiator, and tonight's job will be put the bed together. However the light it at the end of the tunnel on this room!
I sealed the above electronics into a box for protection and placed them under the removable hatch in the floor, where they can easily be maintained.
I forgot to take a photo of the finished floor other than this
although it doesnt really help picture the setup at all.
above is the room as it is now with carpet. I need to paint the window sill, purchase and fit, blinds, a light fitting, some furniture and also i need to fit the door and the radiator, and tonight's job will be put the bed together. However the light it at the end of the tunnel on this room!
Sponsored Links
yeah i did the skirting myself in one afternoon, and its not a bad job, i tired fixing with gripfil but it wouldnt stick, then i tried screws and plugs, but a particular section of wall / bent skirting just pulled the plugs back out of the wall and i tried a few different types, so in the end i used silicone, and dabed them on. they will likley be a nightmare should i ever need to remove them, but hopefully i wont! I screwed some blocks to the floor to hold them tight evernight and they all stayed in place. platerer skimmed the origional walls first and added the skirting after.
So shortish update today, Put the bed together and I hadnt planned the room as well as i would have liked, the up shot is, ivce had to change the plan and move the bed to another wall, puts a few sockets in the wrong places but no mega disaster, here is a quick shot of the bed in place, ill take a few more in a few days when some of the wardrobes are up and the blinds have arrived.

pictures of rooms like this are hard, the bed isnt as imposing in the room as it looks here, its probably the perfect size to be honest.
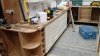
next job was to strip the kitchen of all remaining units and appliances ready for the plasterer to visit tomorrow


should be an interesing up coming few weeks as the plan is to start kitchen fitting in a weeks time!!
pictures of rooms like this are hard, the bed isnt as imposing in the room as it looks here, its probably the perfect size to be honest.
next job was to strip the kitchen of all remaining units and appliances ready for the plasterer to visit tomorrow
should be an interesing up coming few weeks as the plan is to start kitchen fitting in a weeks time!!
here are some kitchen images from the sketchup designs i did, so it should look something like the below when all done. cant wait!


Drying nicely now!

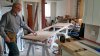
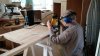
fitting starts, myself the FIL and his friend:
Here we have take some time to measure the gaps for the appliances and the right thickness for end panels and such, took quite a bit of figuring out. I was very pleased the boiler fitted perfectly in the tall cupboard, you will hopefull

Here we have take some time to measure the gaps for the appliances and the right thickness for end panels and such, took quite a bit of figuring out. I was very pleased the boiler fitted perfectly in the tall cupboard, you will hopefull
Attachments
-
 IMG_20160429_151541060_HDR.jpg138.9 KB · Views: 193
 -
 IMG_20160429_231000497.jpg59.9 KB · Views: 223
 -
 IMG_20160429_231013681.jpg133.1 KB · Views: 248
 -
 IMG_20160430_165815165_HDR.jpg100.1 KB · Views: 198
 -
 IMG_20160430_165829498_HDR.jpg148 KB · Views: 215
 -
 IMG_20160430_170952874.jpg158.6 KB · Views: 244
 -
 IMG_20160501_085913660_HDR.jpg88.4 KB · Views: 234
 -
 IMG_20160501_145224362.jpg35.5 KB · Views: 204
 -
 IMG_20160501_174140323.jpg103 KB · Views: 221
fitting starts, myself the FIL and his friend:
Here we have take some time to measure the gaps for the appliances and the right thickness for end panels and such, took quite a bit of figuring out. I was very pleased the boiler fitted perfectly in the tall cupboard, you will hopefully never know its there unless you open the door!
View attachment 98234
more units in place:

end panel and post in place, this 50mm post gived the impression the units are much sturdier and thicker than they actually are.

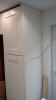
wall cabs up

Corner end units in place

cut out for the kitchen sink

Starting on the tops (which i dint think we would attempt)

Here we have take some time to measure the gaps for the appliances and the right thickness for end panels and such, took quite a bit of figuring out. I was very pleased the boiler fitted perfectly in the tall cupboard, you will hopefully never know its there unless you open the door!
View attachment 98234
more units in place:
end panel and post in place, this 50mm post gived the impression the units are much sturdier and thicker than they actually are.
wall cabs up
Corner end units in place
cut out for the kitchen sink
Starting on the tops (which i dint think we would attempt)
Fixing the Tops together:

Another End Panel done

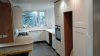
How it ended up after 4 days of solid working.


Still loads to do, should be oiling the tops over the next few days and fitting the appliances. Got to buy some door handles, and then tile the walls and floor and paint.
but the hardest part is done now which was cutting the tops IMO. still some finishing to do with them but very pleased so far.
Another End Panel done
How it ended up after 4 days of solid working.
Still loads to do, should be oiling the tops over the next few days and fitting the appliances. Got to buy some door handles, and then tile the walls and floor and paint.
but the hardest part is done now which was cutting the tops IMO. still some finishing to do with them but very pleased so far.
- Joined
- 3 May 2016
- Messages
- 8
- Reaction score
- 1
- Country

Hi DeadBeat,
I've really enjoyed following your build thread so far and rather than be a casual discreet observer its convinced me to sign up!
I downloaded sketchup as your kitchen designs looked very thorough and i'm in the process of buying a 'fixer-uper' but now after seeing the finished unit I'm starting to think that this isn't just a hobby for you? Are you or do you have someone close to you in the joinery biz or have you really designed, bought and built that kitchen without any professional help?
no, i dont know anyone in the biz, the biggest problem for me after moving to a different city is finding people in the trade. my fil has built a few wooden fences and has used a router before but only for personal projects, i couldn't believe he got the corners on those curves as well as he did and first try too, he had never done work tops and certainly not oak before. all this is done at weekends and after my proper job which is in IT. All this is new to me. I have done a house up before, but i didnt really do any of the work or planning other than painting.. the last time i got plumbers joiners and sparkys to do it and in all honesty i could have done the same job for half the price myself, this time ive decided to do it all myself. with the exception of electrics, gas, plastering and a couple of other bits, oh and hanging doors which i dont have patients for. Im chuffed to think you feel the job is a professional one. im sure the pros could pick holes in it here and there. The only trick ive learned is research as much as i can on google (diynot etc) and youtube and try to figure out what solutions will work for me. i dont think its anything others cant do as long as they can research on a laptop. annoyingly i dont appear to be able to apply this kind of method to anything else i do, or i might have a much better job lol
DIYnot Local
Staff member
If you need to find a tradesperson to get your job done, please try our local search below, or if you are doing it yourself you can find suppliers local to you.
Select the supplier or trade you require, enter your location to begin your search.
Please select a service and enter a location to continue...
Are you a trade or supplier? You can create your listing free at DIYnot Local
Sponsored Links
Similar threads
- Replies
- 1
- Views
- 3K