New suspended wooden floor

Joined
28 Apr 2008
Messages
90
Reaction score
0
Location
Gloucestershire
Country
United Kingdom
I've got a room that's currently missing a floor so in order to avoid any nagging from the family it's about time I got one installed!

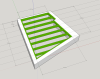
As this will be a bathroom which may have tiles on the floor I've aimed to spec it to be stiffer than the building regs call for. All timber (C16 or better and treated) is 47x150mm @ 400mm centres with the longest span being <2500mm. I'll run a line of strutting in up the middle although I've not drawn these.

In the rest of the house I've used 22x150 T&G floorboards which I'm sure would be enough but I'm thinking ply would probably be better here as it's a bathroom.

So far so good but I've got a couple of questions...

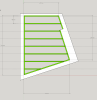
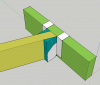
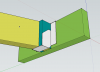
As you can see from the attached pictures the room I'm working in doesn't have two parallel walls. I'd planned on fixing wall plates around the perimeter of the room and then using joist hangers but clearly on the right hand side of the room joist hangers won't work (unless you can get 70 degree hangers?). What's the best way to terminate the timber on the right hand side? The best alternative idea I can come up with is to fit the wall plate on the right lower, rest the timber on top and then in fill between the joists to prevent them from twisting.

Have I missed anything else I should be considering?

Cheers :)
 

Attachments

  • joists1.png
    joists1.png
    439.8 KB · Views: 135
  • joists2.png
    joists2.png
    733.4 KB · Views: 107
Sponsored Links
Fix your "wall plates" as per drawing.
On solid outside walls sheath the back of the plates with DPC to protect against penetrating damp.
Fix your joist hangers.
For the RH plate check the Simpsons Strongtie catalog for: LS Skewable Angle's.
Use two of these angles - bend only once to the desired angles.
If you have trouble working out how to fix them come back here.
Where you can source the LS Skewable Angles I dont know.

Before anything : have a clear floor plan drawing of where your pipes might penetrate the floor or your fixtures are located. This might involve adjusting joist positions & noggins.
Ply will work fine or OSB, & for me chipboard will also work. It depends on your finished surface.
 
Thanks, I'll see if I can find those angles or something like them. I've pretty much got a services plan. The top joist in the picture might need a little thought to get around the toilet waste but other than that I think I'm good.

The only problem I can see with those angle plates it how would I nail them on the "inside" acute angle? As it's only 70 degrees I could probably just about get a nail in at an angle. EDIT: Please ignore my RTFM type question, they have a very comprehensive installation guide.
 
Last edited:
The Angles (brackets) are actually made for wall plate to rafter but can, of course, be utilised for joist hanging.
Bend the bracket to the "inside" acute angle, and then fix it to the joist before offering up the joist.
Then nail/screw the bracket to the "wall plate". Using a bit extension on a driver will help to angle the screws in.
Finally bend and fix the bracket on the other, accessible, side of the joist.

To hold the joist steady before fixing the brackets use a toe-nail on the top edge of the rafter to temporarily pin the joist in place.
 
Sponsored Links
I've been searching around for those adjustable angles and I can't get them locally but I've found a couple of online suppliers (that will supply in bulk).

Would this be an acceptable alternative solution though? I'd get a slightly larger regular joist hanger, in this case I'd need a 75mm hanger for 47mm timber, and then pack either side with shims (blue). Then I'd nail through the shims into the joist (yellow). The hanger would be nails to the wall plate (green) as usual. I like this solution because it gives support to the bottom of the joist rather than just relying on the nails or screws driven in from the side.
 

Attachments

  • oversized_joist_hanger_1.png
    oversized_joist_hanger_1.png
    29.6 KB · Views: 97
  • oversized_joist_hanger_2.png
    oversized_joist_hanger_2.png
    26.2 KB · Views: 95
If the wall behind the "wall plate" is masonry then what about leaving out the "wall plate" on that wall, and cutting pockets in the masonry for the joist tails to sit in. Wedge the tails in place.
You could then infill with noggin like off-cuts in the bays between the joists - they will give you edge bearing for the ceiling plaster board & the sub floor.

Your proposal will work but my objection to it would be that it might begin to squeak over time - however, if you drill the sides of the hanger holes to open them up for larger gauge screws it all might be OK.

There are simple heavy duty "Ell" plates available that you could bend to the angles required - after all its only two joist bearings that you are dealing with.
 
I'd rather not cut pockets into the wall as it's a party wall of slightly dubious construction (the joy of having an old house) and the neighbours are grumpy. Building a sleeper wall is (this is a ground floor bathroom) is also not really an option as there's extensive drainage over that side of the room running hard up against the wall.

If squeaking is the worst it'll do then I can live with that. I reckon I can fix it tight enough to prevent that though.

Thanks for the help.
 

DIYnot Local

Staff member

If you need to find a tradesperson to get your job done, please try our local search below, or if you are doing it yourself you can find suppliers local to you.

Select the supplier or trade you require, enter your location to begin your search.


Are you a trade or supplier? You can create your listing free at DIYnot Local

 
Back
Top