how to repair and repaint cracked artex ceiling after a small leak

Joined
25 Jul 2012
Messages
38
Reaction score
3
Location
West Midlands
Country
United Kingdom
I have looked around the forum but I can't find a similar case to mine. I caused a gate valve to leak in the airing cupboard. A small amount of water leaked before I could get the valve repaired. The water flowed to an old crack in the ceiling where it dripped through the artex causing a stain.

We bought the house 19 years ago. I remember that we had to delay moving in because of a water leak. I seem to remember the original leak was probably in the same location as the crack.

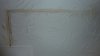
I have attached images.

I had a visit from a loss adjuster. He seems to think this could be a DIY job. He suggested filling the crack using a flexible filler then applying a stainblock paint and finally repainting the area with emulsion.

I would like to ask:

Does the fact we have such a straight crack mean something else is likely to be wrong that I would need to address first?

What kind of filler should I use? flexible calk for example?

The Artex feels smooth. I think that means it must have been painted. Would it be better to apply an oil based undercoat or a stain blocking paint? Any specific recommendations?

The loss adjuster suggested I might need to paint the whole ceiling. Bearing in mind the age of the ceiling is that inevitable in order to get a good appearance?
 

Attachments

  • P1000777.JPG
    P1000777.JPG
    83.7 KB · Views: 1,224
  • P1000776.JPG
    P1000776.JPG
    71.4 KB · Views: 1,317
  • P1000775.JPG
    P1000775.JPG
    68.3 KB · Views: 1,179
Sponsored Links
The loss adjuster is probably right in saying this is a simple fix for a DIYer, but there are a few things that may prove otherwise. Providing that there is no swelling to the plasterboards, which is making the surface bubble or blister, or that the Artex hasn't come loose, the method he suggested is the standard way to repair such a problem.

The reason the cracks are straight is because they have developed along the plasterboard joints. This is where another issue comes into play. If you push up on the ceiling and feel excessive movement, you may need to use a few screws into the ceiling joists to tighten the boards up. These will obviously also need filling over, before painting, making the job a little bigger and a bit more time consuming. None of this is difficult though.

You can take your pick of fillers, as most will work, although a flexible one would be a good choice if you feel there is just a tiny amount of movement in the boards which wouldn't need to be fixed with screws. Most stain blocking paints will work perfectly well on this kind of problem so the choice is yours. Zinsser Coverstain or B-I-N are the go to products within the trade for water stains, but other brands from the DIY chains also work fine, or you also have the option of using an oil based undercoat (slightly thinned with white spirit to make application easier), which also does the job in most cases. Once dry, you can try and just emulsion the patch to see if it blends in but, as was suggested, painting the whole ceiling is usually the best option.

Now, and this is where the 'probably' comes in, if you add up the costs of materials, your time and your effort, and if you can achieve the finish you would be happy with, you need to weigh up whether it would be better for you to pay the excess on your insurance claim and then probably have to pay increased premiums, or if you would prefer to do the job yourself. Only you can decide this but, to be fair, I think maybe the adjuster is trying to set you on the best path, even though it is their job to try and avoid claims being made.
 
I would go for what the adjuster has said its a fairly minor job, the excess you pay will probably be more than the job costs.

Mister helpful has explained how to repair the cracks, make sure the plasterboard is not moving, the only problem I can see is that the jointing tape between the plaster board sheets may have split, dig out the cracks with a filler knife, dosent have to be much, you should then be able to see the tape,( if its split) fill in between gap of plaster board sheeting and stick back the tape use a flexible filler ( painter Mate) and fill over the tape with polyfilla to hide the crack. trying to match it in with the existing pattern and paint.
 
Sponsored Links
I realise it's been some time but I haven't spent much time on DIY recently. As the latest image shows, I have removed most of the Artex over the jointing tape. As you can see, there is about 25mm at the bottom of the image where there is either no tape or a longitudinal split in it. The plaster board doesn't move when pushed.

Do you think it would be OK to fill over the 25mm gap or will I have to replace the tape?

If so, whats the best way of removing the short length of split tape please?
 

Attachments

  • crack with artex removed.JPG
    crack with artex removed.JPG
    59.9 KB · Views: 810

DIYnot Local

Staff member

If you need to find a tradesperson to get your job done, please try our local search below, or if you are doing it yourself you can find suppliers local to you.

Select the supplier or trade you require, enter your location to begin your search.


Are you a trade or supplier? You can create your listing free at DIYnot Local

 
Back
Top