are these tile battens ok

Joined
8 Sep 2016
Messages
22
Reaction score
0
Country
United Kingdom
hi

my carpenter has installed my tile and battens on my hipped roof extension ready for me to tile it. i'm using vallet tiles and granny bonnets.

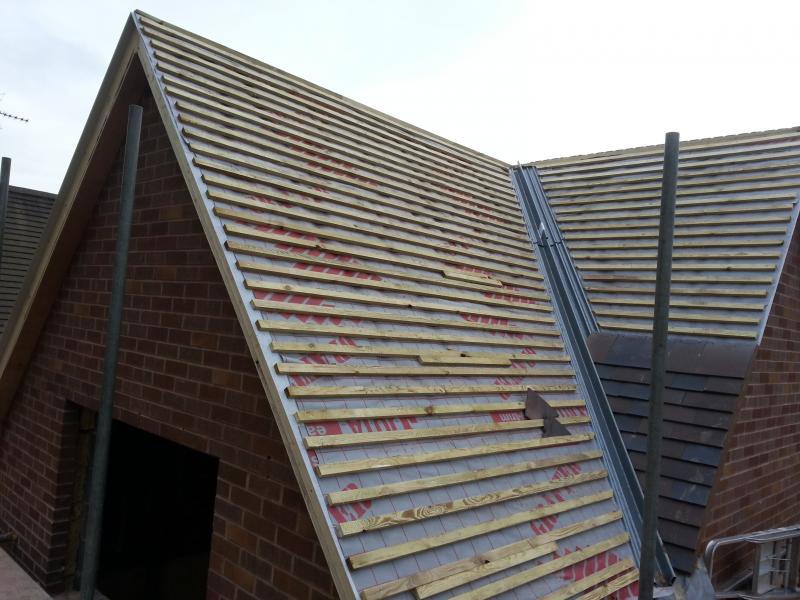
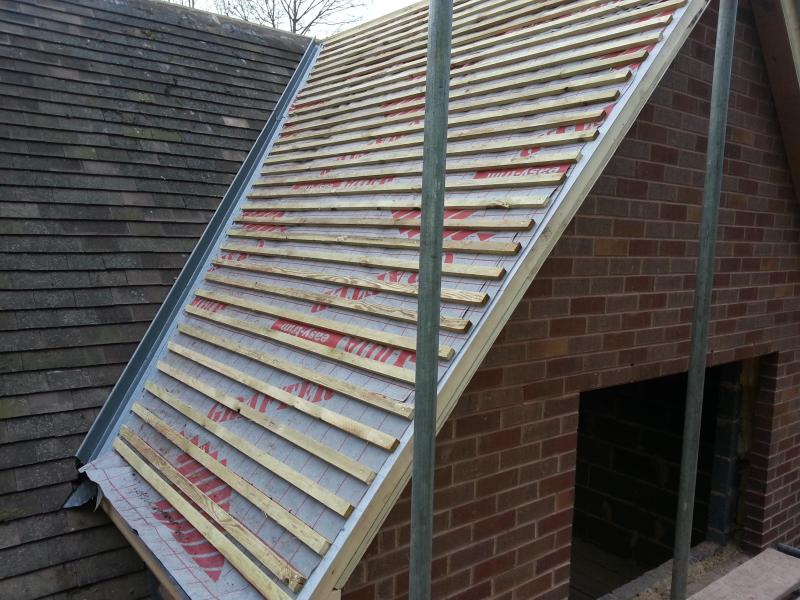
the tile battens don't seem to be in line, as i'm using granny bonnets would that be ok or cause a problem as they seem to be out by quite a bit? see photo

also the new battens don't match the height of the existing roof battens. should these be the same height? see other photo

he says you won't notice it once its tiled but i'm not so sure.
1.jpg
2.jpg


any advice appreciated, thanks in advance
 
Sponsored Links
Hopefully, whoever cut the roof knew what they were doing because if the rafter framing is out of whack then nothing else will properly follow.

Presumably, whoever did the roof has started out battening on the far side where the old roof plane & the new roof plane meet - both planes should have been equal.
As the battens have been brought around the roof to end up at the valley they have lost their way.

Perhaps the first hip began to throw the battens out.
But it doesn't look like a v. professional bit of work.

Nowadays there are better valley arrangements than valley tiles.
Quite how that valley is meant to work is difficult to tell.

A good roofer can work wonders, and hip bonnets can hide discrepancies but I can only see a few small views of the roof.
 
Are all the roof pitches the same?
As you seem aware each batten should course round the roof.
If there was a pitch issue it would have been best lost in the valley, making the bonnets easier to fit.

Having said that With a lot of fiddling the bonnets would go on . Valley battens are not visible but you might be lucky.

If its not too much trouble for you , re felt &re batten its a small roof
 
Sponsored Links
I'd opt for a dry (GRP) valley and ridged hips. As said if the roof pitches differ then so will the spacings whilst using the same gauge. If altering the gauge is contentious then a dry valley and ridged hips is the only way.

Dry valley......

 
Dry valley.....

I'm going to use some of those dry valleys in a couple of months. What stops them getting clogged up with inaccessible debris and being unserviceable compared to a normal valley?

Is the assumption that you cut the tile tight to the central upstand and then not too much moss will fall down, meaning that there will always be a couple of clear hidden channels to carry water if required?
 
they are simple.But any close cut/mitred valley can eventually get a clog up as can secret gutters.
Having said that so can tiled vallys and standard open vally be it grp or lead
 
I'm going to use some of those dry valleys in a couple of months. What stops them getting clogged up with inaccessible debris and being unserviceable compared to a normal valley?
Any rainwater that can't find its way onto the GRP valley stays on the tiles and finds its way into the gutter. They are as unlikely to clog up beneath the cover of the tiles as any other part of the roof.
 
hi

i decided to kick the "carpenter" off the job and stripped the felt and batten and redid it myself. the battens match the guage of the existing in the valleys perfectly now. but as i was redoing it i noticed that the battens on the far elevation were going out and required a slightly bigger guage so i can only assume that the pitch on that side doesn't match the other 2 pitches or the existing roof. but i've got round that with a bit of messing about and it's much better now.

my question now is i've dry laid the bonnets which are held in with a screw and plan to bed them on mortar every twelve tiles or so as i'm a bit slow and with 2 cuts for every bonnet, i figured it would be quicker than pugging them up as i go up the hip. the bonnets don't seem to kick up much, when i've seen them laid on other roofs theres often quite a bit of pug under them but these won't have much at all by the looks of things, is that ok? please see photo

p.s. looking ar the photo some of them look a bit twisted on the hip so i'll check that before putting mortar under them.


0wDyRT8.jpg


2qvdspd.jpg
 
You need to be careful with the bond on the cut tiles beside the bonnets. If a tile and half is slightly too small them you may need to cut 30mm of the tile adjacent to the cut into the bonnet to maintain the bond.

The thickness of the muck will not be a problem but it is best to bed the bonnets before fixing them.
 
They are fine, Redland bonnets do sit flat which is nice.
But as Ray says your bond is not good. You should have no need to cut the tiles so slim when you appear to be tiling away from the hip.
t&h will help you out, or you could soaker the cuts.. or start again .
 
You need to be careful with the bond on the cut tiles beside the bonnets. If a tile and half is slightly too small them you may need to cut 30mm of the tile adjacent to the cut into the bonnet to maintain the bond.

The thickness of the muck will not be a problem but it is best to bed the bonnets before fixing them.


They are fine, Redland bonnets do sit flat which is nice.
But as Ray says your bond is not good. You should have no need to cut the tiles so slim when you appear to be tiling away from the hip.
t&h will help you out, or you could soaker the cuts.. or start again .


thanks or the advice its appreciated. to be honest i was struggling a bit as i needed to use a tile and a half on the eaves on the corner of the hip to be able to have enough tile to nail it. so then i was struggling to keep a half bond between the eaves and first row. is it those lower ones that are the issue, should i use tiles and a half ?

edit: sorry i just worked out was t&h means lol, so question answered
 
Yes, in the bottom courses if a tile and half is too small you should have cut about 20mm of the tile before the bonnet and then the cut would be bigger. you would need to do the same in the next 3 or 4 courses.
 

DIYnot Local

Staff member

If you need to find a tradesperson to get your job done, please try our local search below, or if you are doing it yourself you can find suppliers local to you.

Select the supplier or trade you require, enter your location to begin your search.


Are you a trade or supplier? You can create your listing free at DIYnot Local

 
Sponsored Links
Back
Top