
- Joined
- 11 Aug 2017
- Messages
- 6
- Reaction score
- 0
- Country

Hello all - DIYnot newbie here!
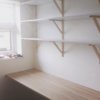
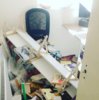
We put up some shelves in our flat about two months ago - 230cm long, made of 18mm mdf and fixed with masonry wall plugs to blockwork walls with four wooden brackets (spaced at 10-80-150-210cm along the wall) - and this morning they fell down. I think I possibly overloaded the top shelf with books and it took the lower shelves with it on its way to the ground but I was out when they fell down so I didn't see how it happened. The neighbours with whom we share that wall were also doing some hammering and drilling on their side this morning so that might also have something to do with it?
Anyway I'd like to put the shelves back up and ideally keep the brackets in the same place as they were. However I'm not quite sure how to do this. I've seen these Wet'n'Fix discs recommended on another thread but don't know how much to trust them. Does anyone have any thoughts on these or do I need to refill the holes and then redrill for the brackets? I'm quite new to this as it's our first flat so any step-by-step thoughts would be very welcome!
Also am I using enough brackets in the first place? Should I be putting up extra brackets for support if the shelves are for books? Any tips very much appreciated!
")