Old extractor vent hole found in wrong place

Joined
23 Jul 2017
Messages
25
Reaction score
0
Country
United Kingdom
Sorry if this is the wrong forum but seemed most relevant to building.

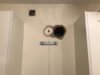
Happily starting to core away for our cooker hood and all the plaster broke off one edge revealing an old hole 140mm of to one side that had been rendered over at each end. Problem is we've already bought, built and fitted all the rest of the kitchen and there's no space left to move anything down. There's at most about 25mm to move the extractor over, the chimney would need to move over about 75mm to fit the ducting behind it. The hole can't really go any higher because of all the wiring embedded into the plaster, besides for it to go high enough to be clear of the old hole you'd never get the drill in because of the ceiling.

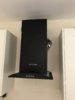
The easiest thing I can think of is to cut away diagonally from inside the chimneys footprint across into the old hole about halfway in, or cut an extra 75mm out of the side going straight through, but that would leave a big oval shaped hole on a supporting wall, is that acceptable? And in the second case probably be impossible to keep the core bit straight when only half of it is engaged.

Any other ideas?
 
Sponsored Links
How big is the existing hole? Cant see a problem with keeping the new hole as planned, forget core drilling, stitch it out as needed then make good the brickwork/point it up after
 
How big is the existing hole? Cant see a problem with keeping the new hole as planned, forget core drilling, stitch it out as needed then make good the brickwork/point it up after

It's the same size, 5" pipe fits down there nicely, it's just 75mm too far over for the chimney to fit round.

In fact here's a pic
 

Attachments

  • IMG_1679.JPG
    IMG_1679.JPG
    105.5 KB · Views: 441
I'd just do as I said above and then make good the brickwork. Drill holes around the shape and chisel it out.
 
Sponsored Links
Don't worry. It'll be fine with both holes or one large hole. The masonry will spread the loads around it.
 
yeah just carry on drilling your hole fit your ducting and fill the other one in.
 
Brilliant, cheers.

First will try to knock what's left of the first skin of bricks to the side out and see if I can squeeze some flexi through. Would the old hole want filling with anything substantial or just any old crap? It was packed up with rubbish before and rendered over outside and plastered inside. Rendering outside thankfully makes any making good nice and easy. The first time I'm pleased a previous owner covered the entire outside of the house!
 
You're core drills wobbling, so you need to be careful that you don't bugger it, nor make the new hole too large. If you can get the core drill centred, and working properly, then put in a plastic tube with a vent outside, and atach the flexii tube to the plastic tube from inside with tie cables. When you drill the core out, drop it downwards a few degees so that any water flows to the outside. A flexi tube can retain water in the grooves, so shouldn't be used more than necessary. Then you can fill in the old hole with pretty much anything, but render inside and outside before you plaster inside.
 
You're core drills wobbling, so you need to be careful that you don't bugger it, nor make the new hole too large. If you can get the core drill centred, and working properly, then put in a plastic tube with a vent outside, and atach the flexii tube to the plastic tube from inside with tie cables. When you drill the core out, drop it downwards a few degees so that any water flows to the outside. A flexi tube can retain water in the grooves, so shouldn't be used more than necessary. Then you can fill in the old hole with pretty much anything, but render inside and outside before you plaster inside.

That was me standing in an awkward position and starting on plaster that made it wander like that. Once into a solid pilot in the brick it would have straightened. Plastic pipe was the plan, the whole short run of it starting with an elbow. But if flexi allows me to get in at a bit of an angle and use the existing exit hole, it makes my life a lot easier and will suffice.
 
Fill the old hole with what you cut out from the new one.
 
I just chiselled away the first layer of bricks next to the old hole and got some flex through at an angle. It all fits nicely in place now where it should. Big bastard of a hole to fill in somehow now, foamed around the ducting at the exit end just to seal it up and try to prevent drafts coming in. Can't decide whether to foam and filler over the interior side or cram it full of plaster. The obvious difference being one will be ready to paint this weekend, whilst the other (IMO probably better way) will probably have dried out and be ready to paint some time in 2020 :LOL:

This is going down as one of those 'It'll do' jobs. I bet the flipping thing will only get used as a light anyway.
 

Attachments

  • IMG_1682.JPG
    IMG_1682.JPG
    81.4 KB · Views: 331
  • IMG_1685.JPG
    IMG_1685.JPG
    171.2 KB · Views: 368

DIYnot Local

Staff member

If you need to find a tradesperson to get your job done, please try our local search below, or if you are doing it yourself you can find suppliers local to you.

Select the supplier or trade you require, enter your location to begin your search.


Are you a trade or supplier? You can create your listing free at DIYnot Local

 
Sponsored Links
Back
Top