
You are using an out of date browser. It may not display this or other websites correctly.
You should upgrade or use an alternative browser.
You should upgrade or use an alternative browser.
Insulated timber-framed Garden Room
- Thread starter Bagheera
- Start date
Sponsored Links
- Joined
- 12 Dec 2016
- Messages
- 22
- Reaction score
- 2
- Country

How to spend a rainy day - excellent vid ! I think HSE may have had some issues with the "wall pushing" ")
- Joined
- 3 Jan 2017
- Messages
- 51
- Reaction score
- 6
- Country
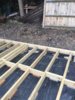
Some more progress to report.
But anyway, here be the pics:


All comments welcome. I'm looking forward to framing my first wall soon, hopefully the project will move on quickly now but I feel positive about having done the floor as best as I could. Feels very solid
- I went back a step and removed the frame from the blocks and mortared the blocks together and built a retaining wall on the rear side where the earth was higher.
- I placed DPC on the blocks, put the frame back on, squared it up and screwed it together and added all the joist hangers.
- I then used angle brackets (as suggested) to attach the frame to the blocks. I tried anchor bolts but they exploded the block so I went with masonry screws instead.
- I attached small pieces of red cedar just over 100mm down from the top of the joists to hold the insulation and to keep it from falling through should the wood contract/expand.
- Then cut my Celotex PIR GA4100 (100mm) down between the joists. Any gaps I filled with slivers or expanding foam.
- To create a continuous vapour membrane (I thought I may as well), I taped all the joists with aluminium foil tape and patched any holes in the Celotex. Annoyingly a fox got on one night and his claws made little holes in all over-guess I should have known they like to jump around on soft things from the John Lewis Christmas ad.
- Then with 18mm WBP ply, think BB/CC, is currently being installed over the top. screws every 6 inches on edges and 8 inches along the joists in the centre. I have to say my 16 inch centres really make it a breeze but I wish I had made my base to a whole 16inch multiple rather than using metres. Why we have two systems that are used interchangeably is beyond me.
But anyway, here be the pics:
All comments welcome. I'm looking forward to framing my first wall soon, hopefully the project will move on quickly now but I feel positive about having done the floor as best as I could. Feels very solid
Attachments
- Joined
- 3 Jan 2017
- Messages
- 51
- Reaction score
- 6
- Country
First two walls are up. After framing them on the floor, I screwed them down through the ply when they were squared up and then sheathed them with 11mm OSB3 so they were rigid. Studs etc made from 100 x 47 (95 x 44mm) and headers made from 2x6/150 x 47 (145 x 44) though added an extra bit to the door's header. Front is 8cm higher than back (1:60 drop). Took four lads to lift them.


It's looking pretty big now, bit scary really but hopefully it will look right when all clad and windows in etc. Have to learn how to do a rake wall now...
It's looking pretty big now, bit scary really but hopefully it will look right when all clad and windows in etc. Have to learn how to do a rake wall now...
Sponsored Links
- Joined
- 12 Dec 2016
- Messages
- 22
- Reaction score
- 2
- Country
Are you a family of midgets at your house as that opening in the second picture looks a little low ???
- Joined
- 3 Jan 2017
- Messages
- 51
- Reaction score
- 6
- Country
Well, the gf's nigh on at midget status but I'm sure she'll want to use a full sized door nonetheless. That's my access point to get in and cut out the doors and windows when all squared up Also it would have served no structural role unlike the board above it so I decided to cut the last bit to size to be economical with my OSB.
On another note, anyone, what are the pros and cons of going for roof joists 220 x 47 versus 195 x 75? Both span my 4.8m.
On another note, anyone, what are the pros and cons of going for roof joists 220 x 47 versus 195 x 75? Both span my 4.8m.


- Joined
- 12 Dec 2016
- Messages
- 22
- Reaction score
- 2
- Country
Good progress !!


- Joined
- 12 Dec 2016
- Messages
- 22
- Reaction score
- 2
- Country
That's a nice sized space to work in - excellent space for a Scalextric track or a train layout !!!
Good effort!
Jonathan
Good effort!
Jonathan
- Joined
- 3 Jan 2017
- Messages
- 51
- Reaction score
- 6
- Country
No Hornby railway here Jonathan, that was my dad's thing! I have a wide angle camera for internal pics so it may look bigger than it is. 4.8m x 6.3 internally. Pretty decent.
Worth mentioning too is that the foundation I did seems very solid, no problems at all so far and the space underneath is dry and great for storing ladders!
Worth mentioning too is that the foundation I did seems very solid, no problems at all so far and the space underneath is dry and great for storing ladders!
This looks great, and i am going to be doing the same thing soon. I need to replace a rubbish and ugly sectional garage and replace it with exactly what you have done.
I want to stay within the 30sqm though as don't want to do planning.
I like the idea you are storing the ladders underneath the building as this is something i will also need to consider.
How much have you spent so far on it ?
I want to stay within the 30sqm though as don't want to do planning.
I like the idea you are storing the ladders underneath the building as this is something i will also need to consider.
How much have you spent so far on it ?
- Joined
- 3 Jan 2017
- Messages
- 51
- Reaction score
- 6
- Country
Hi Trevorbayliss,
I will publish a vid soon on everything you need to know about planning permission and b regs and link it here. The 30m2 rule is actually a b regs one, not planning permission.
So far about £4.5k including EPDM roof + fascias (1k). Unfortunately PIR insulation has gone through the roof (excuse the pun) recently due to an undersupply. If that changes by the time you do your project then it may be cheaper to get to this stage.
I'd recommend starting planning it now, knock down the garage in spring and build the bulk of it next summer.
DIYnot Local
Staff member
If you need to find a tradesperson to get your job done, please try our local search below, or if you are doing it yourself you can find suppliers local to you.
Select the supplier or trade you require, enter your location to begin your search.
Please select a service and enter a location to continue...
Are you a trade or supplier? You can create your listing free at DIYnot Local
Sponsored Links
Similar threads
- Replies
- 8
- Views
- 4K
- Replies
- 52
- Views
- 21K
P
- Replies
- 18
- Views
- 11K