

I know it's a topic frequently discussed on here, but I thought I'd share my experience of installing a woodburning stove from start to finish.
When I started this, I had good knowledge of some of the steps, but the project as a whole was daunting. Nonetheless, I got to it.
It all started when I was decorating the living room. I had changed sockets, skirting, architrave, etc. and we'd picked some wallpaper for the chimney breast. Along with the plastered-over 1960s tile surround though, it didn't do this feature wall justice and I couldn't help but think of Del Boy's flat...

So, I got to it... first thing was to see what we were working with behind the surround. The surround itself came off too easily really -- held on by two iron nails on brackets either side. Lots of rubble behind there as expected, lots of SOOT as expected and a nice brick archway in good nick...

After removing all of the fireplace backplate, rubble and rubbish, we got a good idea of what we were working with. The brickwork was sound, the opening was big enough for a few of the stoves we'd been looking at and we got a good idea of what exposed brick would look like...

We decided to put up ceramic tiles inside the opening. Before doing so, I put up 12.5mm Hardiebacker board (~£10 a sheet from Travis Perkins, used 2) which was screwed into the brickwork. We also had the chimney flue liner put into place which was done for £150 by a local roofer. The flue liner itself was £220 delivered. No concerns over combustibles being a solid brick construction.

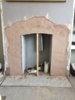
Laying the hearth next. Out house has concrete floors downstairs and is around 2' higher than most houses locally as it was build during the post-war flood years. There were no concerns over the hearth depth meaning I could simply lay sand/cement with the limestone slabs on top...

I also applied Thistle Hardwall onto the bricks. Amazing stuff to work with (like Angel Delight). I cut the flue liner to length too...

Next steps were to plaster over the Hardwall. Unfortunately I'm not a plasterer (gradually getting better) I have only ever skimmed sheets of plasterboard after drywall lining. After it had dried there were marks/lines visible in certain light. I decided to let this dry then go over with a smooth, light one-fill filler. I know this is amateur but after doing so and going over with emulsion, it does look good...
I also put the tiles up using rapd-set tile adhesive and a tube of high temperature grout from a tube (tolerant up to 1200 degrees C). Both products from Mapei...

Next was to put the stove in, so I could work out stove flue height, bracket locations, etc...

After connecting everything up, coating the wall with two coats of emulsion (top coat yet to be picked!), putting up coving in the room and putting the mantle up, I was quite pleased with the work I did. It took me 2 months but that takes into account reading up on the building regs, taking a break, doing it in between work and other bits and bobs.
It cost me £800 all in, with the stove and liner being the most expensive at £500 together (stove was second hand). Not had it signed off yet. Council want £200 to do it.

Just got to pick a top coat, paint the shelving, get a new carpet, fit the plaster ceiling rose/new light fitting and finish off the skirting near to the fireplace opening.
I've missed out a few bits as didn't always take pictures. The register plate was easy enough - I just fixed brackets inside the flue, with the register plate pushing up to this and secured with bolts and wingnuts. It can be easily removed and slid down for inspection. The stove flue pipe was custom-made and contains 2 x 45 degree angles to bring it into the room.
I'm very skeptical about the claims that a stove will "heat the whole house". Once going, this will heat the front room very nicely and only really spill out into the kitchen diner a little bit. That said, we don't put the heating on downstairs anymore and only heat upstairs for 1.5 hours before we go up for the night. It depends so much on wall construction, level of insulation, etc. I did get a fan for the top of it which makes a noticeable difference.
As for wood consumption, I was lucky to be given a lot of free hardwood from my dad who once worked for a local furniture manufacturer that went under. It was kiln-dried when new and had been drying under shelter for 6 years after that. It is surprising how much you go through, so if I wasn't given that I think by now (4 weeks of use) I would have got through a builder's bag. The basket in the last picture is filled at 1700 and empty by 2100.
When I started this, I had good knowledge of some of the steps, but the project as a whole was daunting. Nonetheless, I got to it.
It all started when I was decorating the living room. I had changed sockets, skirting, architrave, etc. and we'd picked some wallpaper for the chimney breast. Along with the plastered-over 1960s tile surround though, it didn't do this feature wall justice and I couldn't help but think of Del Boy's flat...
So, I got to it... first thing was to see what we were working with behind the surround. The surround itself came off too easily really -- held on by two iron nails on brackets either side. Lots of rubble behind there as expected, lots of SOOT as expected and a nice brick archway in good nick...
After removing all of the fireplace backplate, rubble and rubbish, we got a good idea of what we were working with. The brickwork was sound, the opening was big enough for a few of the stoves we'd been looking at and we got a good idea of what exposed brick would look like...
We decided to put up ceramic tiles inside the opening. Before doing so, I put up 12.5mm Hardiebacker board (~£10 a sheet from Travis Perkins, used 2) which was screwed into the brickwork. We also had the chimney flue liner put into place which was done for £150 by a local roofer. The flue liner itself was £220 delivered. No concerns over combustibles being a solid brick construction.
Laying the hearth next. Out house has concrete floors downstairs and is around 2' higher than most houses locally as it was build during the post-war flood years. There were no concerns over the hearth depth meaning I could simply lay sand/cement with the limestone slabs on top...
I also applied Thistle Hardwall onto the bricks. Amazing stuff to work with (like Angel Delight). I cut the flue liner to length too...
Next steps were to plaster over the Hardwall. Unfortunately I'm not a plasterer (gradually getting better) I have only ever skimmed sheets of plasterboard after drywall lining. After it had dried there were marks/lines visible in certain light. I decided to let this dry then go over with a smooth, light one-fill filler. I know this is amateur but after doing so and going over with emulsion, it does look good...
I also put the tiles up using rapd-set tile adhesive and a tube of high temperature grout from a tube (tolerant up to 1200 degrees C). Both products from Mapei...
Next was to put the stove in, so I could work out stove flue height, bracket locations, etc...
After connecting everything up, coating the wall with two coats of emulsion (top coat yet to be picked!), putting up coving in the room and putting the mantle up, I was quite pleased with the work I did. It took me 2 months but that takes into account reading up on the building regs, taking a break, doing it in between work and other bits and bobs.
It cost me £800 all in, with the stove and liner being the most expensive at £500 together (stove was second hand). Not had it signed off yet. Council want £200 to do it.
Just got to pick a top coat, paint the shelving, get a new carpet, fit the plaster ceiling rose/new light fitting and finish off the skirting near to the fireplace opening.
I've missed out a few bits as didn't always take pictures. The register plate was easy enough - I just fixed brackets inside the flue, with the register plate pushing up to this and secured with bolts and wingnuts. It can be easily removed and slid down for inspection. The stove flue pipe was custom-made and contains 2 x 45 degree angles to bring it into the room.
I'm very skeptical about the claims that a stove will "heat the whole house". Once going, this will heat the front room very nicely and only really spill out into the kitchen diner a little bit. That said, we don't put the heating on downstairs anymore and only heat upstairs for 1.5 hours before we go up for the night. It depends so much on wall construction, level of insulation, etc. I did get a fan for the top of it which makes a noticeable difference.
As for wood consumption, I was lucky to be given a lot of free hardwood from my dad who once worked for a local furniture manufacturer that went under. It was kiln-dried when new and had been drying under shelter for 6 years after that. It is surprising how much you go through, so if I wasn't given that I think by now (4 weeks of use) I would have got through a builder's bag. The basket in the last picture is filled at 1700 and empty by 2100.
Attachments
Last edited: