
You are using an out of date browser. It may not display this or other websites correctly.
You should upgrade or use an alternative browser.
You should upgrade or use an alternative browser.
Upgrading to Hive
- Thread starter nay376
- Start date

Sponsored Links
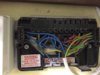
Unfortunately, The Potterton EP range of programmers is more difficult than most to convert. But it has been covered before in this forum, once or twice ") . Below is a recent example. If you use the forum search facility, you will find others.
. Below is a recent example. If you use the forum search facility, you will find others.
Potterton EP to Hive example
Please note though. You will need to be competent with electrical work and be able to understand what you are doing. With the Potterton EP some of the terminals don't have defined functions and would be selected for a purpose based on the preferences of the initial installer, meaning that your installation may well be slightly different from others on here. If in any doubt get a professional in to do it for you.
Once installed, you will be able to operate the Hive successfully by leaving the existing room thermostat in place and turning it up to its highest setting. However if you do wish to remove it, it needs to be decommissioned properly. It can't simply be disconnected, as this would leave the heating wiring 'open circuit' and the heating would not operate. To do this, it is necessary to trace the room thermostat cable back to its origin and note where each of the Red / Yellow / Blue wires go before disconnecting them. A wire link would then be inserted between the two terminals where the red and yellow wires previously originated from. The old thermostat and wire to it can then be completely removed.
. Below is a recent example. If you use the forum search facility, you will find others. Potterton EP to Hive example
Please note though. You will need to be competent with electrical work and be able to understand what you are doing. With the Potterton EP some of the terminals don't have defined functions and would be selected for a purpose based on the preferences of the initial installer, meaning that your installation may well be slightly different from others on here. If in any doubt get a professional in to do it for you.
Once installed, you will be able to operate the Hive successfully by leaving the existing room thermostat in place and turning it up to its highest setting. However if you do wish to remove it, it needs to be decommissioned properly. It can't simply be disconnected, as this would leave the heating wiring 'open circuit' and the heating would not operate. To do this, it is necessary to trace the room thermostat cable back to its origin and note where each of the Red / Yellow / Blue wires go before disconnecting them. A wire link would then be inserted between the two terminals where the red and yellow wires previously originated from. The old thermostat and wire to it can then be completely removed.
Hi Stem,
This information is great! I feel very confident. Just need to get my head around the circuits.
Where i struggle, Pins 1&2 are not connected in my EP. These are hw on/off according to the circuit diagram.
So how does my Hw turn on and off?
Thanks
This information is great! I feel very confident. Just need to get my head around the circuits.
Where i struggle, Pins 1&2 are not connected in my EP. These are hw on/off according to the circuit diagram.
So how does my Hw turn on and off?
Thanks
Note quite. Look carefully at the connections and you will see that pin 1 is 'hot water off and pin 2 is 'central heating off' many systems don't use these. Some systems do use pin 1, but pin 2 is very very rarely used.
If they are not used with your installation, only the 'on' pins will be required. Power the 'on' pin, and the heating or hot water come on as applicable, remove the power and they go off. A bit like plugging an appliance in to the mains when you want to use it, and unplugging it when it's not required.
If pins 1 & 2 are not used now and the system works OK, then you won't need to use them with the Hive.
Sponsored Links
Hi Stem,
Hope you're well.
Just want to clarify. Would you agree:-
Pin 3 = HW on
Pin 5 = CH on?
Thanks
Hope you're well.
Just want to clarify. Would you agree:-
Pin 3 = HW on
Pin 5 = CH on?
Thanks
You are half right.
Pin 3 is Hot Water on
But.
Pin 4 is Central Heating on
Pin 5 is for the common side of the heating switch and is unique to the EP Programmer. There isn't a pin 5 on the Hive because the connection is made internally. So you can forget about 5.
Pin 3 is Hot Water on
But.
Pin 4 is Central Heating on
Pin 5 is for the common side of the heating switch and is unique to the EP Programmer. There isn't a pin 5 on the Hive because the connection is made internally. So you can forget about 5.
Evening Stem,
I finally got round to giving this a try.
I kept all joins (pin B & D) the same
Neutral = Neutral hive
Live = Live hive
Pin 3 = HW on hive
Pin 4 = CH on hive
Pin 5 = remove bridge and isolate
The hive turns on and flashes amber as per expectation.
However, the CH doesn't come on when CH button is pressed to test.
I set the thermostat to max but nothing!
What could I have done wrong?
Many thanks
What you describe sounds reasonable, but just check to make sure that the two red wires that were in the EP '5' are still connected together, they should be connected, but they just don't connect to the Hive.
EDIT
The rest sounds about right, so just as a check:
The 3 blue wires that were in the EP row of terminals top left are still connected together including the wire linking them to the blue wire in the EP ‘N’ terminal both of which should now be in Hive ‘N’
As you say the yellow and brown wires in in ‘B’ are still connected together
Also, the two blue wires in ‘D’ are still connected together
All of the wires that were in EP ‘L’ now go to the Hive ‘L’
Red in EP 3 goes to Hive 3
Yellow in EP 4 goes to Hive 4
All earths together.
You do have the dual channel version of the Hive and not the single channel don't you.
Last edited:
Hi Stem,
Yes, definitely dual version as I have the two buttons.
I think I realised my error. I removed the link between pin 5 and live. However, instead of isolating the remaining wire, I should have connected this to live too!
I'll try this and let you know how I get on.
Thanks
Yes, definitely dual version as I have the two buttons.
I think I realised my error. I removed the link between pin 5 and live. However, instead of isolating the remaining wire, I should have connected this to live too!
I'll try this and let you know how I get on.
Thanks
I think I realised my error. I removed the link between pin 5 and live. However, instead of isolating the remaining wire, I should have connected this to live too!
Yep. That should sort it.
Hi Stem,
Just to let you know. Connecting that wire worked! Thank you.
Last question, what is the diferwnce between gravity fed/part pumped and fully pumped (default)
Beat Regards
Just to let you know. Connecting that wire worked! Thank you.
Last question, what is the diferwnce between gravity fed/part pumped and fully pumped (default)
Beat Regards
Fully pumped is where the pump circulates water around the radiators and also to the hot water cylinder. Normally a single 3-Port motorised valve, or two 2-Port motorised valves connected to thermostats provide control.

A part pumped / gravity system is where the pump circulates water only around the radiators, but not to the hot water cylinder. The water to the hot water cylinder circulates naturally around a separate pipe system by 'gravity' in that hot water rises, and cooler water falls. Usually there aren't any motorised valves and the room thermostat controls the pump, and there isn't any thermostatic control of the hot water.

A part pumped / gravity system is where the pump circulates water only around the radiators, but not to the hot water cylinder. The water to the hot water cylinder circulates naturally around a separate pipe system by 'gravity' in that hot water rises, and cooler water falls. Usually there aren't any motorised valves and the room thermostat controls the pump, and there isn't any thermostatic control of the hot water.
Great diagram. Mine must be fully pumped as i have two valves, on for CH and one for HW
That's good, then you have is what is generally known as an 'S-Plan'.
The part pumped / gravity systems tend to be very old (35 years plus) and although Hive can be set to work with these systems, not all of the functions available would be utilised.
The part pumped / gravity systems tend to be very old (35 years plus) and although Hive can be set to work with these systems, not all of the functions available would be utilised.
DIYnot Local
Staff member
If you need to find a tradesperson to get your job done, please try our local search below, or if you are doing it yourself you can find suppliers local to you.
Select the supplier or trade you require, enter your location to begin your search.
Please select a service and enter a location to continue...
Are you a trade or supplier? You can create your listing free at DIYnot Local
Sponsored Links
Similar threads
- Replies
- 2
- Views
- 449