Nest Thermostat, Danfoss TS2

Joined
6 Dec 2018
Messages
6
Reaction score
0
Location
Bristol
Country
United Kingdom
Hello Forum,

This is my first post, so please forgive me if mess anything up.

Im planning to Install a 3rd gen Nest heat link and Thermostat (directly replacing the sensor in the hall) in my new flat.

It currently has,

Suprima 40 HE
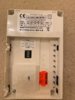
Danfoss TP9 Programmer
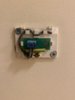
Danfoss TS2 Sensor

I've read up a little into what is going to be required, and have made the following assumptions (Im happy to be told I could be wrong, please do point that out).

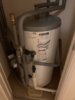
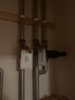
My boiler is a system boiler, not a combi, as I have a large tank in a hall cupboard.

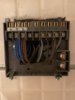
Now from all the reading I had done, I felt ready to take this project on. But now I have 2 questions, do I have Y plan or S plan? (what information can I provide to identify this) and also when I took the panel off the TS2 sensor, and found two 'floating' wires, which have confused me a little. All I was expecting to find were the 2 wires coming from terminals 5&6 of the TP9, so I wanted to ask the forum why this possibly be before I go ahead and start the install.
 

Attachments

  • IMG_0229.jpg
    IMG_0229.jpg
    63.4 KB · Views: 755
  • IMG_0230.jpg
    IMG_0230.jpg
    46 KB · Views: 764
  • IMG_0231.jpg
    IMG_0231.jpg
    49.2 KB · Views: 791
  • IMG_0232.jpg
    IMG_0232.jpg
    43.6 KB · Views: 686
  • IMG_0233.jpg
    IMG_0233.jpg
    26 KB · Views: 666
Sponsored Links
Hi Branagorn & Welcome to the forum. Good first post, you have included the necessary information.

You have an S-Plan with two x 2-port motorised valves. The absence of a wire in terminal (1) which Y-Plans have is the clue.

The good news too, is that because the sensor is actually part of the programmer and the switching bit is inside the programmer, it makes the replacement easier because there is not a remote thermostat to decommission.

Remove the sensor wires from 5 & 6 and remove them, they are no longer required. (standard 3 core and earth cable has been used, so there are two unused wires, quite common) You are then left with wires in: N, L, 3 & 4 they go to the Heat link as follows:

HL.jpg


N (Blue wires) they go to heat link N
L (Brown wires) they go to heat link L
3 (Grey wire) is hot water call for heat or 'on' and goes to Nest (6)
4 (Black wire) is heating call for heat or 'on' and goes to Nest (3)

Then links are required between (L) and the two Commons (2) & (5) so that the three terminals are electrically connected.

If you want to power the Nest thermostat from the Heat link instead of using a separate plug in power supply run a cable to connect it to T1 & T2. Don't forget the earth connection.

Where there are several wires in one terminal you will find it difficult to get all of them into on terminal at the Heat link, it's a fiddly beast to wire. So, I normally terminate them in screw terminals, tuck them away in the back box (I see there are some already in there) and then just run one wire to the appropriate Heat link terminal.
 
Thank you so much for your time put into this advice, and the clarity. It is much appreciated.

I am currently undecided as to whether I should fit the thermostat in place of the sensor, and utilise the existing wiring. Saving the job of cable routing to an alternative slot or purchasing a stand and also lending itself to habitual thermostat use (before now most places I have lived have had the thermostat located in the hallway).

Or Do I indeed purchase a stand/route some cable to the wall in the lounge. From what Ive read, the nest thermostat monitors movement and temperature where it is held, which makes me wonder just how important its location is, hall vs lounge.

But yes,

Thanks once again Stem!
 
Personally, I would put the thermostat where the current sensor is located, If done properly, it should have been installed originally in the best location. It will also minimise redecorating, and you won't have to fork out for the separate power supply. Originally they were included as standard, now they are an extra.

The important thing, is that no matter how good the thermostat is, it won't work effectively if it is in the wrong position. Here are some tips

The room thermostat will switch off all of the radiators in the house when the set temperature is reached in the room in which it is located. Therefore, it should be somewhere that doesn't warm up too quickly or retain heat, (for example an interior hall or passage) so that the radiators remain 'on' in all of the other rooms first to allow them to heat up before the main thermostat starts turning the whole system off. You may have to downsize the radiator in the room where it is located to achieve this. Understand this concept and you will be able to work out the best location for your home.

Whilst the thermostat should be in a room that has a radiator, it should not be subject to other heat sources such as cooking appliances, used fireplaces, or sunlight. Any extra heat that warms up the room where the thermostat is located, will switch off the thermostat, and all of the radiators in the rest of the property.

It should be located in free space so that it senses the true ambient temperature of the room in which it is located, not stuck in a corner, behind curtains / furniture, or somewhere draughty.

Do not fit a TRV to the radiator in the room where the thermostat is located. If you do, it could turn off the radiator before the temperature set on the room thermostat is reached. In this event, the room thermostat will never turn off, and so there is no point in having it. [Some will fit a TRV, and either remove the sensor head or leave it set on maximum, but at some point no doubt someone would turn it down, so personally I would not fit one in the first place]

Fit TRV's to all other radiators to prevent the other rooms overheating.
 
Sponsored Links
Thanks for the pointers here stem.

The system is installed, and working all nice. Im loving it!

I haven't get earthed the T1/T2 connections, as I haven't had to hand appropriate connectors. Its a bit of a snakes wedding behind the thermostat, and I can envisage it being quite difficult to tuck it all in (when I get around to earthing), ended up with quite a few terminal blocks (x3 lives and x3 neutrals hasn't helped)/

But yeah, v impressed with the functionality, happy chap here. Thanks again =)
 
Glad it's working, don't leave it too long before connecting the earth though. Whilst it doesn't appear that the Heat link itself requires an earth, the instructions do specify that an earth be connected "if using T1 & T2"which I guess, is probably why the earth terminal is located next to them.
 
Hey stem, I was hoping you could perhaps help me trouble shoot.

I’ve just gone back to my nest to add the earth cable. It was quite fiddly, so I disconnected everything. Sorted the earth, and reconnected everything back up, as per the previous configuration.

I now have an issue. The nest appears to be working, I have a steady green light, can use the thermostat, and app.

However, whilst the app shows the system should be ‘heating’, trying to reach a higher temperature. This clearly isn’t working, there is not response from the boiler to try and achieve this. I’m at a loss as to what I may have done wrong. What should I check for?
 
To follow up, I think I have identified the problem as per the boilers fault indicator tab.

3 lights off on the boiler means there is an incoming voltage issue. I assume this means I’ve dislodged something in the back box. Perhaps the boilers earth connection, which I temporarily removed to add the Nests. I’d feel more confident if it wasn’t so damn difficult to work behind there.
 
The boiler fault codes.
 

Attachments

  • C509C79A-374B-41BE-BA55-03CA2D89CF89.jpeg
    C509C79A-374B-41BE-BA55-03CA2D89CF89.jpeg
    176.4 KB · Views: 176

DIYnot Local

Staff member

If you need to find a tradesperson to get your job done, please try our local search below, or if you are doing it yourself you can find suppliers local to you.

Select the supplier or trade you require, enter your location to begin your search.


Are you a trade or supplier? You can create your listing free at DIYnot Local

 
Sponsored Links
Back
Top