Bathroom renovation number 2

Joined
2 Aug 2006
Messages
24
Reaction score
6
Location
Sheffield
Country
United Kingdom
Following on from my previous cottage bathroom renovation, my wife decided that the main home's bathroom should have a more contemporary look.

Another part of the reason was the state of the shower enclosure which had had a persistent leak over time, it was also took big for the fairly small bathroom.

This post will detail the job from start to finish, don't have photos of everything. I actually started the renovation a year ago but only really got round to it properly this summer. Then of course a family holiday delayed further work.

Starting off with the satisfying task of removing old fittings I cracked on with the shower.

20171101_183300.jpg
20171101_213014.jpg


With the concrete base broken up it became obvious that the leak had damaged the wall.

20171112_144655.jpg
20171112_144701.jpg

This bathroom was part of an extension - with the plans drawn up as such. So why was bog standard plasterboard used on the walls??? Not even the moisture resistant one at the very least!

You can see the damaged stud wall here. This was cut out and replacement studs fitted. Fortunately the floor joists were fine and not affected as the t&g chipboard had taken the brunt of the leak.
20180616_160828.jpg


The floor was taken up as we wanted to retile everything. The walls by the door and the window were sound so only 2 walls were taken back to the substrate.
20180813_203120.jpg

The ****e bog end was taken up and the unnecessary vent pipe blocked off.
20180814_200244.jpg


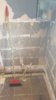
The room now an empty shell:
20180814_201421.jpg


Not too many pictures at this stage but 18mm WBP ply was used for the floor. Extra noggins fitted where there were any suspended overlaps. Pipes for the rad were re-routed and the two bare walls (where the corner shower will be) had Wedi board affixed.
20180830_215754.jpg
 

Attachments

  • 20180526_171613.jpg
    20180526_171613.jpg
    220 KB · Views: 288
Sponsored Links
I used dot and dab and plastic dowels on the solid wall and screws and Wedi washers on the stud wall. Wedi 610 was used on abutting ends.

20180830_215809.jpg


The floor was covered in Ditra matting and Kerdi band. Maybe a bit of overkill and it's only a bathroom - not a wet room. Anyway, we decided on a wall hung bog unit.
The unit had to be fitted slightly off-centre as the soil pipe got in the way. The idiots who built the extension also had the soil pipe facing the wrong way. The unit was simple to install although some of the instructions are akin to decoding hieroglyphs!

20180919_193146.jpg


A frame was built:
20180919_213437.jpg


And then 20mm QBoard - similar to wedi was installed.
20180920_202259.jpg


A big jump in effort and time and I got to this stage, the dark tiles are textured and as I found out later a nightmare to grout!
20181001_181135.jpg


With it being a fairly small room and with using large tiles there were only a few that didn't need any cutting of some sort.
20181002_203814.jpg


20181006_140950.jpg


Once the walls were done I started the floor
20181007_135902.jpg


Which progressed quite rapidly:
20181007_144947.jpg


until the floor was finished.
20181008_190015.jpg
 
The window was done with my system for holding the tiles in place

20181008_190036.jpg

20181008_190044.jpg


Grouting the lighter tiles was easy enough. The dark grey ones were difficult with them being textured.
20181010_115917.jpg

20181015_213611.jpg


Radiator anchoring points were fitted into studwork. I'd already measured where the anchoring points would be prior to installing the Wedi and fitted extra noggins to support the rad.
20181029_170003.jpg


and rad installed.
20181029_210611.jpg
 
Last edited:
I used a cement residue remover to clean the tiles, the dark tiles needing several applications to remove excess grout which wasn't always easy to spot.
The pipe cover for the shower waste was made with QBoard and then tiles over.
20181101_210714.jpg


Installing a B&Q shower rail was problematic. Not with drilling the holes - by this point I was getting very good with the diamond drill bit, starting at a 45 deg angle and slowly working my way to 90 degrees. The instructions said to drill holes 567mm apart. I managed 565 mm but in the picture immediately below it's obvious that the centres are 572/3 mm apart. With barely any adjustability the rail didn't fit. B&Q gave me a £10 voucher and I did manage to get the rail installed by drilling part of the plastic housing. Poor instructions!
20181102_184554.jpg

20181102_184703.jpg


The electric shower was duly fitted
20181103_101304.jpg


This is the final result after fitting the enclosure, wall hung units, sink unit and wall hung toilet.
20181106_200113.jpg

20181106_200123.jpg

20181106_200129.jpg


Wife very happy - so happy wife = happy life :)
 
Sponsored Links
Thanks, I did have a couple of little hiccups along the way. The textured tiles although swish - are a nightmare to work with. The ends are interlocking as so will always need cutting at the edge of a wall. Grouting is a pain as the grout can't be smoothed off with a rubber float. In the end I had to enlist my daughter to help with a sponge to remove excess grout before it dried. We chose anthracite grout which of course makes it hard to see bits we missed! I'm quite good applying silicone and using those rubber profiling tools but it's very difficult with those tiles to try and get a neat edge. I had to spend a while going over it and tidying it up.

I had a problem with the toilet pan leaking, at first I thought it was the flush cone as it only leaked when flushing. Water from a bucket didn't result in a leak. The flush cone was a good rubber one though so couldn't understand where the trickle of water was coming from. Then I found it - a manufacturing fault in the actual pan about an inch downstream of where the flushcone sits in the pan. There had obviously been a hole which appeared to have been patched up poorly. I applied a liberal smear of wedi 610 on both sides of the hole and that cured the leak.

The radiator was fun to install as all 4 brackets have to be perfectly aligned otherwise the radiator won't fit - again not so easy on the textured wall, but I got there in the end. :)

The only other major issue we had was the poor drainage from the shower. It would bubble and stink the room. Often the water would pool in the shower and rise a couple of inches, eventually draining away after about 5 minutes.

The drain goes through the wall by the window and into a void above the utility room. The roof is pitched and there's an access hatch. Turned out the idiots had put in a waste pipe - unsupported - which had sagged causing the blockage. Also where it joined the soil pipe was too high to allow proper drainage. I blocked off the waste pipe at both ends and ran new pipe from the bathroom through the void and out through a lower point in the wall to the outside soil stack. The drop is at a much better angle and the flow rate greatly improved.
 
Last edited:
I like the look of those textured tiles, how are you finding them in terms of cleaning in the shower area?
 

DIYnot Local

Staff member

If you need to find a tradesperson to get your job done, please try our local search below, or if you are doing it yourself you can find suppliers local to you.

Select the supplier or trade you require, enter your location to begin your search.


Are you a trade or supplier? You can create your listing free at DIYnot Local

 
Sponsored Links
Back
Top