How to repair this hinge?

Joined
5 Feb 2014
Messages
62
Reaction score
0
Country
United Kingdom
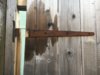
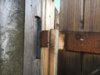
Storm Gareth has taken down my big garden gate.
7230F2C1-06D4-4B83-9B79-7FA0B8D4C8A3.jpeg
8BD8394C-15ED-4324-AC45-D0DD4AC545C8.jpeg

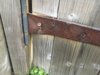
The ironmongery was rusted.
How do I remove and replace this hinge part, which seems to be integrated?
That's not a grafted-on piece of wood, it's a split; the section is cut out for the hinge.
Thanks.
 
Sponsored Links
I’d still wager that those hinge screws are hidden by a planted on lath.....any sign of a join looking from above?
John :)
 
The piece of wood with the C-shape cut-out for the hinge is almost definitely fixed over the top of the hinge screws. Insert a flat chisel or similar between that piece of wood and the next (thinner) piece and pry it off.

Also, the reason the hinge has broken is probably because it hits the middle of the C-shape before the gate is fully open. You can see the mark/fresh wood where it hits. If you're going to re-install the facing then chisel out a wedge section to allow the hinge to fully open without hitting anything.

Edit... John beat me to it :)
 
Sponsored Links
When you fit the new hinges, chop that C shaped wood back a bit/chamfer the edge top to bottom. It looks like the wind opened the gate too far and that wood rived the hinges off. Also they may have been weakened at the point where they snapped, by the hinge going stiff and causing the metal to be bent back and forth when the gate was used - recommend to oil the hinges once a month if they're constantly exposed to the elements
 
Ok, more pics since you're interested :)

No piece grafted on to the piece with the visible C cut-out... but, on review, looks like the whole of that front upright might be drafted on to one behind.

The gate has been open to 90 degrees lots of times previously. Ironmongery was degrading. Gate was not shut overnight, due to wood warping making bolt closure impossible. The storm blew it open and ripped the weak hinges.
 

Attachments

  • IMG-4908.JPG
    IMG-4908.JPG
    345.5 KB · Views: 213
  • IMG-4909.JPG
    IMG-4909.JPG
    372.1 KB · Views: 191
  • IMG-4911.JPG
    IMG-4911.JPG
    310.2 KB · Views: 179
In pic 2 you can see 2 nail holes. These fix the 'facing' on, and it needs pryed off to access the screws.
 

DIYnot Local

Staff member

If you need to find a tradesperson to get your job done, please try our local search below, or if you are doing it yourself you can find suppliers local to you.

Select the supplier or trade you require, enter your location to begin your search.


Are you a trade or supplier? You can create your listing free at DIYnot Local

 
Back
Top