Balcony Oak Beams Rot?

Joined
11 Nov 2014
Messages
15
Reaction score
0
Country
United Kingdom
Hi All

No idea if this is the correct forum for this but here goes.

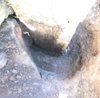
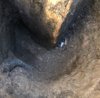
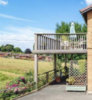
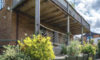
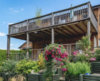
I have a balcony on my house which is supported by 4 8x8(ish) oak beams. These are buried in to the ground. However I can see that they are rotting where they meet the soil. I have also started to dig down and can see this is the same below. As would be expected. See pictures. Ideas to resolve?

Pull down and start again? Dig down to concrete footings and attach steel sleeves up three sides? Any other suggestions?
 

Attachments

  • 68F9E9C1-F10C-4E7A-8C55-F7ACC170D3EB.jpeg
    68F9E9C1-F10C-4E7A-8C55-F7ACC170D3EB.jpeg
    364 KB · Views: 284
  • 2B01CF73-C7A9-4D6A-9EC8-1940EE076B90.jpeg
    2B01CF73-C7A9-4D6A-9EC8-1940EE076B90.jpeg
    340.6 KB · Views: 290
Sponsored Links
four posts suggest a deck not a balcony - can you post a pic showing the whole thing?
can you tell if the "balcony" is cantilevered out or pinned to a ledger?
probe the signs of rot to see if its surface damage or deep rot.
 
Deck/Balcony I’m not sure. It is approx 5 meters high off the ground and measures 5.5 meters x 9.5 meters.

So far I’ve dug holes out down around one of the beams to the concrete they seem to be set in. So far it looks like surface rot. I’m hoping the others are the same.

The plan I think is to get some steel L shaped brackets made and to secure these to the concrete and also to the beam around 1.5-2 meters up. This will be done one 3 sides of each beam. I can’t get to the back side of each beam so can’t do all 4. Or does this sound a bad idea?
 
Posts quite often rot at ground level first.
Is it just surface rot, can you easily push a nail into it? My guess is it may only be the top few mm.

How long have they been in the ground?

Your brackets may help, but one side will still be exposed.
If you have this bracket applied, you need to ensure water cannot get behind it, as all you’ll be doing is trapping water behind it.

I’ve just installed some 6” wooden posts, and have painted a 12” band of black jack bitumen paint around ground level, 3 coats.

I may even concoct some kind of drip strip just above ground level to stop any water sneaking between concrete footing and post.
 
Sponsored Links
See photos below, not taken today obviously as it’s p*ssing down here for a change!!

Hopefully from the photos you can see what I mean. The 4 vertical posts are set in the ground and just have earth/soil around them up to around 18inches high. This is obviously where they are rotting as they are in the ground.

Should I remove all earth that’s touching them and make some sort of barrier around them that stops anything from touching them I.e. water/soil? Together with the brackets? Should I get a structural engineer in to have a look?
 

Attachments

  • C0C47D08-4E40-4F7B-B1A6-D304B4F8C0EB.jpeg
    C0C47D08-4E40-4F7B-B1A6-D304B4F8C0EB.jpeg
    114.2 KB · Views: 251
  • 9CF8E7A3-0685-4BD9-93F3-198A1BCD31C8.jpeg
    9CF8E7A3-0685-4BD9-93F3-198A1BCD31C8.jpeg
    173.7 KB · Views: 262
  • 5FECC9E2-48AF-4362-8353-4E11C6DC5AFB.jpeg
    5FECC9E2-48AF-4362-8353-4E11C6DC5AFB.jpeg
    173.7 KB · Views: 251
Hard to make out how 'good' the deck has been built.

But you've uncovered some rot, but we don't know how bad it is, could just be on the surface. Does the structure feel safe when you walk on it?

Looks like the posts have just been plonked in the ground, they should be concreted in (perhaps they are lower down?)
As a rough rule of thumb for posts (fence/gate), a third of the (out-the-ground) height should be in the ground.
At a guess your posts are 3m out of the ground, therefore a at least a metre, (in your case, probably more) should be in the ground, concreted in.

L shaped brackets into concrete pad, see where you are coming from, but only on three sides, and you'll need to dig a fair bit down.
Holes are better smaller but deeper.
Also you'll be fixing into wood with rot.

Think if it feels a bit 'so-so' I'd start again.
 
An alternative is to create pad foundations and stand the posts on a piece of 4 mm thick sheet lead. The post is not fixed to the pad in any way other than by the weight of the summer house. Two coats of Sadolin Classic protects the sides of the post and the lead presses into the end grain to seal it from moisture ingress. The lead should be trimmed to the same size as the post to prevent water pooling on the tip of the lead.

Any movement of the post caused by shrinkage of the timber frame is allowed for by the the post not being rigidly fixed to the foundation.

This is one we did in 1980, the ends of the posts are still in perfect condition. ( lead was trimmed after the photo was taken )


post-and-lead-jpg.147883


Read more: https://www.diynot.com/diy/threads/wooden-posts-as-stilts.508469/#ixzz5qWRf6vl3
 
I’ve dug down around one post so far and got to the concrete that it’s set in. There is signs of rot on this post but seems to be only on the surface. I’ve poled and prodded and seems quite solid.

The decking itself feels safe and sturdy when up on it. The decking boards themselves need replacing hence would rather know whether to replace as is or will it all need to come down due to rotting posts hence wasted time, effort and money.

The plan was to attach the steel much higher up in to the beam that is sound and has no rot.
 
the rot might just be a minor issue, however, i cant see the attachment and construction details but on the face of it, and with the sloping ground to the front, you'd be best advised to have a RICS Surveyor give your deck the once over.
 
An alternative is to create pad foundations and stand the posts on a piece of 4 mm thick sheet lead...

I thank you BernardGreen for sharing that post on that thread and I can only recommend that solution to your problem @Genista. In the end I didn't build the summerhouse -- I decided to go for decking with a gazebo over the top. I was lucky enough to buy a sheet of lead from a neighbour taking it from their front door shelter to build a porch.
 

DIYnot Local

Staff member

If you need to find a tradesperson to get your job done, please try our local search below, or if you are doing it yourself you can find suppliers local to you.

Select the supplier or trade you require, enter your location to begin your search.


Are you a trade or supplier? You can create your listing free at DIYnot Local

 
Sponsored Links
Back
Top