
I always thought you were meant to have at least some kind of “channel” if you’re patioing up close to the dpc. But yeah I guess you’re right. The 150mm thing still gets specced all the time by BC for cavity walls so I guess they still enforce it?

You are using an out of date browser. It may not display this or other websites correctly.
You should upgrade or use an alternative browser.
You should upgrade or use an alternative browser.
Level Threshold patio
- Thread starter jimmbo
- Start date
Sponsored Links
L
Leofric
In and case, "150mm below DPC" is an anachronism to the time of solid walls. And it has no affect on cavity walls due to what is known as .... a cavity.
 The Magic 8 Ball might say so but I don't think so , the cavity is to prevent moisture passing from the outer to inner leaf , the horizontal dpc is to stop damp rising up from the ground , as recommended by building control , NHBC and every architect as far as I know.
L
Leofric
Wherever you’re not meeting your 75/150/whatever ground level below dpc rule
There is no '75 whatever', it is 150mm.So if damp gets above the DPC on the outer leaf where does it go, and how does it affect the inner leaf?
Compare with damp running down the outer leaf and settling on top of the DPC on the outer leaf. What happens to that?
Magic 8 ball says "Without a doubt"
Sponsored Links
I know the BR figure is 150mm, we all know that, the conversion has progressed beyond that though, so quoting and correcting that part of my response doesn’t really help.
L
Leofric
Brickwork above dpc can get damp when it rains and dry out in drier conditions because it isn't in permanent contact with the ground. The horizontal dpc is a barrier to prevent rising damp going up any further . No offence to Magic 8 ball but I have never met a single architect, building surveyor, BCO, NHBC surveyor/inspector, construction manager, SE, builder or bricklayer who doubted the use of horizontal dpc's in walls , and I have dealt with quite a few of those sort of people, so I think I will stick with my theory on dpc's.So if damp gets above the DPC on the outer leaf where does it go, and how does it affect the inner leaf?
Compare with damp running down the outer leaf and settling on top of the DPC on the outer leaf. What happens to that?
Magic 8 ball says "Without a doubt"
B0llox. Just leave a small gap, full with 20mm gravel and build up the patio sloping away from the house. Make sure the gravel is clear of soil and crap each year.
Caveats: monitor your adjoining walls for damp. Expect some comeback from surveys when you look to sell.
Solution: dig it back out.
Caveats: monitor your adjoining walls for damp. Expect some comeback from surveys when you look to sell.
Solution: dig it back out.
L
Leofric
What does the b o l l o c k s refer toB0llox.
That refers to “just go for it but be prepared for either no problems or a world of pain”
I’ve been posting prolifically this evening because I’ve had a skin full. Beware.
I’ve been posting prolifically this evening because I’ve had a skin full. Beware.
L
Leofric
I’ve been posting prolifically this evening because I’ve had a skin full.
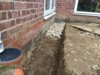
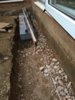
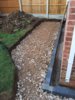
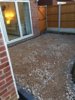
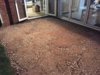
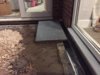
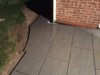
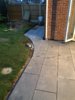
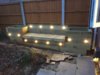
Here’s a load of photos of my project so far, if anyone’s interested!
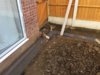
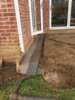
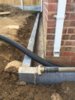
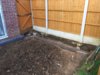
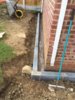
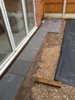
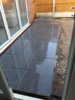
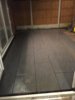
I dug out a channel between the house/garage and planned patio area and built a small restraining wall with breeze blocks to support the slabs.
The channel is graded towards the surface water drain down the side of the house. I mixed some concrete and sloped the base of the channel away from the house.
I then bedded a perforated land drain pipe in the bottom of the channel and connected it the the surface water drain pipe.
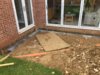
I proceeded to dig out for the patio so finished level would end up level with the DPC and creating a slope away from the house & garage.
Then I filled with hardcore and compacted to level with my dwarf wall (obviously still making sure my falls were correct) and started laying my 900x450 porcelain slabs, overhanging the breeze blocks but still leaving a gap to the brick walls.
I dug out a channel between the house/garage and planned patio area and built a small restraining wall with breeze blocks to support the slabs.
The channel is graded towards the surface water drain down the side of the house. I mixed some concrete and sloped the base of the channel away from the house.
I then bedded a perforated land drain pipe in the bottom of the channel and connected it the the surface water drain pipe.
I proceeded to dig out for the patio so finished level would end up level with the DPC and creating a slope away from the house & garage.
Then I filled with hardcore and compacted to level with my dwarf wall (obviously still making sure my falls were correct) and started laying my 900x450 porcelain slabs, overhanging the breeze blocks but still leaving a gap to the brick walls.
Attachments
-
 E4448FFC-CDE5-42A5-BD27-331B9794940B.jpeg499.8 KB · Views: 288
 -
 EFA3D835-8956-474B-A101-89F3DC0F79E8.jpeg549.9 KB · Views: 282
 -
 162D551F-8276-4761-BC13-86699D0F13B4.jpeg440.6 KB · Views: 265
 -
 58117CF4-E360-4247-9B00-AFA5246AE213.jpeg480.7 KB · Views: 265
 -
 FFCD32D7-C225-4B65-A02F-C65AE4F14453.jpeg374.1 KB · Views: 259
 -
 D8742D42-46D4-4D90-BF37-62EBCA59F5A1.jpeg486.7 KB · Views: 250
 -
 600FD42C-738D-4DAB-9978-62C5FF37F590.jpeg448.8 KB · Views: 258
 -
 B040FB24-DE11-4B87-8752-9D3D03A46D54.jpeg408.1 KB · Views: 251
 -
 39CABE0B-7F0C-4174-9FE6-2D5CFC2241BD.jpeg480.6 KB · Views: 273
 -
 93A06642-4BCD-40F6-86C6-2EF4BD7A6A43.jpeg422.5 KB · Views: 273
Last edited:
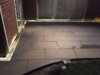
I wrapped the the perf pipe in geo textile fabric with washed gravel and backfilled more gravel. I also fitted some DPM between the house/garage wall and the gravel.
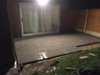
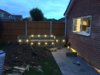
Obviously it is not finished yet, but it’ll have to now go on hold till next year.
Thanks for all your help and advice.
I don’t know if the drain is an overkill or not, but after all the rain we’ve had in the last few weeks there’s no standing water anywhere.
Obviously it is not finished yet, but it’ll have to now go on hold till next year.
Thanks for all your help and advice.
I don’t know if the drain is an overkill or not, but after all the rain we’ve had in the last few weeks there’s no standing water anywhere.
Attachments
-
 C8E69853-2840-4B0D-9FF3-7A1D2CE479BC.jpeg494.3 KB · Views: 253
 -
 38264A28-AC48-45EE-A8EF-ED8B0C472C53.jpeg464.8 KB · Views: 231
 -
 09290912-DC38-4FE4-B3E3-4627102B5387.jpeg504.3 KB · Views: 244
 -
 1CC4F8AB-F3C6-4918-BEC4-4A2754601055.jpeg315.6 KB · Views: 231
 -
 391618F6-D4D4-4670-95B8-3B2803169D00.jpeg378.5 KB · Views: 247
 -
 1CDC15F8-31C0-4D6B-B51B-4533E0D2DF62.jpeg322.2 KB · Views: 269
 -
 010BE2C5-8F85-466A-A0D2-7FE4EF92EF4F.jpeg224.4 KB · Views: 230
 -
 CB097CC7-9555-4581-83D8-6AE34A6826CB.jpeg276.7 KB · Views: 235
 -
 4A46B213-336D-471F-947A-E5B2509F8194.jpeg304.2 KB · Views: 227
 -
 961821B8-7B2C-4477-B0DC-779EB8F2FC64.jpeg336.8 KB · Views: 248
DIYnot Local
Staff member
If you need to find a tradesperson to get your job done, please try our local search below, or if you are doing it yourself you can find suppliers local to you.
Select the supplier or trade you require, enter your location to begin your search.
Please select a service and enter a location to continue...
Are you a trade or supplier? You can create your listing free at DIYnot Local
Sponsored Links
Similar threads
- Replies
- 0
- Views
- 8K
- Replies
- 4
- Views
- 4K
- Replies
- 10
- Views
- 37K