
You are using an out of date browser. It may not display this or other websites correctly.
You should upgrade or use an alternative browser.
You should upgrade or use an alternative browser.
DIY Two Storey Extension
- Thread starter acurachris
- Start date
-
- Tags
- garage house extension lean-to
Sponsored Links
Any updates to this?
I'm hoping to post something more shortly, just been frantically trying to finish the roof so I can get rid of the scaffold (costing me money I haven't got!). Roof on now and scaffold coming down as I type so will get some pics up in next couple of days.
An excellent read and thanks for taking the time to post it. The quality of your work is fabulous
Sponsored Links
Nice to see someone not skimping and building a proper internal wall instead of studwall.
- Joined
- 15 Nov 2019
- Messages
- 4
- Reaction score
- 0
- Country

Excellent project and good to see it documented.
I am a little confused with the DPC. it looks as if it is angled towards the inner leaf?
I am a little confused with the DPC. it looks as if it is angled towards the inner leaf?
I am a little confused with the DPC. it looks as if it is angled towards the inner leaf?
It's a gas DPC which spans the two walls and cavity then will be taped to the gas membrane. I guess that's what you mean, not sure which picture you mean.
Okay, so i'm back to update on the build.... phew what a few months, with the poor weather, work and kinda running out of money ") .... it's been tough! I'm still not fully finished yet ... nearly!
.... it's been tough! I'm still not fully finished yet ... nearly!
As per the last post, the first floor is installed and covered although the rain has been pooling on the floor so i needed to drain the water. I left a gap between the two first floor rooms and installed a temporary drain to take the water away. This collects the water below and drains to the gutter.


It's becoming more difficult to brick lay with the height, looking back now, i should of put the scaffold in earlier.


.... it's been tough! I'm still not fully finished yet ... nearly! As per the last post, the first floor is installed and covered although the rain has been pooling on the floor so i needed to drain the water. I left a gap between the two first floor rooms and installed a temporary drain to take the water away. This collects the water below and drains to the gutter.
It's becoming more difficult to brick lay with the height, looking back now, i should of put the scaffold in earlier.
Attachments
Scaffold Goes Up
So the scaffold went up... finally! I had four scaffold companies come around although all but one were hesitant as I knew i needed the scaffold for at least three months (i'm not the fastest!). The guy agreed a set price of £1000 for 12 weeks and then 10% per week thereafter which is reasonable from what i can gather.

It's amazing how much easier it was having the scaffold, so the pace was able to pickup again.


So the scaffold went up... finally! I had four scaffold companies come around although all but one were hesitant as I knew i needed the scaffold for at least three months (i'm not the fastest!
). The guy agreed a set price of £1000 for 12 weeks and then 10% per week thereafter which is reasonable from what i can gather.It's amazing how much easier it was having the scaffold, so the pace was able to pickup again.
Bricks, Blocks, More Bricks, More Blocks
This is the stage where everything plods along I suppose, just brick laying and block laying! Throughout the build I've alternated between doing block rows first and doing brick rows first, although towards the end of the build I was building the inner block work first as this is the logical and accepted way to build a cavity wall with partial fill insulation.

In an attempt to stop the new chipboard being soaked by the appalling weather, I attempted to seal the plastic sheets to the wall, hence the black and white mess at the perimeter (it didn't work, the rain got into everything, so after about £90 of plastic sheeting, protective sheets, sealants etc, I gave up and decided to just let the floor get wet!).
As mentioned, I left a drain hole between the two rooms so i could brush the water down the gap!


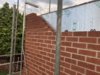
Brickwork starting to get some height to it now.... profiles have been worth every penny!

Some of the brickwork has smudges, I'll clean this further down the line!

One of the hardest parts about bricklaying at this height is hand balling all the bricks, blocks and mortar up the scaffold. I setup my trestles as a half way point. I load everything to the trestles, then up to the scaffold.

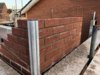
You might be thinking... what on earth with that blockwork (below)! Basically, as I was following the brickwork of the existing house on the outer leaf the coursing height wasn't a strict 75mm and so the blocks didn't line up to the three brick courses and the bed joint was becoming too large; I cut the block in half to insert a second bed of 15mm instead of one bed of 30mm.
When I measured the height of the brick/block of the first floor it didn't calculate into the correct blocks per rows of bricks remaining as the brick joints on the existing house ranged from 8mm - 15mm (more of them at 15mm). This caused a bit of an headache because if i had continued the blocks with a 10mm bed joint, the wall ties wouldn't work and the blocks would end up being out by a full brick. Anyway, that's why the blockwork bed joints are bigger than normal; to meet the brick coursing.

Up to the first floor window height now....

This is the stage where everything plods along I suppose, just brick laying and block laying! Throughout the build I've alternated between doing block rows first and doing brick rows first, although towards the end of the build I was building the inner block work first as this is the logical and accepted way to build a cavity wall with partial fill insulation.
In an attempt to stop the new chipboard being soaked by the appalling weather, I attempted to seal the plastic sheets to the wall, hence the black and white mess at the perimeter (it didn't work, the rain got into everything, so after about £90 of plastic sheeting, protective sheets, sealants etc, I gave up and decided to just let the floor get wet!).
As mentioned, I left a drain hole between the two rooms so i could brush the water down the gap!
Brickwork starting to get some height to it now.... profiles have been worth every penny!
Some of the brickwork has smudges, I'll clean this further down the line!
One of the hardest parts about bricklaying at this height is hand balling all the bricks, blocks and mortar up the scaffold. I setup my trestles as a half way point. I load everything to the trestles, then up to the scaffold.
You might be thinking... what on earth with that blockwork (below)!
Basically, as I was following the brickwork of the existing house on the outer leaf the coursing height wasn't a strict 75mm and so the blocks didn't line up to the three brick courses and the bed joint was becoming too large; I cut the block in half to insert a second bed of 15mm instead of one bed of 30mm.When I measured the height of the brick/block of the first floor it didn't calculate into the correct blocks per rows of bricks remaining as the brick joints on the existing house ranged from 8mm - 15mm (more of them at 15mm). This caused a bit of an headache because if i had continued the blocks with a 10mm bed joint, the wall ties wouldn't work and the blocks would end up being out by a full brick
. Anyway, that's why the blockwork bed joints are bigger than normal; to meet the brick coursing. Up to the first floor window height now....
Attachments
Last edited:
Awkward Corner
The internal corner was awkward as the profile didn't really work there despite having the bracket to use the profile in the internal corner. I built the internal brick corners with just a level and tape measure... the old fashioned way!


It's raining... again!


The internal corner was awkward as the profile didn't really work there despite having the bracket to use the profile in the internal corner. I built the internal brick corners with just a level and tape measure... the old fashioned way
! It's raining... again!
Attachments
We Have Walls!
So the walls are nearly there! Not much to say on this post.... they're walls! Boring grey walls!


So the walls are nearly there! Not much to say on this post.... they're walls!
Boring grey walls!Thinking About The Roof
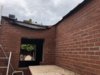
I will need to join the back of the existing roof to the new roof, so i started to strip some of the existing side away. Looks nice hey?

Final toothing knock outs done... what a relief, I hated doing that!


Messed up the bonding on the this corner... ssshhh... no one will ever notice!


I will need to join the back of the existing roof to the new roof, so i started to strip some of the existing side away. Looks nice hey?
Final toothing knock outs done... what a relief, I hated doing that!
Messed up the bonding on the this corner... ssshhh... no one will ever notice!
Attachments
Scaffold In The Heavens
Whoa! I don't like heights to be honest so when the scaffold went up to the top lift, It was scary! Walking around up there took some getting used to and i'll be honest I was really nervous the first time I went up!
The scaffold guy didn't even leave me a platform half way up expecting I guess for me to carry everything up the ladder, he was good though and brought me some boards around to create a half way platform. I mean, how do you hold a pile of bricks whilst climbing the scariest ladder and clutching on for dear life!


It's like a proper room now! So to get the bricks, blocks and mortar to the top I have to load my trestles, then from there to the half way scaffold boards, up to the window ledge of the first floor window and either into the room (below) or up to the top boards of the scaffold. It's hard work at this point, very physically demanding having to manually lift all the bricks, blocks and mortar, not to mention moving the tools up and down every day.
On the plus side, I have lost nearly two stone and have never been fitter!

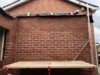
Brick work nearly to wall plate level!


Whoa! I don't like heights to be honest so when the scaffold went up to the top lift, It was scary
! Walking around up there took some getting used to and i'll be honest I was really nervous the first time I went up!The scaffold guy didn't even leave me a platform half way up expecting I guess for me to carry everything up the ladder, he was good though and brought me some boards around to create a half way platform. I mean, how do you hold a pile of bricks whilst climbing the scariest ladder and clutching on for dear life!
It's like a proper room now! So to get the bricks, blocks and mortar to the top I have to load my trestles, then from there to the half way scaffold boards, up to the window ledge of the first floor window and either into the room (below) or up to the top boards of the scaffold. It's hard work at this point, very physically demanding having to manually lift all the bricks, blocks and mortar, not to mention moving the tools up and down every day.
On the plus side, I have lost nearly two stone and have never been fitter!
Brick work nearly to wall plate level!
Attachments

I'm Up High!
So, I didn't do well with heights at all, but after spending several days on the top of the scaffold, I'm used to it, it's a doddle to climb the ladder and i don't even think about the height so much now. It's good actually, you can see loads up here, spoke to two neighbours i've never met before. Noise travels too and there's a naughty dog called Harvey that gets shouted at a lot.

Spoke to my neighbour, he wants to take the trees out, I like the privacy it gives to be honest, but the wife wants them gone too, so.....


Wasp nest in the gable ladder of the existing roof! Old one, no wasps!

I'll have to cut this gable end away to make way for the new trusses.


So, I didn't do well with heights at all, but after spending several days on the top of the scaffold, I'm used to it, it's a doddle to climb the ladder and i don't even think about the height so much now. It's good actually, you can see loads up here, spoke to two neighbours i've never met before. Noise travels too and there's a naughty dog called Harvey that gets shouted at a lot
. Spoke to my neighbour, he wants to take the trees out, I like the privacy it gives to be honest, but the wife wants them gone too, so.....
Wasp nest in the gable ladder of the existing roof! Old one, no wasps!
I'll have to cut this gable end away to make way for the new trusses.
Attachments

DIYnot Local
Staff member
If you need to find a tradesperson to get your job done, please try our local search below, or if you are doing it yourself you can find suppliers local to you.
Select the supplier or trade you require, enter your location to begin your search.
Please select a service and enter a location to continue...
Are you a trade or supplier? You can create your listing free at DIYnot Local
Sponsored Links
Similar threads
- Replies
- 1
- Views
- 1K