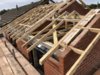
DIY Two Storey Extension

Roof Arrived

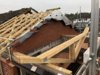
Roof trusses arrived! I laid them out on the grass. Anyone want a kids slide (red and blue near shed).... my kids are 12, 14 & 16 now :LOL:

thumb_IMG_8356_1024.jpg


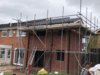
You can see the window lintel going in here for the first floor. I decided to use eaves lintels as there is no brickwork on the outer leaf, only blocks on the inner. I had to lift the lintels to the top of the scaffold on my own too.

thumb_IMG_8360_1024.jpg


All first floor window lintels installed and blocked over.

thumb_IMG_8364_1024.jpg


thumb_IMG_8370_1024.jpg


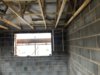
Concrete lintel between the bedroom and ensuite.

thumb_IMG_8371_1024.jpg


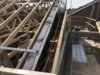
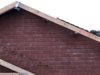
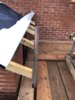
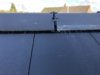
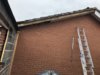
Starting to strip the roof back, this is scary as it's the existing house and the last thing I want to do is break the roof over my head! A lot of the existing roof battens were rotten at the ends where the gable ladder was but these will be cut back anyway.

thumb_IMG_8401_1024.jpg


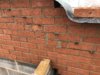
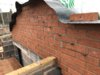
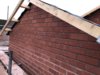
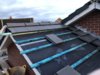
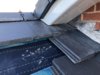
The gable ladder and tiles were stripped back. I cut the gable ladder with a hand saw. This was fairly straightforward to do.

thumb_IMG_8404_1024.jpg
 

Attachments

  • thumb_IMG_8374_1024.jpg
    thumb_IMG_8374_1024.jpg
    315.1 KB · Views: 255
Last edited:
Sponsored Links
Roof Truss Installation

I lifted these roof trusses myself from the floor to the roof using two ropes. I tied two ropes around the top of the scaffold and dangled them to the floor. I then tied one truss at a time to the ropes and lifted each side of the truss, resting it on a scaffold pole whilst I brought the other side to level. Once the truss was with reach, I grabbed hold and lifted it up. I lay the truss on the top of the walls and walked back and forth moving the truss a little until it was in place. Of course it would've been far easier to have someone help me at this stage! o_O

thumb_IMG_8422_1024.jpg


thumb_IMG_8424_1024.jpg


thumb_IMG_8435_1024.jpg


With the trusses for the larger extension in place I could construct the gable end. I set up trestles in the small extension for access to the gable end. I used Celcon Solar blocks for the whole extension until I came to the gable end; couldn't get hold of them anywhere, so switched to Tarmac Standard blocks for the last 25 or so blocks.

thumb_IMG_8461_1024.jpg


Block gable end done! I left grooves for the gable ladder to go into. The little trusses have been brought up now too, lay upside down.

thumb_IMG_8467_1024.jpg


Started the brickwork on the large gable end. The wall plates as pictured below were 100mm x 50mm treated timbers laid on a mortar bed and levelled. I tied the wall plates down using the straps pictured.

thumb_IMG_8468_1024.jpg


The messy brickwork below was a disaster day! It was a really scorching day and it was a difficult day.... brick acid that at some point!

thumb_IMG_8469_1024.jpg


thumb_IMG_8473_1024.jpg
 
Little Trusses

Putting the little trusses in now!

thumb_IMG_8478_1024.jpg


I installed the straps to the large trusses too. Ideally these would've been placed under the trusses although the diagonal bracing was in the way so I measured where the roof battens were going and placed the straps in between those.

thumb_IMG_8483_1024.jpg


You can see my contraption for setting out a line for the gable end here. I screwed some wood to the top of the trusses and ran a line down.

thumb_IMG_8484_1024.jpg


Whoa! What you doing! That looks pretty :LOL:. I'm installing cavity trays here although what a nightmare with all the odd cuts. I really wasn't looking forward to this part, worrying about the position of the trays in relation to the trusses. I setup the line above the trusses by 75-85mm (i think it was) and that is where the end of each tray would start.

thumb_IMG_8485_1024.jpg


The cavity trays are installed and bricks mortared. I made a couple of mistakes on the lower bricks (the ones with the gigantic perp joints :ROFLMAO:) but the others were okay. You won't see these joints after anyway.

thumb_IMG_8490_1024.jpg


The large gable end is nearly built, this is taking longer than I thought and i'm so tired of lifting bricks up to the top of the scaffold now!

thumb_IMG_8494_1024.jpg
 

Attachments

  • thumb_IMG_8476_1024.jpg
    thumb_IMG_8476_1024.jpg
    324 KB · Views: 258
  • thumb_IMG_8491_1024.jpg
    thumb_IMG_8491_1024.jpg
    433.5 KB · Views: 264
  • thumb_IMG_8493_1024.jpg
    thumb_IMG_8493_1024.jpg
    384.7 KB · Views: 246
  • thumb_IMG_8496_1024.jpg
    thumb_IMG_8496_1024.jpg
    343.1 KB · Views: 253
Large Gable Brick Work

I cut the awkward brick pieces for filling in the gable end at the top with my evolution concrete saw. This required a lot of cuts and wasn't probably worth doing really when you consider most of it won't be seen.

thumb_IMG_8502_1024.jpg


The notches in the brick work are for the gable ladder.

thumb_IMG_8512_1024.jpg


Smaller trusses are setup and installed.

thumb_IMG_8517_1024.jpg


thumb_IMG_8526_1024.jpg


The block work to the smaller gable end is done.

thumb_IMG_8530_1024.jpg


And the brick work to the smaller gable .... done!

thumb_IMG_8535_1024.jpg
 

Attachments

  • thumb_IMG_8533_1024.jpg
    thumb_IMG_8533_1024.jpg
    296.7 KB · Views: 236
Last edited:
Sponsored Links
Gable Ladders


thumb_IMG_8541_1024.jpg


thumb_IMG_8546_1024.jpg


thumb_IMG_8548_1024.jpg


The gable ladders mortared into the brickwork notches and levelled.

thumb_IMG_8560_1024.jpg


thumb_IMG_8565_1024.jpg
 

Attachments

  • thumb_IMG_8551_1024.jpg
    thumb_IMG_8551_1024.jpg
    235.7 KB · Views: 246
  • thumb_IMG_8553_1024.jpg
    thumb_IMG_8553_1024.jpg
    308.3 KB · Views: 255
  • thumb_IMG_8561_1024.jpg
    thumb_IMG_8561_1024.jpg
    390.4 KB · Views: 246
Scaffold Issues

So I realised there was a problem with the scaffold poles being in the way of the roof line. I thought the scaffolders would've placed the poles far enough away from the building to allow for the roof but anyway! I phoned the the scaffold guy and he came and moved them. He's been pretty good overall to be honest.

thumb_IMG_8572_1024.jpg


thumb_IMG_8573_1024.jpg


Scaffold poles.... gone!

thumb_IMG_8576_1024.jpg


Tell the neighbour about his leaking gutter :eek:

thumb_IMG_8575_1024.jpg
 

Attachments

  • thumb_IMG_8571_1024.jpg
    thumb_IMG_8571_1024.jpg
    354.8 KB · Views: 251
  • thumb_IMG_8574_1024.jpg
    thumb_IMG_8574_1024.jpg
    338 KB · Views: 259
It's beginning to look a lot like .... a roof!

This was a stage of the build where I neglected to take a lot of pictures (unfortunately :()! I was just so consumed with getting the roof on and getting rid of the scaffold as i'd gone over the agreed twelve weeks and it was costing me £100 per week, so it was all hands on deck (well, my two hands)!

I felted the roof with Cromer felt in a 1.5m width in moderate wind conditions :ROFLMAO:, bet the neighbours were having a good laugh at me trying to place it on the roof, on my own! I used some clout nails to fasten the felt down and then secured it further with some temporary battens.

thumb_IMG_8578_1024.jpg


thumb_IMG_8582_1024.jpg


It was this point I realised I had ordered the wrong size fascia/barge boards. I measured the existing fascia board at the back of the house and ordered the same size as that; mistake! The original house had 225mm boards although I hadn't realised at the time that these were wrong. Since realising, when you look at the roofline of my house compared to the adjoining neighbour, my roof tiles lift (sat on fascia) as the wrong size fascia has been used by whoever changed it last time! Not a major worry, I cut the boards down to 175mm, just more faffing about!

I installed the barge board and box end to the large gable roof without using silicone as i think it discolours after a while. Instead i screwed and nailed as discreetly as possible. Happy with the result. Wish I'd have taken more pictures whilst doing this.

thumb_IMG_8625_1024.jpg


I was quite anxious about the doing the lead flashing to the side abutments, especially with the cavity trays that I installed. It took me a while to get my head around how to do the flashing, thinking i'd done the cavity trays wrong. I'd had enough by this point, everything was pressured, weather rubbish, scaffold costing, still not watertight. I actually stopped working on it that morning and went out, away from the build.... it was getting on top of me! :cry:

I decided to use the over tile soakers as pictured below which actually look quite good now it's cleaned, so happy with that choice. Also, returning with a clear head to tackle the flashing and it just measured and worked first time! Goes to show, sometimes a step back can make a difference!

thumb_IMG_8627_1024.jpg


I tiled the back of the roof and installed the dry verge units. They were easy!

thumb_IMG_8628_1024.jpg


Again, I wish i'd have taken more pictures here but i didn't! The rear of the roof tiled with the dry ridge units installed on the small roof.

thumb_IMG_8629_1024.jpg


My roof installation method is probably unusual. I installed the top row of tiles first (supported by an extra batten under the bottom edge) and then installed the dry ridge system and ridge tiles. I did it this way as I didn't want to walk on the tiles afterwards to install the ridge and I didn't have a suitable roof ladder for access either. When it was time to install the tiles below, I just pushed them up under the top row and removed the batten.

thumb_IMG_8631_1024.jpg


I also installed the lead flashing before the bulk of the tiles. By doing it this way, I could avoid leaning/walking on the tiles.

thumb_IMG_8632_1024.jpg
 

Attachments

  • thumb_IMG_8633_1024.jpg
    thumb_IMG_8633_1024.jpg
    264.5 KB · Views: 225
Last edited:
We Have A Roof!

It's starting to take shape... a roof! Thought i'd never get to this point!

thumb_IMG_8637_1024.jpg


Put the nice finials on to finish the barge boards.

thumb_IMG_8644_1024.jpg


I cut and re-attached the existing house barge boards and added the finial. I was originally going to replace the existing barge/fascia/soffits and roof although I just ran out of money! I re-seated the existing end ridge tile and mortared it in. At this point of installing the roof, I didn't even have money for the windows!

Mortared the lead flashing in. I initially bought LeadMate to seal the lead although it was awkward to work with and i didn't like the look of it so decided to use mortar; glad i did.

thumb_IMG_8646_1024.jpg


thumb_IMG_8654_1024.jpg


I think the over tile soakers look quite nice, glad i chose them. The large and small roofs (roof's? I dunno!) are tiled and the dry verge units installed.

thumb_IMG_8656_1024.jpg


thumb_IMG_8658_1024.jpg
 

Attachments

  • thumb_IMG_8645_1024.jpg
    thumb_IMG_8645_1024.jpg
    293.2 KB · Views: 250
  • thumb_IMG_8647_1024.jpg
    thumb_IMG_8647_1024.jpg
    309 KB · Views: 267
  • thumb_IMG_8651_1024.jpg
    thumb_IMG_8651_1024.jpg
    181.9 KB · Views: 279
  • thumb_IMG_8649_1024.jpg
    thumb_IMG_8649_1024.jpg
    223.6 KB · Views: 251
Roof Done

So the bulk of the build is done!

thumb_IMG_8664_1024.jpg


As an after thought I decided (whilst i still had the scaffold) to vent the ensuite extractor through the roof, so I bought a tile vent and installed that. This would have been easier to do whilst tiling of course, but I like to make my life difficult it seems! It's a better colour match than the picture suggests.


thumb_IMG_8676_1024.jpg


Inside the bedroom.... a watertight roof.... yay! :D

You can see here where the wall plate has been strapped to the inside walls to stop the 2 tonne roof blowing off o_O!

thumb_IMG_8700_1024.jpg
 

Attachments

  • thumb_IMG_8681_1024.jpg
    thumb_IMG_8681_1024.jpg
    313.7 KB · Views: 245
  • thumb_IMG_8703_1024.jpg
    thumb_IMG_8703_1024.jpg
    250.1 KB · Views: 242
  • thumb_IMG_8705_1024.jpg
    thumb_IMG_8705_1024.jpg
    251.5 KB · Views: 248
Bye Bye Scaffold... You cost me dear!

Okay, so the scaffold has gone! GONE! :D:)(y) This is a relief, a massive step forward in the whole build, I can actually take a breather now and relax a little.

thumb_IMG_8719_1024.jpg


I forgot to take any pictures whilst installing the gutters, drainpipes and soil pipe! :( I am going to change the existing gutters to black next year once the lean to is knocked down and i have better access to the roof in that area.

thumb_IMG_8724_1024.jpg


There are a few mistakes here and there, some obvious to the trained eye, most wouldn't see them though. However, the building is level and plumb which is important to me and the mistakes are not glaringly obvious.


thumb_IMG_8725_1024.jpg


I need to do some work on the front elevation of the existing house as it looks shabby. I have some ideas and will hopefully do something with it in the next year or two (still not got enough money to finish this extension!). Extensions are expensive even when you do them yourself! :LOL:

thumb_IMG_8727_1024.jpg


thumb_IMG_8726_1024.jpg


Not too bad (if I may say so myself :D) for a guy who had never laid a brick before this extension!

thumb_IMG_8731_1024.jpg


thumb_IMG_8732_1024.jpg
 

Attachments

  • thumb_IMG_8744_1024.jpg
    thumb_IMG_8744_1024.jpg
    566.3 KB · Views: 243
Knock Knock.... We're coming through!

I hired a couple of strong boy attachments (the acrow props I bought last year as I knew i'd need these a fair bit) to help with the knock through. I'm not sure if I even needed these for the opening size, but better to have something there than take the risk of the brickwork collapsing.

I marked the cutout with a spray and set the strong boys above.

thumb_IMG_8750_1024.jpg


I only did the brick side of the wall to start with. I used a combination of stitch drilling/bolster/hammer and the diamond saw to cut the brick opening.

thumb_IMG_8752_1024.jpg


thumb_IMG_8753_1024.jpg


As total misfortune would have it, I put the opening exactly where the internal fire flue is! Brilliant! :rolleyes:

The fire had already been removed downstairs and the gas connection cut under the floor when the central heating was installed 5 years ago so the chimney can come out! We'll never use it again and i'll block it up permanently below to make sure any future owners don't attempt to re-use it!

thumb_IMG_8758_1024.jpg


Concrete lintel installed with a 225mm bearing either side for the simple reason that the 1200mm lintels were not in stock, so i bought 1500mm lintels and decided it was easier to knock a full brick out and cut the lintel to fit! It's not the prettiest mortar work... i'll call this... functional!

The lintels are packed with slate pieces and mortared.

How do you like the existing block work on my house? I can see those builders in the 70's took their time! o_O

Look at all that rubble!

thumb_IMG_8760_1024.jpg


Then there was a hole!

thumb_IMG_8764_1024.jpg


I made a temporary door frame and roughly screwed and foamed it in so that we can seal the doorway back up (no windows in at the this point). I hadn't taken pictures, but a stud wall between the two existing bedrooms was knocked down (it was dividing the rooms where I knocked through here) and two new stud walls have been built to create the hallway between the two rooms.

thumb_IMG_8767_1024.jpg


thumb_IMG_8769_1024.jpg
 

Attachments

  • thumb_IMG_8765_1024.jpg
    thumb_IMG_8765_1024.jpg
    277.5 KB · Views: 257
Last edited:
Windows

I ordered the windows online at a supply only company so the measuring was up to me. They fit okay although the gap around the windows is bigger than I would have liked, I could've taken 5-10mm off the sizes and they would've been perfect with a 4/5mm gap around. So i'm left with a gap around of roughly 10-12mm, not the end of the world but lesson learnt!

First time installing windows (of the uPVC variety); installed the Microsoft variety thousands of times o_O.

thumb_IMG_8833_1024.jpg


thumb_IMG_8834_1024.jpg


I invested in an expanding foam applicator gun... what a difference that makes! I foamed around the windows to seal any gaps with a low expansion foam. I just need to seal the windows externally now although i don't have a ladder tall enough!

thumb_IMG_8835_1024.jpg
 
Christ on a bike

Pop over and do mine

You'll have it done in a morning. Lol
 
Floor Screed Kitchen

Okay, so this is up to date as of 18th Nov 2019, I'm laying the floor screed to the downstairs extension. I started by laying the yellow gas membrane down and taping this to the gas DPC (black) that bridges the cavity. The has a visqueen double sided tape with a minimum 150mm lap and then a visqueen single sided tape over the join.

Once again, I haven't taken as many pictures as I wanted to, just remembered as I was about to lay the last of the insulation so got a quick pic of the gas membrane (Visqueen low permeability gas membrane)! Note to self... take more pictures from now on!

thumb_IMG_8842_1024.jpg


I then installed the floor insulation which is a 75mm thick board taped at all edges with an insulation foil tape (really good tape actually, sticks brilliantly). Hoovered the finished floor with Henry.

thumb_IMG_8843_1024.jpg


thumb_IMG_8845_1024.jpg


thumb_IMG_8851_1024.jpg


Once the insulation was down, I laid a vapour barrier over the top of the insulation and taped any joints with duct tape.

thumb_IMG_8852_1024.jpg


Hey, there's my existing house. Now that the french doors are installed and all windows are in, I removed the stud wall between the extension and the house. The lintels were already there from the last (smaller) extension which i knocked down.

thumb_IMG_8861_1024.jpg


I set out some perimeter insulation using left over kingpin boards cut to the size of the screed although i'm not sure if this is the correct way to do it. I had planned for 75mm of insulation and a 65mm screed, however, it's worked out to be 75mm insulation and a 90mm screed which is probably better as a 65mm screed was likely bordering on too thin.

thumb_IMG_8864_1024.jpg


I'm now ready to try and screed the floor and this is the bit i've been dreading! From what i've read about floor screeding, it's hard work and a difficult skill to pull off so i'm expecting it to be tough going. What's worse, like everything else on this extension, i'm doing it all on my own, mixing, laying, finishing... I must be bonkers! The next post will be the screed.... fingers crossed it goes well!
 

Attachments

  • thumb_IMG_8848_1024.jpg
    thumb_IMG_8848_1024.jpg
    321 KB · Views: 265
Last edited:
You should take pride in the cracking job you have done. And the amount of money you have saved. Nearly there. Be waiting for the D.I.Ynot grand opening thru the post.
 

DIYnot Local

Staff member

If you need to find a tradesperson to get your job done, please try our local search below, or if you are doing it yourself you can find suppliers local to you.

Select the supplier or trade you require, enter your location to begin your search.


Are you a trade or supplier? You can create your listing free at DIYnot Local

 
Sponsored Links
Back
Top