how to connect a Nest 3rd Generation

Joined
7 Jan 2020
Messages
12
Reaction score
1
Country
United Kingdom
Sorry to jump on this thread but I'm new to the forum and cant work out how to post and running out of patience! I bought Nest 3rd Generation as I read that they were easier to self install and compatible with my heating....I've fallen at the first hurdle and need help! Where do I connect L1 and LX cable on the Nest heat link please? I've trawled the internet and cant find an answer? Its a Seimens heat link. Dont worry, I only have my electricity on as I've given up for now!!!
 

Attachments

  • 15784063333025781650802725435197.jpg
    15784063333025781650802725435197.jpg
    199.4 KB · Views: 295
Sponsored Links
Blue wire in Siemens N = Nest Heat link N

Brown wire in Siemens L = Nest Heat link L

Grey wire in Siemens L1 = Nest Heat link 3

Use the black 'link' to join Heat link L terminal to 2

The Nest thermostat can be powered using a separate plug in power supply, or by running new wires to connect the Thermostats T1 & T2 terminals to the T1 & T2 terminals at the Heat link. If you do the latter, an earth connection to the Heat link earth terminal (next to T1 & T2) is also required.

I assume this is for a combi boiler and that you don't have a separate hot water system (ie a hot water cylinder) connected to it that requires timed control via the Nest.
 
Thank you so much. Thr thermostat will be freestanding and will be plugged in. No, it isnt a combi boiler, that's why I went for the 3rd generation, as it can do heating and hot water separately, or so I'm lead to believe!
 

Attachments

  • 15784144743598390420637966908143.jpg
    15784144743598390420637966908143.jpg
    203.6 KB · Views: 244
The Nest heat link can replace the programmer, likely the Drayton has N, L, 1, 2, 3, 4 terminals and 1 and 2 likely not used.
So N to N
L to L plus 2 plus 5 so needs some links.
1 to 4 likely not used. Normally closed
2 to 1 likely not used. Normally closed
3 to 6 hot water on. Normal open
4 to 4 central heating on. Normal open
The old thermostat will still be active so need putting to max temperature or put L1 and LX wires in same hole.

Likely there is a wiring centre and normally the heat link would be wired into the wiring centre. Although it can replace the programmer that is not how I would wire it. I am guessing I have right Drayton instructions click here to see plan I looked at.

Central heating in the main follows plans, we have Y, W, S and C for example and with C at least 3 versions, Nest can replace them all, and the instructions show 6 of the options, there are more, in the main they work by the thermostat telling a valve what to do and in turn the valve tells boiler, but there are some odd systems where there are no valves and so until you know how old one wired, we are guessing a bit, so look for valves and pumps, say how many and if two or three pipes go to the valves, and of course pictures help.
 
Last edited:
Sponsored Links
Oh, so I'm actually replacing the Drayton programmer with the Nest heat link?
 
Indeed! God job I asked about the hot water. There aren't any wires here.....

15784063333025781650802725435197.jpg


.....that control the hot water. So if you had followed my original instructions, the Nest would only have been able to control the central heating, and not the hot water.

So, now instead; the The Heat link will replace the Drayton programmer (that you didn't mention originally!) as that is where both the hot water and heating wires can be found.

Then the original Siemens thermostat receiver needs to be decommissioned this is done by tracing the thermostat cable back to where it comes from and disconnecting all of its wires at their origin. Then a link should be inserted between the terminals that you have just removed the brown and grey wires from.
 
Thank you both for your help! It's all sounding far too complicated now, I think I'll just call an electrician!!!
 
It can be quite complicated for a novice. A couple of Drayton's have been replaced with Nest this week, you can read one thread by clicking here.

If you get an electrician in, make sure they are familiar with how heating systems are wired. Not all are.
 
Thank you so much. From the posts you've added, I'll check the wiring on the programmer and if its wired correctly, I'll give it a go myself. As the only thing that's putting me off is, disconnecting the thermostat and isolating it. Or am I right in thinking I can just wire the Nedt thermostat to the origional. I only wanted it freestanding as the thermostat I have is in the coldest place in the house!
 
If you wired in the Nest as I described originally, it would control just the central heating.

The Drayton would remain in place and set so that the central heating was permanently 'on' 24/7 so that it doesn't interfere with the Nest. Then the hot water settings on the Drayton will still continue to control the hot water exactly as it does now.
 
You could just replace the thermostat, the Nest e is a two wire version of Nest that only does the central heating. And the Nest gen 3 can be used to just run central heating if you want.

However reading replies it would seem the problem is heating goes off too soon, so it leaves some rooms cool. Use of the thermostatic radiator valves (TRV) and lock shield valves can cure this.

Simple first, turn down the lock shield valve in the room with wall thermostat, and other rooms will warm up.

Using programmable TRV's you can with some thought have each room nearly independent, I say nearly, as clearly the TRV unless linked to wall thermostat will not turn on the boiler, but you can get a lot of control. Using a programmable TRV and wall thermostat in the same room, you can delay the boiler turning off, giving other rooms chance to heat.

Even with Nest installed I still use the programmable TRV heads to get the rooms to heat wanted. The programmable heads start at £10, google eQ-3, for a bluetooth version £15 so you don't need to touch the valve, Terrier i30 very similar, OK once you go to wifi and geofencing then the Energenie which were suppose to work with Nest first three £180 with the hub, but if you not looking for geofencing then £10 each.

And main thing, really easy to fit, unscrew old screw on new, no wires involved.
 
Thank you for all your replies! I've had a busy few days but I'm going to give it a go... I think! Would I be right in thinking that if I attach the wires (highlighted in my pic), live together with the live from the programmer, in the Nest. The neutral together with the neutral of the programmer, in the Nest. The L1 and LX fitted, as described by STEM's reply. Then the programmers wires wired in to the Nest. It should operate heating and hot water and, the origional thermostat will be disabled?
 

Attachments

  • 20200112_140041.jpg
    20200112_140041.jpg
    209.6 KB · Views: 222
  • 15788397308993448534102157113754.jpg
    15788397308993448534102157113754.jpg
    108.2 KB · Views: 223
Last edited:
Not quite. The Drayton is removed and the Nest Heat link replaces it and it will take the now unused N & L from there. So...

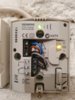
...The Drayton wire connections can be identified from the diagram on the back of it. This has the wires that control both the central heating and the hot water.

Drayton.png


Capture.JPG


Based on the above diagram / photo, the wires move from the Drayton to the terminals that have exactly the same function at the Nest Heat link. So,

The blue wire in Drayton (N) goes to Heat Link (N)
The brown wire in Drayton (L) goes to Heat Link (L)
The black wire in Drayton (3) HW ON goes to Heat Link (6) HW call for heat
The grey wire in Drayton (4) CH ON goes to Heat Link (3) Heating call for heat

Then the two Heat link common terminals (2) and (5) should be wired / linked to terminal (L)

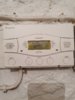
The Nest thermostat requires 12v power for it to operate. This can be provided by running a new cable to connect terminals T1 & T2 at the Heat link, to the corresponding T1 & T2 terminals at the Nest thermostat. If you do this you will also need an earth connection to the earth terminal next to T1 & T2. Alternatively the Nest thermostat can simply be powered by a separate plug in power supply.

Nest.jpg


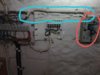
To remove the old thermostat find the origin of the brown and grey wires in this cable that you have highlighted...

Capture2.JPG


...where they terminate at the wiring centre on the left in your photo. Note where they go, and then remove the old thermostat cable and the old thermostat receiver completely. Then join together the two terminals where you have just removed the brown and grey wires from.

PLEASE NOTE:
The photo below is not 100% clear. To me it looks like black wire in LX is simply a loop of wire connecting LX and L. And the above instructions are based on that assumption. If this is not the case, and the black wire in LX goes somewhere else, don't proceed and post back details of where it goes.

Capture3.JPG
 
Last edited:
Thank you! So the cable that I highlighted contains all 4 coloured wires and runs into the back, it's not looped.
 

DIYnot Local

Staff member

If you need to find a tradesperson to get your job done, please try our local search below, or if you are doing it yourself you can find suppliers local to you.

Select the supplier or trade you require, enter your location to begin your search.


Are you a trade or supplier? You can create your listing free at DIYnot Local

 
Sponsored Links
Back
Top