painting a ceiling with easifiller color problems

Joined
29 Feb 2020
Messages
4
Reaction score
0
Country
United Kingdom
Hello to everyone who is reading and willing to help.
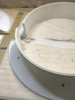
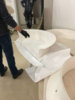
long story short I'm working on a project and it contains gypsum volcanos elements that were installed to the plastered ceiling and afterwards builders used easifiller to blend it into the ceiling according to the project design.

But the results are not that great as it should be initially fully blended. The major thing now is the difference in the colour of the paint. You can easily see where easifiller was used and where the ceiling starts. I do think that they applied paint straight on easifiller without any special coatings etc that probably needed to achieve at least same colour

I'm attaching photos so you guys can understand what do I mean.

I desperately need some advice about what to do and if there is any chance to make it better.

thank you very much
IMG_5709.jpeg IMG_5710.jpeg
 
Sponsored Links
yes but I don't understand the words you used.
 
Sponsored Links
yes but I don't understand the words you used.
Ah sorry.
Its a gypsum model that was made to order to act as a design piece and LED light source. It was sent as a one big round piece that needs to be mounted on the ceiling with special rods and then blend it into the ceiling to give a look that they are one piece with it but not as a separate addon. Prior to installation the whole ceiling was plastered and this gypsum pieces attached to it with easifiller on the sides to act as a blender to try to make it seamless like in a project but as you can see the photo its visible shade differences and colour around it.

Attaching some photos of the elements

So the problem is now that the same paint that was applied on filler looks different than on rest of the plastered ceiling thus giving that round shade effect that are much more pronounced in real life.
 

Attachments

  • IMG_9256.jpg
    IMG_9256.jpg
    228.1 KB · Views: 231
  • IMG_9423.jpg
    IMG_9423.jpg
    184.2 KB · Views: 219
it should have been given a mist coat before painting, and any bare surface should have been given sufficient coats for it to match the texture and absorbency of the rest of the ceiling. Once that's done, a couple of coats of your finish colour over the whole ceiling should match it.

If your protrusions or their surrounds have less coats on them than the rest of the ceiling, give them a few more. You will not get an even colour though until you repaint the whole ceiling, including the protrusions, all done in one day. If you are using a roller on the flat part, get a small roller such as a radiator roller to do the protrusions. If you use a brush the texture will look different so they will not visually match.

Light it from below because any shadows will make it look patchy

oh Thank you very much John. You made my day much better. I will add then one or two colour coats with radiator roller on the different colour part around the element where is easifiller to try to improve the situation.Will keep you updated how it will go.God bless
thank you very much
 
Last edited:
I cannot tell if the filler is "flashing" or whether the ring is the result of the brushing in of the paint after the rolled paint has dried (letterboxing).

Flashing is often a difference in sheen/colour where different materials meet. Normally I wouldn't expect easyfill to flash when meeting plaster.

Letterboxing can be a real PITA with darker colours. If one were to do the rolling and then the cutting in you can end up with a letterbox effect (diffrent shades) where the two meet. Floetrol added to the emuslion will help to maintain a wet edge for longer and thus reduce the letterboxing.

As JohnD said, try more coats and also consider adding Floetrol.
 

DIYnot Local

Staff member

If you need to find a tradesperson to get your job done, please try our local search below, or if you are doing it yourself you can find suppliers local to you.

Select the supplier or trade you require, enter your location to begin your search.


Are you a trade or supplier? You can create your listing free at DIYnot Local

 
Sponsored Links
Back
Top