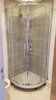
Resealing leaking shower

Joined
22 Feb 2020
Messages
49
Reaction score
0
Country
United Kingdom
Hi all

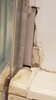
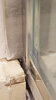
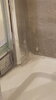
I've had a new shower fitted in my ensuite (complete job, new tray, tiles, enclosure etc) which leaks from both corners . My fitter came back twice to add more silicone and I expressed concern at the time that there was silicone on the inside of the enclosure where the wall channels meet the tray, which from my research was is known to cause leaks (he kept adding extra silicone inside and outside). I also pointed out the instructions say to seal outside only. He replied that they throw instructions away and don't follow them as they're never right, which I wasn't impressed by, particularly as his 'right' way clearly hasn't worked...

Anyway the leak continues so I've told him I want him to dismantle the enclosure and start again, and do it according to the instructions this time, and he's agreed.

I was just wondering if anyone had any general advice on what I need to make sure is done this time to ensure no corners are cut (I know this isn't a DIY question but I feel like it partially is since I'm having to look out for things myself!). I'm guessing this can't be done in a day as the areas need to dry after the old silicone is removed before resealing? I also want to check the tray was siliconed to the tiles past where the enclosure sits as I've heard this can also be the issue.

Also - the instructions say to seal only on the outside both horizontally and vertically, but I know a lot of people seem to recommend sealing vertically inside too. What do you think? They did seal vertically on the inside before and he also said there's a bed of silicone behind the wall channels - but again the instructions don't say to do this.

Instructions here for reference:

https://ctb.co.uk/files/c0383-a00-01-quadrant-confirmed.pdf

Thanks!
 
Sponsored Links
Some pictures might help.

Sealing shouldn't be a problem with or without the install instructions. At a guess, the leaks are caused by movement in the parts on either side of the seal. Excessive movement would tear the seal apart.
 
Thanks for replying. I've attached some photos. It's not all done yet since he still needs to fit the plastic part covering under the tray (but better without it for now anyway to see the leaks better) and the boxing to the sides needs redoing as well as that chunk on the right wall!

Have attached a pic of the whole thing and the corners both inside and outside.

One concern I did have is whether the tray was fitted before and after tiling as I read that the latter is not as desirable but I genuinely don't which he did. Another question is whether the silicone around the wall channel is a continuation of the silicone around the tray meaning they were done at the same time and there's no silicone on the tray past the enclosure? Obv I'm just speculating.
 

Attachments

  • 20200830_134707.jpg
    20200830_134707.jpg
    176.4 KB · Views: 294
  • 20200830_134744.jpg
    20200830_134744.jpg
    169.9 KB · Views: 293
  • 20200830_134729.jpg
    20200830_134729.jpg
    195.5 KB · Views: 279
  • 20200830_134844.jpg
    20200830_134844.jpg
    149.4 KB · Views: 522
  • 20200830_134851.jpg
    20200830_134851.jpg
    167.6 KB · Views: 295
4 places that need sealing: the vertical frames that meet the wall. The sides of the tray that meet the wall. The exterior of the shower shouldn't affect anything. The side glass bottom on the interior looks open. Maybe water is coming from there.
 
Sponsored Links
Thanks I may politely ask him to look into that.. what exactly does the side glass bottom mean sorry?

It is sealed vertically at the moment both inside and outside. Originally it was just inside.
 
To the right of the shiny metal plate is open. Why? That metal plate is at the bottom of the side glass.

20200830_134844-jpg.203319
 
I expressed concern at the time that there was silicone on the inside of the enclosure where the wall channels meet the tray

That's the most common failure point. Seal the tray, fit the vertical channels then seal on the outside only.
 
That's a terrible job, the enclosure needs to be completely removed and cleaned of all the silicone before starting again. Manufacturers instructions should always be followed, not thrown away. Firstly the tray should be solid, level and unable to move at all. The joint with the tiles should be siliconed in one continuous bead and allowed to dry before fitting the enclosure. Your fitter has positioned the frame flush with the edge of the tray but it is usually set 10-15mm in from the tray edge. This allows a nice silicone seal to be made after the enclosure is fitted. Hopefully the existing holes in the tiles will be covered by the wall channels when they are repositioned. I always silicone the wall channels to the wall as well as screwing as this affords extra strength once set. It's usually only the outside of enclosures that are sealed as this allows any water which gets inside the frame to find it's way back into the tray. The instructions will say exactly what needs sealing. Good luck next time.
 
Did you buy the tray and enclosure? It looks to me like the enclosure is too big for the tray.
 
He supplied and installed both the tray and enclosure. You're right it does look like there are sizing issues... as you say, the tray and enclosure are flush at the sides but as they curve at the front. the enclosure sticks out from the tray (although interestingly I've not encountered any leaks there (yet), maybe because at the front it appears there's correctly only silicone on the outside.

I'm not sure what to do :( 
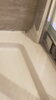
also I've noticed a few scratches/scuffs on the tray, not very noticeable but obviously it's annoying... he said he'll pay for a professional enamel repair for those.
 
Enclosures do have min and max tolerances to allow for out of plumb walls and for slight adjustments on the tray. It just looks to me like that enclosure is already set at it's min as the frame looks like it's fully inside the wall channels. I might be wrong and it may be that the frame can be adjusted to fit correctly on the tray. There should always be a lip visible in front of the frame and as I say the sides are usually set in from the tray edge by 10-15mm. As for re enamelling, it's up to you whether that's acceptable but the enclosure needs sorting first.
 
Enclosures do have min and max tolerances to allow for out of plumb walls and for slight adjustments on the tray. It just looks to me like that enclosure is already set at it's min as the frame looks like it's fully inside the wall channels. I might be wrong and it may be that the frame can be adjusted to fit correctly on the tray. There should always be a lip visible in front of the frame and as I say the sides are usually set in from the tray edge by 10-15mm. As for re enamelling, it's up to you whether that's acceptable but the enclosure needs sorting first.

What you're saying makes sense... maybe they realised when fitting it that it wouldn't adjust any further and they tried to get away with doing it the way it's been done.

I've checked and the tray is 800mm but about 4cm is behind the tiles and I don't know if that's too much and possibly the issue.
 
The specs for the shower enclosure say 770 - 790 mm adjustment.

I've measured the sides of the trays to where they meet the tile; one side is 780cm and one is 760cm... so perhaps the latter is where the issue is.
 
Fitter error. They should refit the whole enclosure, tray and all, and be very apologetic about it. Hope that's how it plays out for.you. Good luck.
 
Fitter error. They should refit the whole enclosure, tray and all, and be very apologetic about it. Hope that's how it plays out for.you. Good luck.

Maybe that's the reason for the leak too. Stretching the enclosure beyond its min adjustment...

Thanks for your help Jaimie - you've really done me a favour spotting that.
 

DIYnot Local

Staff member

If you need to find a tradesperson to get your job done, please try our local search below, or if you are doing it yourself you can find suppliers local to you.

Select the supplier or trade you require, enter your location to begin your search.


Are you a trade or supplier? You can create your listing free at DIYnot Local

 
Sponsored Links
Back
Top