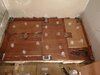
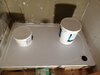
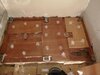
Shower trap fitting problem

Sponsored Links
I know, that's what I wanted to reply with but I'm too polite. He was the sales guy who had had some sort of presentation from the manufacturer as the sales guy thought it was boll@x also funny enough. But he said it looked fine to him.
I'm still gonna do it the proper way tho as in Stixall underneath and silicone around the edges.

I fitted 15 shower trays in my life, I counted them before writing.
All with good tile adhesive.
13 of them are still there after many many years, no movement, the other 2 were replaced by baths due to babies being born.
Use tried and tested methods and you won't go wrong.
Those screws will sink into any wood eventually, no way they will hold for long time.
You need a bed of something substantial.
 
Sponsored Links
And hey, I like a nice radox bath so the missus will just have to clean it more often or stop moaning about the mould. :)
 
It's all to do with the manufacturers warranty, if that means anything to you. If they say it's not to be bedded on anything and then there's a warranty call then if it's fitted against their recommendations then they'll walk away.
I'd hate to count how many shower tray's, bathrooms etc I've installed, it might remind me how long I've been doing this. I've never used tile adhesive, nor mortar and I've yet to have any call backs. It's horses for courses, of course and I wouldn't dis using tile adhesive, I've just never seen the need, nice solid flat base, good prep and waterproofing and a good quality adhesive/silicone does the trick for me every time.
In my experience a good cleaning regime is key to keep both the tray and the silicone in good condition, if there's mould forming in the grooves then it's not being cleaned properly IMO. A good anti bacterial cleaner and good ventilation to dry it and the room after use should keep everything in good condition.
 
Sounds like good advice to me Rob, thank you. After a load of faffing around, I realised the base/plinth isn't straight, rookie mistake! Gonna have to pack up with varying thicknesses of wood with aluminium on top so the load screw doesn't dig in (probably more economical using 50p pieces the amount of wear with my drill bit, lol). I'm also going to use Stixall underneath and silicone on sides.
 

Attachments

  • IMG_20201018_151829.jpg
    IMG_20201018_151829.jpg
    294.5 KB · Views: 166
  • IMG_20201018_151837.jpg
    IMG_20201018_151837.jpg
    331.2 KB · Views: 188
That's a very unconventional way to fit a shower tray, to say the least.
I wonder what a professional bathroom fitter would think if found something like this in dismantling a shower tray.
I know what i would say: starts with b and ends in odge.
 
There isn't really an issue using plates to sit the screws on, if that's really the way that they want their trays to be fitted but I'll be totally honest with you (not like me :whistle:), if it was me I'd be throwing those self levelling screws away and sitting the tray flat to the plinth.

I'd be checking the tray first of course, making sure the base has been manufactured dead level (if not send it back) and then sit it on the plinth and use whatever choice of bedding method was suitable/appropriate.
 
The tray base will never be dead level, that's why it needs to be bedded into something (adhesive, mortar, silicone, anything else people have used in the past and worked).
To help you, rest the tray on the floor in its final position, level it by using your screws, spacers, anything until you're happy with the level.
As said: only very extreme edges must be levelled, not the inside of the tray which has a fall.
Once you have positioned your spacers/screws/whatever, remove the tray, place your choice of adhesive/mortar, silicone/camel spit/goose fat and then drop the tray in place.
Stand on it to press it down.
Double check level only on very external edges.
It's more difficult to explain it than doing it.
 
Just wanted to give update. Had a mental block with this and only returned to it yesterday. As the base(marine ply) wasn't level, I had to pack under the levelling screws to get level. Took me hours faffing around but really happy with level now. Used a cut up saw blade on top of packers so levelling screws wouldn't dig in. All the packers have been glued and screwed and left overnight so I'll SBR the base and underside of tray and silicone/sealant it before placing tray back down. I didn't realise how much easier it would have been if the marine ply base was dead level. Any thoughts on which sealant/silicone to use and how much to use? Stixall was my thought.
 

Attachments

  • IMG_20201031_181918.jpg
    IMG_20201031_181918.jpg
    274.5 KB · Views: 160
  • IMG_20201031_182334.jpg
    IMG_20201031_182334.jpg
    284.1 KB · Views: 137
  • IMG_20201031_182449.jpg
    IMG_20201031_182449.jpg
    242.4 KB · Views: 145
That's a very unconventional way to fit a shower tray, to say the least.
I wonder what a professional bathroom fitter would think if found something like this in dismantling a shower tray.
I know what i would say: starts with b and ends in odge.
I'll leave a copy of the instructions under the tray so he'll see how fiddly the self-levelling screws are, he'll understand
 
Finally installed shower tray! Top tip for anyone using tray with built in levelling screws, make sure base is level.
I screwed a few pieces of marine ply to build up to the underside of tray to make it easier when siliconing underneath.
As you can see, blobs of Stixall underneath to give it more stability as I just couldn't trust a few little grub screws in the end. So MI out the window and fingers crossed that this very unconventional installation will work
 

Attachments

  • IMG_20201112_182347.jpg
    IMG_20201112_182347.jpg
    201.2 KB · Views: 141
  • IMG_20201112_190234.jpg
    IMG_20201112_190234.jpg
    175.9 KB · Views: 159
  • IMG_20201112_182500.jpg
    IMG_20201112_182500.jpg
    220.4 KB · Views: 162

DIYnot Local

Staff member

If you need to find a tradesperson to get your job done, please try our local search below, or if you are doing it yourself you can find suppliers local to you.

Select the supplier or trade you require, enter your location to begin your search.


Are you a trade or supplier? You can create your listing free at DIYnot Local

 
Sponsored Links
Back
Top