Creaking Floor from flat above

Joined
25 Nov 2020
Messages
7
Reaction score
0
Country
United Kingdom
Hi,

I live in a ground floor flat in a Victorian terrace house in London, UK. The ground and 1st floor were extended 15 years ago. This part of our flat has a ceiling that is incredibly noisy, it creaks and bounces whenever someone walks around above. Over the last 2-3 years it has become gradually worse.

When we move in, we replaced the plasterboard lining to this, we noticed that the floor subfloor above was poorly installed. It was not tongue and groove chipboard, but square edge in places and edges of this where not always supported on top of the joists. There is no noggins or blocking either between the joists.

As well as the creaking our plasterboard and skimmed ceiling that we installed 7 years ago is now cracking at the joint lines etc.

We can only remedy this from below, what are my options? Do any of the below make sense?

Obviously in order to do any of this we need to take down the plasterboard to access the floor structure. There is not the possibility of access from above.

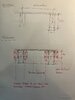
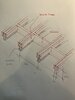
Noggins / blocking between the joists, especially where ends of the chipboard is unsupported
(I think this is a must)

Possibility of strengthening the joists either gluing / screwing 18 or 25mm ply to either side of the joists

OR

Strengthening the joists by bolting new joists to them to prevent them from flexing further (the existing joists could be propped in place whilst these are installed)

Shims between the joists and the chipboard if there are any gaps? I have heard pro's and cons of doing this,
Are there any other options I have in order to fix this problem?

Thanks for any help and advice
 
Sponsored Links
With the plasterboard out it is certainly possible to sister the joists from below, but I don't know how much benefit you are going to get from that without having a bit more info; what is the span of the joists, how are they fixed at the ends and what section are they? A photo of a joist end would be a great help. With a bit more information it should be possible to give a more complete solution. What I would say is that plywood plating, even if both sidess of the joists, isn't going to be the best way to tackle this and may well not be sufficient.

If there are gaps between the bottoms of the boards and the joists that would normally require intervention from above (I.e screwing), but as that is out I'd consider trying a polyurethane glue, but the type which is minimally foaming and comes in a tube (Tool Station do one, a gel product, no. 78519) for use in a caulking gun. This stuff goes off fast and may need to be pushed into the gap with something like a decorator's plastic spatula. Wear gloves unless you relish black fingers!

I would certainly consider adding extra blocking between joists, screwed in place nd with PU glue on top, especially beneath those joints. If you are sistering the joists though, it may not be necessary to do this.

One thing I would say is that when you do eventually replace the ceiling consider installing resilient bars on the undersides of the joists (look on the British Gypsum web site) then board with sound block board rathervthan standard plasterboard. The res. bars give you a degree of separation between the ceiling and the floor structure, reducing sound transmission whilst the sound block plasterboard reduces sound transmission. Packing the areas between the joists with mineral wool batting will also help with noise reduction

Thanks for your reply, the joists are 225 by 50mm at 400mm centres at one end the rest are notched into an I-beam at the other they are built into the inner leaf of a brick cavity wall.

I think I a leaning towards the following approac, installing full dept noggins, where required and inbetween these using sections of 100 by 50mm timber (2by4) to sister the joists either side. This will be temporarily propped from the floor to push them up into the underside of the chipboard subfloor. Then screwed into the joists with something like 80/90mm long spax screws.

I've tried to sketch this out but it's getting late, hopefully the attached images make sense.

Sadly I don't have the headheight for resilient bars.

Thanks for your help!
 

Attachments

  • IMG_9873.jpg
    IMG_9873.jpg
    223.2 KB · Views: 192
  • IMG_9875.jpg
    IMG_9875.jpg
    257.9 KB · Views: 182
If the span is too great for the cross section of timber you really need to sister the joists which will have the added effect of stiffening the floor (so solid strutting of blocking may well be superfluous), if it isn't you can simply add solid strutting and blocking to stiffen the floor. Unsupported joints in boards need to be supported by solid strutting. The general principle is that for solid strutting to be effective must be at least 80% of the depth of the existing joists and the same thickness

Personally if sistering joists, I'd forget about the 4 x 2s (100x 50s). To be effective sistering joists have to be pretty much the same depth as the original joists, I.e about 225 x 50 or maybe slightly less tall so they don't project down when fitted. This is because the functions of them is to increase the load capacity of the existing joists as well as to stiffen those joists so that they won't twist under load. 100 x 50s just won't do this as effectively as the correct size timber, even if you put them either side of the existing joists, because they are just not deep enough. They would also make it extremely time consuming and awkward to install solid strutting/blocking afterwards should that be required (such as to support joints in the floor), which would all need to be cut to fit round the100 x 50s.

Without looking it up in tables, the cross section of timber you state implies a span of no more than about 17 feet (5.2 metres). If that is so you will shouldn't really need to sister the joists (hence why I asked about the span length) and could probably achieve your aim by installing one or two rows of solid strutting/blocking (see below). If on the other hand your span is greater than that you would probably be better off increasing the stiffness and load capacity of the floor using sistered, full size joists, coach bolted to the existing joists on centres no greater than 600mm between bolts. The coach bolts should be something like M12 x 150mm with a dog (star) washer in between the timbers and a flat, penny washer beneath the nuts. One end should be notched to rest in the web of the RSJ, whilst ideally the other end should be pocketed into the brickwork. As this is impractical in your situation, so I'd suggest that you finish that end short of the wall by 30 to 50mm and install a row of solid strutting, the same depth as the joists, between the joists at that end. Set these off the wall by 200 to 300mm so you can get a 1st fix nail gun or screw gun in there to do the fixing. Your sistering joists and blocking should be at a minimum C16 structural grade. Whilst Spax screws are great, you really don't need them in this instance (cheaper screws will suffice). What you do need to do, though, is to ensure that your blocking is a snug (tight) fit between the joists

I'd suggest pre-notching and pre-drilling (14mm auger bit - faster than a spade bit) the sister joists before offering them in. Before even notching or drilling sight down them to ensure that any crowning will be to the top ,(this will flatten under load). To hold the sister joist in place whilst you drill through the pair of joists you'll need a couple of quick release one hand clamps such as the Irwin XP. 150mm ones are better than longer ones which will tend to get in the way. Insert the notched endvinto the RSJ first and pivotbm the sister joist up into place. To push the sister joists up tight to the ceiling I'd use a piece of 3 x 2 (75 x 50mm) rough sawn softwood maybe 30 mm longer than the floor to underside of joist height. Cut to the correct length and knocked in tight so it starts to bends bit this will act as a go bar and spring the sister joist up tight to the underside of the floor boards. Once the two joists are together drill through the holes in the first using them as a guide and bolt together as you work along the joist. This may be necessary to counteract any wind in the joists as well

If instead of doubling up the joists you only need to go for solid strutting, this needs to be the same thickness as the existing joists and at least 80% of the depth to be effective, I.e 180 x 50 to 225 x 50mm cross section. It should be a structural grade, minimum C16. If there is no blocking already installed in the web of the steel I'd start by installing that before installing a row down the middle of the room. You shouldn't be any more than that as the ends in the wall should be tight in the masonry pockets.

Please bear in mind that I haven't seen the building in question, so this advice is being given blind without knowing it there are any other factors you haven't mentioned. Also I am a carpenter and joiner, not a structural engineer, although TBH me and my partner have sistered more than 2000 joists, all beneath existing floors, in the last 18 months alone on a mill refurb project (so I think I'm actually starting to get good at it)
 
Last edited by a moderator:
Sponsored Links
Really detailed help. Thanks

The span of these 225 by 50mm joists is 2500mm, so fairly short. The joists should be more than strong enough.

Just to clarify, I imagined, installing the noggins first and then cutting the 2by4 to fit after. My reason for the 2by4s was to support the sub floor more than providing additional strength to the existing beams

My reason for this approach was that there are a lot of electrical cables and heating pipes going through the joists. I am not sure how we could sister the joists in this situation?

I guess untill we open up the ceiling we won't be able to determine which approach to use. My gut feeling is if we can is to both sister and use noggins, if not install the noggins first, to see if this makes a difference before closing up the ceiling and then adding 2by4 if necessary?
 
Following on from this I'd be interested to know if anyone has any advice with how to sister existing joists that have services running through them?
 
Just wondered if anyone had any further advice or has experienced anything similar to this situation.
 
Why don’t you speak to the owner of the flat above , it’s in their interest to not have the floor collapse under them .
The landlord is responsible for the structure you need their permission to alter it .
 

DIYnot Local

Staff member

If you need to find a tradesperson to get your job done, please try our local search below, or if you are doing it yourself you can find suppliers local to you.

Select the supplier or trade you require, enter your location to begin your search.


Are you a trade or supplier? You can create your listing free at DIYnot Local

 
Sponsored Links
Back
Top