You appear to have a solid wall, is that the gable wall?
Yes that is the gable wall
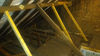
An air brick suggests that the floor is suspended - how many air bricks can you see around the house?
three on the gable end, one on the rear elevation and one on front elevation
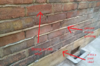
The sand and cement plinth should be removed and all your pointing repointed in lime mortar.
Thanks. Will do
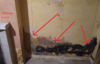
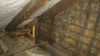
The interior recess seems to have rising and penetrating damp - hack off all traces of damp plaster in the recess on the return wall and the chimney breast. And render with a 3:1 sand & lime mix.
Some form of bitumen tanking has previously been tried - it failed.
Do you intend to keep the tiled fireplace?
I actually want to get rid of the chimney and the chimney breast in its entirety.
Has the flue been swept?
I am unsure at present. I will find out
Examine closely the c/breast and the other recess for damp signs.
The chimney breast appears to be damp free on ground floor
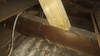
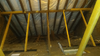
Examine the floor for rot - if it is indeed a suspended floor.
Floor boards have been lifted and there is no rotting to the joist on the ground floor
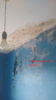
The gutter on the rear elevation is sagging.
Great spot. That is disappointing as i understand that the roof/gutter & render was done approx 1-2 years ago
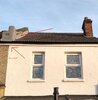
The render to the rear elevation is not of a high standard.
You're right but what gave this away? What are the signs of poor quality render?
The flat roof flashing - is it lead or felt? Any damp below?
It is lead
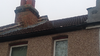
Both the chimney stack and the parapet show fillets of sand and cement " flashings" instead of lead flashing - the front apron lead flashing on the stack is hanging loose. The fillets might crack and allow leaks.
The stack has a slight inwards lean.
As the chimney is not in use and due to all its defects, I would like to remove this and the chimney breast. Is this a job for a competent diy'er? 
The render on the parapet has been repaired?
I am confident work was done to it, but this was before i took ownership
The last flat bit of the parapet capping should be sloping to discharge water - instead its ponding.
This is probably the cause of the damage below on the party wall etc.
The neighbour's parapet shows an air brick in an unusual hump - is there/ was there a chimney breast going up in that corner of the neighbour's house?
I do not believe so. I have attached an pic of the neighbours roof