I have a Bosch GCM 8 SJL Mitre Saw and, I guess this topic has been done to death in various places for Mitre saws in general but, I really couldn't find any successful threads so here is hoping.
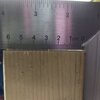
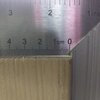
I have attached some pictures where I have calibrated the saw, squaring the blade to the left and right fence and then vertically to the table and right away I am getting far far better cuts than I was before when trying to do true 90 degree cuts.
But, as you can see from the images, it is still a tad out and I can't figure out what else there would be to adjust. Any other ideas what could be giving this slight out of 90 degree cut?
I have tried letting the blade spin up to full speed before pulling down, I have tried pulling down and through the wood really really slow through medium pace through fast and still get very similar results so I am not sure it's "user input".
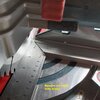
One thing I do notice is, if I slide a bit of wood across the left fence, keep it pushed to the fence and keep sliding right so it slides over to the right fence, ie, so the wood will span both the left and right fence it catches ever so slightly the right fence before sliding over, it catches literally by a hair (or maybe two hairs) but could that "hair" be enough to send it out like shown in the picture? If so, I will struggle because, no matter how I adjust the left fence, soon as I tighten it pulls into that position.
I have attached some pictures where I have calibrated the saw, squaring the blade to the left and right fence and then vertically to the table and right away I am getting far far better cuts than I was before when trying to do true 90 degree cuts.
But, as you can see from the images, it is still a tad out and I can't figure out what else there would be to adjust. Any other ideas what could be giving this slight out of 90 degree cut?
I have tried letting the blade spin up to full speed before pulling down, I have tried pulling down and through the wood really really slow through medium pace through fast and still get very similar results so I am not sure it's "user input".
One thing I do notice is, if I slide a bit of wood across the left fence, keep it pushed to the fence and keep sliding right so it slides over to the right fence, ie, so the wood will span both the left and right fence it catches ever so slightly the right fence before sliding over, it catches literally by a hair (or maybe two hairs) but could that "hair" be enough to send it out like shown in the picture? If so, I will struggle because, no matter how I adjust the left fence, soon as I tighten it pulls into that position.