Fitting skirting and architrave

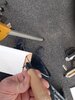
AFAIK that dry foam comes in a can which has a clip to hold the nozzle when not in use - using that clip puts a kink in the flexible nozzle, effectively sealing it (and preventing air from getting at it, causing it to cure). Not seen gun grade low expansion foam in quite a while - standard expanding foam and the newer blue fire foam, yes, but not the low expansion stuff

J&K - that pinkgrip and the equivalent Instastick are low-expansion foams with added adhesive. Instastik is available as both regular and gun grade https://www.screwfix.com/p/dow-inst...Lq_mTSzR0RCCo2srEcQaAhXMEALw_wcB&gclsrc=aw.ds and that pinkgrip has a dual mount that allows either the regular nozzle or a foam gun to be attached

"Pinkgrip Dryfix FR is a revolutionary type of fast-curing adhesive foam that has been specially developed for the rapid installation of plasterboard, insulation boards and other sheet materials such as roof decking and floorboards.
The new Dual Flow system means that Pinkgrip Dryfix FR can be applied using the nozzle provided or attached to the Dry Fix Applicator Gun. Providing significant labour saving and convenience benefits when compared to traditional dry wall adhesives, it will bond to most common building substrates and can be applied horizontally or vertically to the board, wall or battens/beams. The foam expands very minimally on application but enough to fill any gaps on uneven surfaces
."

I have extensively used both recently and nothing to choose between the two brands as far as I can tell (except one's pink)
 
Sponsored Links
Not sure where ours comes from (although it is pink foam and the can is red and white) but I do know that it comes with a fixed on head and the supplier has told us he can't get it in gun grade at present, because we have requested it several times

The kink to seal works if you are storing it for several days, but I don't think I'd trust it for much longer. TBH I still much prefer conventional grip adhesives. Familiarity, but also cost.
 
This foam stuff seems more annoying than anything. I'll stick with gripfil and pins until confident with it . Regarding internal corners which section do you scribe short or long?

Regarding cutting it. Do you do 45 degree cut on chop saw then put a piece of off cut on it at 90 degrees and pencil in the shape ( as in pix)? I found this tricky as both bits of wood not touching. How about using a pin machine for shape?
20210715_101523.jpg
20210715_100822.jpg
20210714_213236.jpg
20210715_101523.jpg
20210715_100822.jpg
20210714_213236.jpg
20210715_095528.jpg
20210715_095712.jpg
 
It's easier to do than describe - perhaps watch some youtube. Basically fit a square ended piece to the wall into the corner. Cut the next piece at 45 degrees as if you were mitreing in to the corner, and then with the coping saw cut away the material along the sharp edge where the cut and the face meet back to 90 degrees (or slightly more to ensure a tight looking fit)
 
Sponsored Links
It's easier to do than describe - perhaps watch some youtube. Basically fit a square ended piece to the wall into the corner. Cut the next piece at 45 degrees as if you were mitring in to the corner, and then with the coping saw cut away the material along the sharp edge where the cut and the face meet back to 90 degrees (or slightly more to ensure a tight looking fit)

Practised on a bit of bull nose. Cut the 45 degrees with chop saw then used coping saw . Is this how you do it? Is it usually longer piece of skirting which scribes over shorter bit or it doesn't matter. I guess gotta make sure I measure the length perfectly before cutting 45 to ensure I dont waste a length
20210715_193311.jpg
20210715_193244.jpg
20210715_192611.jpg
20210715_192836.jpg
 

Attachments

  • 20210715_193046.jpg
    20210715_193046.jpg
    515.9 KB · Views: 68
Yes, that's basically how you do it. It doesn't matter if you do it to the long bit or the short bit.
Cut the scribed end first and get it to fit, then cut the other end off to the correct length but a straight cut.
In that way you only scribe one length of each piece and it is easy to measure and cut the other end square.
 
Of course, the real fun comes when you need to do a piece with scribes at both ends... :mad:
 
20210716_091641.jpg
Of course, the real fun comes when you need to do a piece with scribes at both ends... :mad:
Wouldn't you just do a straight cut then mitre the joining piece?


I guess I could practice on my hall.


Tried out the two adhesives in my garage. The pink grip and foam one. The foam pushed out the top and made a mess. Couldn't wipe it off with wet cloth either-
20210716_100330.jpg
20210716_100426.jpg
20210716_095107.jpg
View attachment 239262
20210716_094021.jpg
 
Last edited:
Far too much foam - that's why the gun grade is better. A foam gun has an adjuster on the discharge and you can shut it down to a minimum. Foam is best when fixing to non-flat surfaces where there are craters and gaps, like you often find behind skirtings. If you have a smooth surface to fix to, the grab adhesives are better.

Foam is also good for large areas like sheets of plasterboard - you wouldn't want to do that with grab adhesive!
 
Wouldn't you just do a straight cut then mitre the joining piece?
There are sometimes circumstances where a scribe at both ends is unavoidable, such as making good skirtings in small bzthrooms and toilets.

The problem with skirting scribes is that skirting is almost never installed plumb (or for that matter corners built square). So whilst you can get the top bit (the moulding) more or less right for one end, and accommodate any tilt in the main body of the skirting, how do you do that at the other end? Another issue is that you will naturally find it easier to cut the scribe on end of the skirting or the other (being right handed I find it easier to cut right end scribes). Bear in mind that you need to incorporate a few degrees of back cut in most of your scribe cut to get a tight fit

plasterers don’t make the plaster down near the floor terribly flat….it tends to belly out a bit. So skirting never sit nice and plumb.
 
20210717_104744.jpg
20210717_104744.jpg
Far too much foam - that's why the gun grade is better. A foam gun has an adjuster on the discharge and you can shut it down to a minimum. Foam is best when fixing to non-flat surfaces where there are craters and gaps, like you often find behind skirtings. If you have a smooth surface to fix to, the grab adhesives are better.

Foam is also good for large areas like sheets of plasterboard - you wouldn't want to do that with grab adhesive!

You say gun grade is better, do you mean gun grade foam or the pink stuff (which i used )?

I'll put less foam on next time, and put it in the middle. It caused an 8mm gap behind skirting with my attempt.
 
Last edited:
There are sometimes circumstances where a scribe at both ends is unavoidable, such as making good skirtings in small bzthrooms and toilets.

The problem with skirting scribes is that skirting is almost never installed plumb (or for that matter corners built square). So whilst you can get the top bit (the moulding) more or less right for one end, and accommodate any tilt in the main body of the skirting, how do you do that at the other end? Another issue is that you will naturally find it easier to cut the scribe on end of the skirting or the other (being right handed I find it easier to cut right end scribes). Bear in mind that you need to incorporate a few degrees of back cut in most of your scribe cut to get a tight fit

Had a play in my hall and found it's better to cut the decking much longer on straight cut incase I mess up the scribe cut and can redo it. The angle on external cut was definitely not 90 degrees. I guess first now just fill any gaps in the joins and worry about cutting perfect angle in future
20210717_121113.jpg
20210717_120954.jpg
 

DIYnot Local

Staff member

If you need to find a tradesperson to get your job done, please try our local search below, or if you are doing it yourself you can find suppliers local to you.

Select the supplier or trade you require, enter your location to begin your search.


Are you a trade or supplier? You can create your listing free at DIYnot Local

 
Sponsored Links
Back
Top