Enlarge Fireplace for Log Burner

Joined
18 Apr 2007
Messages
172
Reaction score
0
Location
Cambridgeshire
Country
United Kingdom
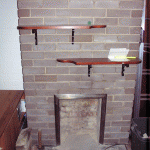
I have removed the gas fire (and inner fireplace) from my chimney to have a log burner installed. I've had a ballpark quote of 3k for this which included £500 burner, new steel in enlarged chimney, liner, insulation, new pot, etc. That is far more than I expected and am hoping to bring material costs in for about £1k and do as much of the work as I can myself.

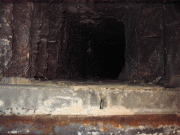
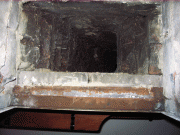
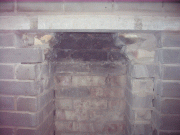
Stage 1 is enlarging the hole. Chimney itself is 1122mm wide externally and narrows to around 600mm when it reaches 1st floor height (as well as deviating to the left).

Current opening is 625mm height , 460mm width, 345mm depth.

Log burner dimensions are 609mm height, 456mm width, 380mm depth. Including hearth, top flue and surround spacing the new hole needs to be around 750mm height, 600mm width.

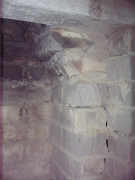
How do I go about working what size lintel I need? External appearance isn't of much concern as the gf wants all the brickwork plastered over anyway :confused:

 
Sponsored Links
Generally the lintel should have 150 bearings, but can survive with 100mm bearings. Use a concrete one - 75mm deep will do

Not sure if you are saying the fire comes with its own back and sides or if its just a basket

Check with the fire installation details to see if you need an special fire-back and throat to the flue.
 
You will need one lintel for the front bricks, and you are most likely to need another for the bricks behind them.

The only problem with chimneys is that sometimes the internal bricks around the flue are loose or have poor joints and so they tend to drop quite easily, so make sure you pack up any dropped bricks
 
Sponsored Links
OK, it's starting to sound tricky now!

Below are some pictures taken looking directly up inside the chimney. As the chimney is widened (brick width out on each side) I can see the need for more support below the sections that taper in.

Where would you position a second lintel? Back of the chimney? Directly behind first lintel? Or maybe two more at right angles to the first?

There is a metal workshop not far from where I live, so perhaps some pre-cut sections of 9mm sheet steel could be used to support the tapering internals of the chimney with less disruption than installing 2 or more lintels?

 
Normally a chimney brest will have old bricks to form the flue, and the face bricks built on the front forming a 215mm thick wall - ie two skins of brickwork.

In your case it seems that the facing bricks are forming the flue and so you only need one lintel on the front to support those grey bricks
 
Based on the advice here and that from a retired builder friend I've made a start on this, but am after reassurance before continuing.

I've put the lintel in place and now I'm starting to widen the opening. The pictures show how I've made the start of the narrowing of the flue visible. I need to enlarge the opening by half a brick on each side, but I'm still concerned that when I do this I will remove too much support from under the narrowing section?

The builder friend said this would be OK, but I didn't really want to ask a 70 year old to get on the floor to look up the chimney to check (lintel wasn't in place when he advised).

What do you think? Is it worth getting some L shaped brackets made out of sheet steel (100mm wide, 400mm deep) to bolt onto the inside of the pillars for extra support?

 
Hi Darren

How did this project go? Did you have to put in additional lintels or did the main one at the front suffice. I'm just about to start a similar project and the amount of brickwork behind the front face of the breast is daunting!
 
I'm still working on it as I got side tracked with other work. I'm playing with some lighting ideas, need to get the chimney rendered up and complete the hearth. I plan to post in the 'Projects' section when I'm done.

I think my chimney is different to normal as I only have one skin of bricks at the front, so I only needed one lintel - you may need 2.

Removing the single brick (end) width from each side my chimney was just packed up with a mix of bricks and weak mortar (pic1). Pics 3 and 4 show how I bricked this up and packed everything tight with mortar. Not sure if it was strictly necessary, but I did it.

The narrowing section, which I now know is called the gather, I supported with steel bars drilled front to back just above the lintel. It's also supported by half bricks built into the back wall (they were there originally), so again I'm not sure if what I did was strictly necessary.

The final pic with the burner in position, with a lighting experiment. I plan to finish the hearth off with slate tiles, but I've still not worked out how to move a 140kg beast into place without damaging them!

I'm no builder, but I believe what I've done so far is safe. Good luck remodelling your chimney. :)

 
Diy Darren (also cambridgeshire like me) ..the fireplace project is definitely going to be my point of influence when tackling my similar fireplace.

Due to the cold & only electric oil rads & open fireplace to keep us warm currently I won't be starting till its good & warm.
Got a Austroflamm 6-8 kw output multifuel stove/burner to fit in the opening which will have to be enlarged, hopefully my stihl cutter can save some time dismantling the old surround.
As far as moving your villager out temporarily in order to fit tiles, we had a similar problem when offloading the Austoflamm (G3) for temporary siting in our narrow entrance hall.
we simpy placed it on a sack barrow (front 2 legs) and bound it with rope & wood to support the rear legs lifted it up over the front step (a good 9 inches) and manouvered it into place, took all of 3 minutes without scratching the granite floor.
Another suggestion maybe to part lift & unroll a thick rubber backed hall rug (dirt trapper) underneath the legs theb unroll some more to part lift the other legs, should then be able to move it slowly & without risk of scratching your nice new surfaces!
 
Looks like a great result on this project. How did it turn out in the end?

Can you advise where you sourced the baffle and how you secured it?
Thanks.
 

DIYnot Local

Staff member

If you need to find a tradesperson to get your job done, please try our local search below, or if you are doing it yourself you can find suppliers local to you.

Select the supplier or trade you require, enter your location to begin your search.


Are you a trade or supplier? You can create your listing free at DIYnot Local

 
Sponsored Links
Back
Top