The method I used one of my bathroom walls. was as follows.
Measure the length of the diagonal of your tile. (if they're 6" square this should come to about 8 1/2 inches.)
Divide this length into the width and height of your panel(allowing a joint of about 1/8 inch per tile), to work out what you will have left over in each dimention. At this stage, if either of the dimentions comes out close to full tiles, you may consider adjusting the width of your joints to make an exact fit.
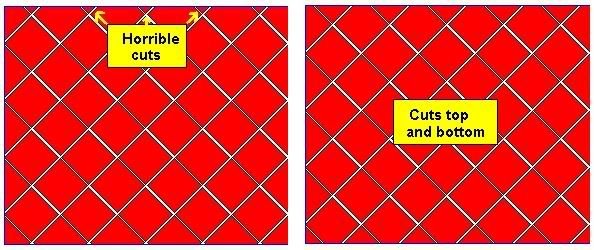
With this knowledge you then need to decide where you are going to place your first full tile. It is usually easiest to start with whole tiles at the bottom of the panel, but if this is going to result in unpractical small visible cuts at the top, it can be worth starting with cut tiles, (thus having more resonable sized cuts top and bottom). See illustration below.
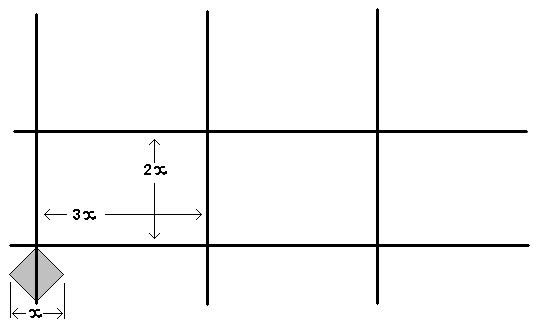
Having decided where you are going to put your first full tile, draw a level line along the wall, level with the top point of the tile. Draw another line through the top point straight up the wall.
Calculate 3 x the diagonal length of your tiles (including the joint) and draw vertical lines up the wall, at this distance apart, (parallel with the first plumb line).
Calculate 2 x the diagonal length of your tiles (including the joint) and draw horizontal lines along the wall, at this distance apart, (parallel with your first level line). See below.
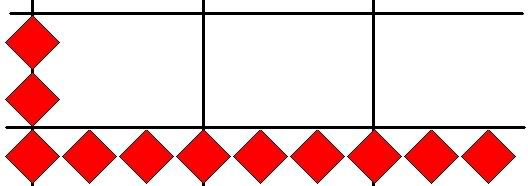
Run in your first line of full tiles. The line along the top assists in maintaining the level, and every third tile you have a guide for the vertical placement of the tile. The orientation of tiles between the plumb lines are simply rotated to maintain point to point with their neighbours.
I stopped for a cup of coffee at this stage to allow this row of tiles to become quite stable. (you may need to use wedges against these to hold the sucessive courses in place).
Put in the next two tiles immediately above the first tile. Ensure that they are spaced equally and that the top one lines up with your next level line.
Fill in the remainder of tiles up to this line. maintaining even joint spacings. Check the top of every course of tiles with a level as you go.
Repeat the process untill you have completed all of the full tiles, then complete the edges with the required cuts.
I am quite used to running in 3 courses of brickwork at a time to a single line, so I have developed a bit of confidence in my own eye. If you don't feel so confident, you could always draw your guide lines closer together.
Hope this helps.