I have a couple of radiators with fixed valves, and I bought TRVs to fit on them. I have been let down by a couple of plumbers who I guess at this time of year are busy installing boilers! When I uncouple the pipe to the right what do I do if the pipe is inflexible? It feels solid but of course it's attached so it will? If it won't move will I end up having to remove the floor tiles? I've watched a few YouTube videos and understand the principles of the job. Have you ever had to insert extra pipework? Am I over thinking this? Would really appreciate a pointer or two...


-
 Looking for a smarter way to manage your heating this winter? We’ve been testing the new Aqara Radiator Thermostat W600 to see how quiet, accurate and easy it is to use around the home. Click here read our review.
You are using an out of date browser. It may not display this or other websites correctly.
You should upgrade or use an alternative browser.
You should upgrade or use an alternative browser.
Plumbers solution for inflexible pipes
- Thread starter NackJich
- Start date
- Joined
- 8 May 2017
- Messages
- 10,479
- Reaction score
- 2,775
- Country

Show us a picture of your new TRV ,it may be a straightforward swap.
- Joined
- 5 Nov 2024
- Messages
- 3,738
- Reaction score
- 1,887
- Country
I think you may need to add additional pipework, due to the existing connection and new tail will be slightly longer.
- Joined
- 8 May 2017
- Messages
- 10,479
- Reaction score
- 2,775
- Country
As above ,you will likely need to extend the pipework.
A TRV with a union fitting ,rather than the compression fitting yours has, may allow you to fit it without amending pipework.
A TRV with a union fitting ,rather than the compression fitting yours has, may allow you to fit it without amending pipework.
1. In your photograph the lower chrome plated part is what screws into the radiator and is called a "tail". Incidentally, the lower nut screwed onto the threaded part shoulddn't be there, it is to attach the valve (upper part in your photograph) to the pipework.
2. The valve is attached to the tail in one of two ways:
2.1 Via a compression fitting, like the one you have. OR
2.2 Via a union fitting. This is the type you have on the photograph of your radiator.
3. If you changed the TRVs you have for union fitting ones, they would probably fit straight on without changing the pipework. Note "probably", its not guaranteed.
4. If you use the one you have already bought it is likely they will need the pipework to be extended a few mm. Either on each side, or on only one side if the radiator can be moved a few mm to left or right.
5. Extending the pipework is not that difficult and should not require removal of any tiles. It could be done in one of the following ways:
5.1 Assuming you need an extra 5 mm. Cut 100 mm out of the pipework between where it comes out of the floor and the elbow just before the valve. Cut a 105 mm length of 15mm diameter copper pipe, and use two straight couplers (e.g. Screwfix item 89904) to join it to the existiong pipework. Easiest to do but leaves four extra soldered joints visible.
5.2 Cut a 50 mm (or greater) length from the pipework, use a coupler to join to the existing pipe, then a suitable (e.g. 55mm) length of pipe, then an elbow (e.g. Screwfix item 91735) and a stub of copper pipe up into the valve. Leaves only two extra joints visible
5.3 Unsolder the horizontal branch of the elbow as it comes out of the floor, and replace the entire length of pipe with one slightly longer and add an elbow and pipe stub. Most difficult to do but leaves no additional joints showing. Unless you have some experience of soldering pipework, probably best left to a professional.
6. Whatever approach you adopt, you will need to drain the system down below the level of the valves, and if soldering, to below floor level. There are ways of avoiding a drain down. These depend on the type of system you have, and require experience to achieve success without a flood.
Looks to me like a straight swap leaving existing tail and nut and olive.
Sorry I meant using new tail and existing nut and olive
- Joined
- 5 Nov 2024
- Messages
- 3,738
- Reaction score
- 1,887
- Country
If the OP can get the new tail in deep enough, ime, it’s rarely the case.Sorry I meant using new tail and existing nut and olive
Thanks for your replies (oldbuffer amazingly detailed)! I photographed one of my existing TRVs and another radiator without any TRV and yes I can see what I am up against. The thread of the tail I bought is way too small for a start. Is there an adapter with no great length for union to compression? I can see me having to get a pro in as I haven't cut pipes before and I can predict a disaster!
Attachments
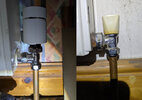
1. The thread of the tail you bought is the correct size. The threaded part screws into the radiator after you have removed the existing tail for the union fitting.
2. If you imagine that tail screwed into the radiator, then the plain part sticking out is what the valve fastens on to. The valve fits onto that plain part, and, when you tighten the nut and olive onto it, it seals the valve to the plain part. The nut, shown wrongly screwed onto the part of the the tail which screws into the radiator in your photograph, is used, with another olive, to secure the pipe into the bottom connection of the valve.
3. There are no "union to compression" adaptors. You either have a union tail and a union valve, or a compression tail with a compression valve.
4. You remove the old tail. Then wrap the threaded shank of the new tail with a good number of wraps of PTFE tap and screw it into the radiator. It should screw in until only 1 or 2 threads remain visible, but it must be tight and require reasonable force with a decent spanner. If there are more than 1 or 2 threads showing, remove the tail, remove and discard the PTFE and re-wrap with 20 wraps. There are other ways of fitting tails, using pipe cord (e.g. Loctite 55) or a liquid PTFE like Flomasta Pipe Seal. The liquid PTFE needs the new and old threads to be clean and grease free, not always easy with an old radiator. You can also use gas PTFE tape, which is much thicker than ordinary PTFE and so requires fewer wraps.
5. If you use a compression tail, they can be cut down in length on the plain side to get the valve closer to the radiator. You must leave enough of the plain part to enable the valve to be fully seated on that plain part, plus a couple of mm. The cut must be clean, perpendicular to the axis of the tail and de-burred with a file or similar.
6. If you use a union tail, you will have to change the new valves to union types, which will come with union tails. The valve side of the tail has a convex curve, and the corresponding part of the valve has a matching concave curve.
7. It is always best to use the union valve and tail as supplied. If you use the existing tail with a new union valve, there is a risk that the curves may not be perfectly matched. If you do try this, use a sealant like JetLube V2 to overcome any slight mis-match, and make sure the tail's union surface is perfectly clean.
8. If you do change the tail, you will need a special spanner to remove the old tail. This will have a hexagon inside it, or possible some form of grooving, and the special spanner will fit into this. Screwfix item 133RH is an example of such a spanner, but there other types such as "universal" radiator radiator keys.
DIYnot Local
Staff member
If you need to find a tradesperson to get your job done, please try our local search below, or if you are doing it yourself you can find suppliers local to you.
Select the supplier or trade you require, enter your location to begin your search.
Please select a service and enter a location to continue...
Are you a trade or supplier? You can create your listing free at DIYnot Local
Similar threads
- Replies
- 5
- Views
- 699
- Replies
- 4
- Views
- 4K
- Replies
- 4
- Views
- 3K
- Replies
- 10
- Views
- 1K