A two gang and a one gang light switch for 2 lights - help!

Joined
14 May 2011
Messages
6
Reaction score
0
Country
United Kingdom
Hi,

I have a double switch and a single switch in my front room. The left hand of the double and the single control the left light, and the right hand double on its own controls the right light.

I swapped my existing plastic switch for a fancy one but the switch operated upside down. E.G. Off was on and visa versa. A friend of mine said he knew how to fix it, but unfortunately after his attemptes to help none of my switches correctly at all!!

Hopefully someone can point me in the right direction?

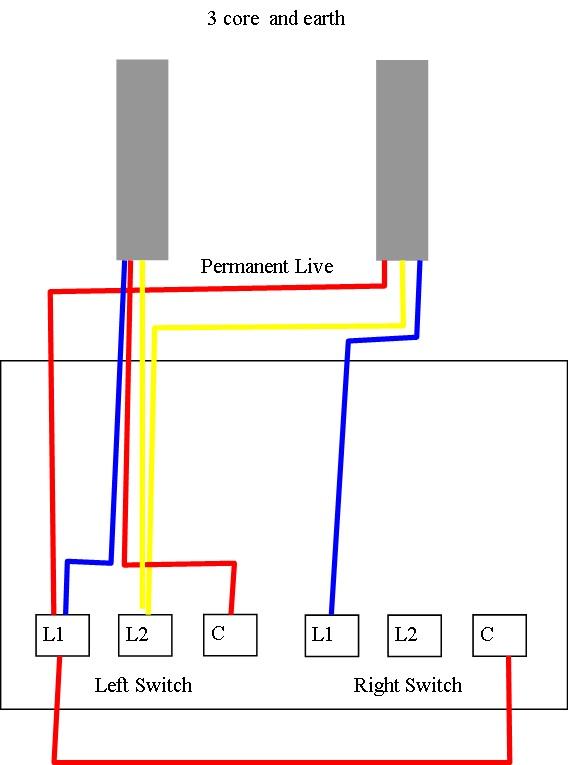
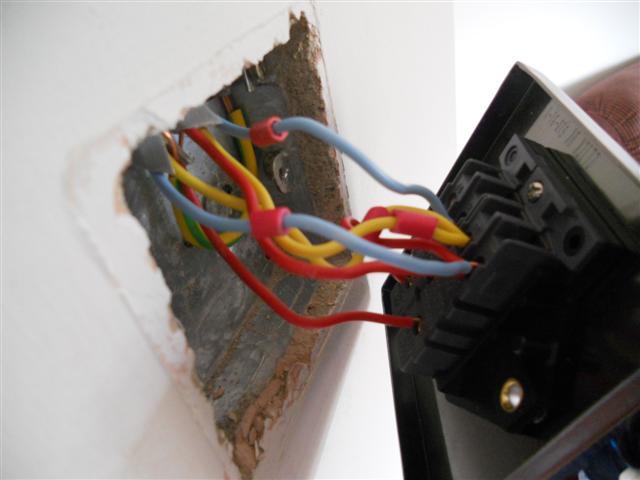
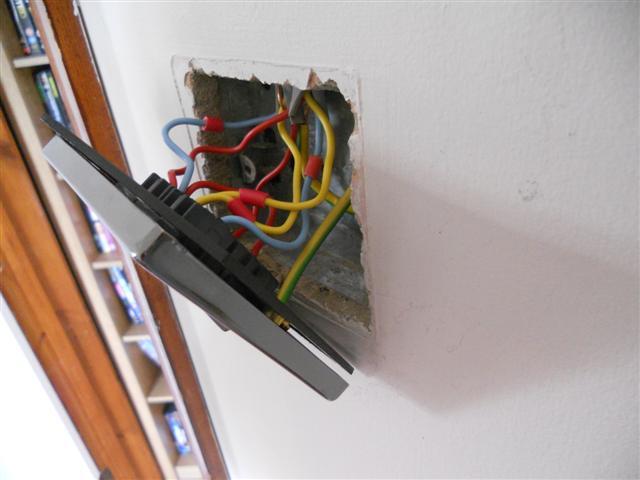
What I can tell you is, I have two 3 core and earth cables going to the double switch (2 reds, 2 blue, 2 yellow and 2 earths) but also a small red wire that connects between the two switch gangs. The single switch also has one 3 core and earth cable running to it.

I have only one live input which comes into the double socket end.

Any help would be greatly received, and please let me know if I have missed out any pertinent information.

Thanks Mr_bump180
 
Sponsored Links
I take it - it was working before your friends assistance?
Which switch did you swop?
 
Hi there,

I swapped both switches with Click Deco Decorative Switches, and yes they worked correctly except the two way switch worked upside down (i.e. off was on and on was off) on both lights.

My friend spent a couple of hours fiddling but now I have to have the single socket in the on position to make the double switch work at all.

Originally there were no wires connected to the L1 connector on the right switch and a little connector wire ran from the Left L1 connector to the Right Common connector.

Anyway, I decided that rather than let him fiddle any further; I thought I'd create a post in hope that someone who has seen this setup before is reading the post.

Thanks in advance,
MrBump180
 
I have a feeling you're going to have get hold of a multimeter to try and establish which cable(s) acts as live, switched live and the strappers. And just to check none of the cables were grouped together in terminal blocks inside the back box where they?

If not, and you can identify the above then the normal way to wire the switches as you have described is as follows:

Starting with the cable you have identified as your live feed.

Put the live feed into the common on the right hand double and then you will have to identify the switch live that goes to the right hand lamp and put that in L1. I take it none of the cable had sleeves on? If you have the right switch live cable then this should power the right hand lamp on its own.

Connect the right hand double common with the left hand double common with a piece of cable. This gives you power to the left hand double common. Then you need to find the switch live that goes the left hand lamp and connect that to the L1 on the left hand double - this should power the left hand lamp on its own.

You will then need to go to the single switch and put the red, blue and yellow cables in the Common, L1 and L2 - it doesn't matter which one goes where but take a note of the terminal and the colour because you want to put the same colours in the same terminals in the left hand double switch.

I know that doesn't account for all your cables but until you can positively identify them it is difficult to proceed.

You should also check at the lamps to see how the wiring is set up there. If they are wall lights it is possible that they require a live and neutral set up in which case you will need to come here.

Try taking some photographs of what you have at both the switches and the lamps and post them here. After that I would go to bed and come back in the morning because its getting late and you don't want to mess about with electricity in the dark or when you are tired.
 
Sponsored Links
Thanks for the update, and I have already given up tonight as the fuse board is out in the garage.

Actually yes, the two yellow wires were together, and two other wires were together with the little link wire making three into one port. Also all of the blue and yellow wires have red collars on to identify them as switched lives which just adds to my confusion. I will however take your advice, dig my out my multi-meter to work out which wires go where and take some pictures in the morning.

Thanks for the help so far,

MrBump180
 
Plan B.

Find out how lighting circuits work BEFORE you start fiddling with them.

It surely is a most basic and fundamental that applies to any field of human activity - if you don't understand it leave off opening it up and meddling with it until you do.

//www.diynot.com/wiki/electrics:lighting
 
At the 2 gang switch,
one cable will go to the single 2 way switch

The other cable will consist of wire permanent live wire
one switched live wire to one light
one switched live wire to the other light

The permanent live wire of the second cable I have mentioned I would expect to be red, but you never know.

If, with the power off, you can safely tell us which cables are which, we should be able to help you.

I would expect one ceiling rose to be fed by either a yellow or blue, also with a joint connecting the remaining wire to a cable supplying the other ceiling rose. See what you can find out.

And tell us which light has to be 2 wayed.

And tell us what markings the switch have, COM, L1 and L2 are usual, but not always the case.
 
Firstly thanks to ban-all-sheds for that gem of wisdom ...although I'm not entirely sure how that will help me out of my current predicament.

OK, I fished out my original diagram from the kitchen bin this morning (nice) and reconnected my original plastic switch. All of the lights then worked correctly, with the fancy single switch still connected.

I then transposed the wiring to the fancy double switch and although the switches all work the lights as they should, the double turns the lights off in the on position and on in the off!

Now my logic fails me as I disconnected the wires again, turned the switch over and reconnected all the wires but the switch still operates upside down. I have looked at the possibility of turning the switch over in the housing, but due to the design that is not possible.

Below are two images, the first is my attempt at a wiring diagram (please excuse the armature nature) and the second a photo of the switch in question.


I can of course give you more information, but didn’t want to take the light fittings down if that was now unnecessary. I have a multi-tester (with continuity), but am uncertain how to determine which is a switched live, and rather than blow myself up experimenting perhaps someone could give me some basic instructions?

My hope is now that a swap a couple of connectors round and the lights start to operated correctly, but I will await you feedback.

I really appreciate the amount of help I have received so far, and look forward to haveing some working lights tonight!!

MrBump180
 
Are those metal switches?

You must earth the metal faceplates. Take the earth wires out of the back box and connect to the metal faceplate terminal.

If possible, provide a link wire in green and yellow sleeve from metal faceplate to metal back box.
 
Hi SparkWright,

I can't believe it was that simple, I switched the wire as you said and I am up and running. Also, a big thank you for the tip regarding the additional earth wire as well. As soon as you mentioned the metal switch it was obvious there should be one, but I wouldn't have thought of it.

Below is a picture of the switch connected correctly and with the linked earth wire attached in the sleeve as you recommended, just in case I gave you sleepless nights!


Thanks again,

MrBump180
 
Firstly thanks to ban-all-sheds for that gem of wisdom ...although I'm not entirely sure how that will help me out of my current predicament.
It'll stop you ever getting into any predicaments ever again.

In fairness my only predicament (apart from allowing my mate take a look) was the switches worked upside down, which even if nobody here had helped me wouldn't have been the end of the world.

In the future if I end up in a similar situation I will post a thread here, before I try anything else. However, I am well aware of my limitations, so don't worry I won't start rewiring the house till next weekend :LOL:
 
To be fair to the op, he did draw a diagram of where the wires went, and when he wired the new switch he wired it exactly as it was. As a DIYer or novice, how was he to know that swapping L1 and L2 will effect the way the switch operates for one way operation? It was his mate interferring which messed things up. As the op had done a diagram he was able to put things back as they were. He also earthed the faceplate as instructed very promptly - he has done everything expected of him, apart from perhaps learning how the switches work, but then he's just a DIYer replacing a switch, afterall. And everyone has to start somewhere.
 

DIYnot Local

Staff member

If you need to find a tradesperson to get your job done, please try our local search below, or if you are doing it yourself you can find suppliers local to you.

Select the supplier or trade you require, enter your location to begin your search.


Are you a trade or supplier? You can create your listing free at DIYnot Local

 
Sponsored Links
Back
Top