

Hi I am making an Oak gallows construction and would like some advice how to join the diagonal part for the best strength.
I want to mount a beam on the ceiling with an upright each end and a gallow construction both ends.
There is not much room for movement and the beams that I am using are very heavy so it is not something I can make on the ground and lift into place. I did weigh the beams, the horizontal piece is 3.5m long just over and it is 250mm x 150mm and weighs about 18 stone, the uprights are 200mm x 150mm and about 2.25m long and weigh about 8 stone each.
The diagonals are 150mm x 150mm.
What I am planning to do is to make holes in the walls each end of the room for the horizontal beam to go into as it the beam is about 7cm longer than the space, ie I will end up with 3.5cm in the wall each end. I will hold the beam up with support acros and put slate, brick and cement etc in each end to support the horizontal beam partially but I realise this is not enough so I will then fit in the 2 uprights tightly (they will be standing on a concrete floor) so that they act as the main supports.
I am not a professional carpenter but I am fairly good with timber and have done stuff like this before.
Last time I did something similar I made a mortice and tenon affair to join the diagonal and paired it away until I could actually slot in the diagonal into the already fixed in place horizontal and vertical parts (obviously the diagonal can not just slot in if the horizontal and verticals are already fixed in place).
I used home made oak 14mm pegs to lock it all into place with offset holes for tightness. It worked pretty well but left small gaps at the diagonal to upright joints, not a disaster but a little annoying. I also wondered about how strong this would be. That was for an outside structure, this time it is for an inside structure and so I want it to be even neater and stronger as there is a chance kids may grab the diagonals and hang off them while playing.
Doing it the way I did with the tenon paired away to slot in obviously it was floppy in the join until the pegs were driven in and the faces touched. I would have liked the tenon and mortice to be much bigger but could not keep it all big and still slot everything in, in place. I also used a bit of Gorilla glue as this fills the gaps a bit as well as sticks.
The ones I did before are very strong but I would still like the advice of others, ie
Is there a special way to do this?
How would you fix the parts together?
Would you cut the tenon any special way?
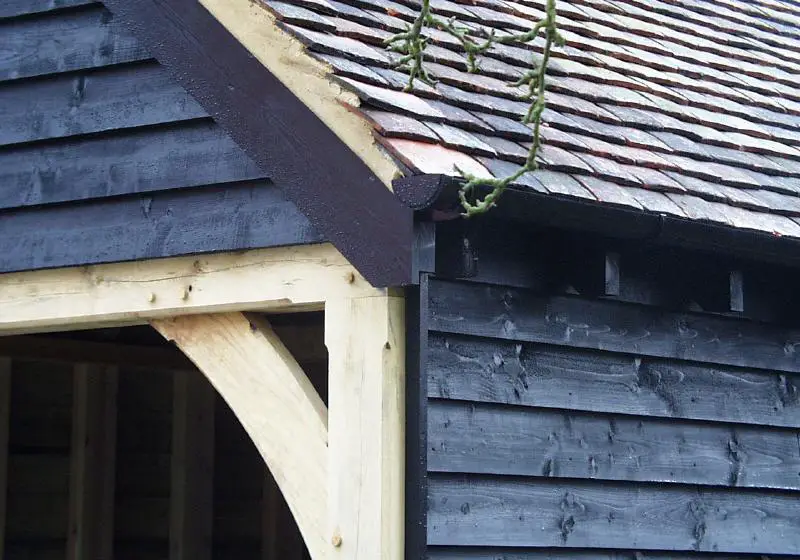
Here is not the one I did but a very similar one, so that you know what I am talking about.
Any advice/help appreciated.
I want to mount a beam on the ceiling with an upright each end and a gallow construction both ends.
There is not much room for movement and the beams that I am using are very heavy so it is not something I can make on the ground and lift into place. I did weigh the beams, the horizontal piece is 3.5m long just over and it is 250mm x 150mm and weighs about 18 stone, the uprights are 200mm x 150mm and about 2.25m long and weigh about 8 stone each.
The diagonals are 150mm x 150mm.
What I am planning to do is to make holes in the walls each end of the room for the horizontal beam to go into as it the beam is about 7cm longer than the space, ie I will end up with 3.5cm in the wall each end. I will hold the beam up with support acros and put slate, brick and cement etc in each end to support the horizontal beam partially but I realise this is not enough so I will then fit in the 2 uprights tightly (they will be standing on a concrete floor) so that they act as the main supports.
I am not a professional carpenter but I am fairly good with timber and have done stuff like this before.
Last time I did something similar I made a mortice and tenon affair to join the diagonal and paired it away until I could actually slot in the diagonal into the already fixed in place horizontal and vertical parts (obviously the diagonal can not just slot in if the horizontal and verticals are already fixed in place).
I used home made oak 14mm pegs to lock it all into place with offset holes for tightness. It worked pretty well but left small gaps at the diagonal to upright joints, not a disaster but a little annoying. I also wondered about how strong this would be. That was for an outside structure, this time it is for an inside structure and so I want it to be even neater and stronger as there is a chance kids may grab the diagonals and hang off them while playing.
Doing it the way I did with the tenon paired away to slot in obviously it was floppy in the join until the pegs were driven in and the faces touched. I would have liked the tenon and mortice to be much bigger but could not keep it all big and still slot everything in, in place. I also used a bit of Gorilla glue as this fills the gaps a bit as well as sticks.
The ones I did before are very strong but I would still like the advice of others, ie
Is there a special way to do this?
How would you fix the parts together?
Would you cut the tenon any special way?
Here is not the one I did but a very similar one, so that you know what I am talking about.
Any advice/help appreciated.
