
You are using an out of date browser. It may not display this or other websites correctly.
You should upgrade or use an alternative browser.
You should upgrade or use an alternative browser.
Leaky tap
- Thread starter Bender000
- Start date

Sponsored Links
1. Three hole bath taps are, I'm afraid, the work of the devil.
2. You will probably find that the handles have long spindles which go down to cartridges below the level of the bath top. To get the cartridges out you may well have to remove the taps from the bath completely, which will require access to the underside of the bath.
3. For preparation, make sure you have a way of readily isolating the hot and cold supplies to the taps.
4. You may well find that there is a grub screw behind each tap handle, recessed into a hole. If so, isolate the water, turn each handle 90 degrees outward and remove the grub screw. They are usually 2 mm or 2.5 mm Allen head grub screws, so you will need appropriate Allen keys.
5. With the grub screws removed, or if there are no grub screws, the handles should pull off vertically. If stiff, pour very hot (but not boiling) water over the taps, which may expand them enough to come loose.
6. With the handles off you may see a hexagonal, usually brass, nut at the top of the tap works for each tap. Undo this if you can and that's the cartridge removed.
6. If all you can see is the spindle going downwards, you will have to remove the chrome base of each tap, then get underneath and remove the taps and then remove the cartridges.
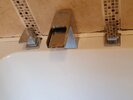
7. As a suggestion, remove the handles, then post a further photograph of what can be seen.
8. If you know the make and model of the tap, look up the installation instructions which may give you a clearer view on how to change the cartridges.
2. You will probably find that the handles have long spindles which go down to cartridges below the level of the bath top. To get the cartridges out you may well have to remove the taps from the bath completely, which will require access to the underside of the bath.
3. For preparation, make sure you have a way of readily isolating the hot and cold supplies to the taps.
4. You may well find that there is a grub screw behind each tap handle, recessed into a hole. If so, isolate the water, turn each handle 90 degrees outward and remove the grub screw. They are usually 2 mm or 2.5 mm Allen head grub screws, so you will need appropriate Allen keys.
5. With the grub screws removed, or if there are no grub screws, the handles should pull off vertically. If stiff, pour very hot (but not boiling) water over the taps, which may expand them enough to come loose.
6. With the handles off you may see a hexagonal, usually brass, nut at the top of the tap works for each tap. Undo this if you can and that's the cartridge removed.
6. If all you can see is the spindle going downwards, you will have to remove the chrome base of each tap, then get underneath and remove the taps and then remove the cartridges.
7. As a suggestion, remove the handles, then post a further photograph of what can be seen.
8. If you know the make and model of the tap, look up the installation instructions which may give you a clearer view on how to change the cartridges.
Really comprehensive answer, many thanks.1. Three hole bath taps are, I'm afraid, the work of the devil.
2. You will probably find that the handles have long spindles which go down to cartridges below the level of the bath top. To get the cartridges out you may well have to remove the taps from the bath completely, which will require access to the underside of the bath.
3. For preparation, make sure you have a way of readily isolating the hot and cold supplies to the taps.
4. You may well find that there is a grub screw behind each tap handle, recessed into a hole. If so, isolate the water, turn each handle 90 degrees outward and remove the grub screw. They are usually 2 mm or 2.5 mm Allen head grub screws, so you will need appropriate Allen keys.
5. With the grub screws removed, or if there are no grub screws, the handles should pull off vertically. If stiff, pour very hot (but not boiling) water over the taps, which may expand them enough to come loose.
6. With the handles off you may see a hexagonal, usually brass, nut at the top of the tap works for each tap. Undo this if you can and that's the cartridge removed.
6. If all you can see is the spindle going downwards, you will have to remove the chrome base of each tap, then get underneath and remove the taps and then remove the cartridges.
7. As a suggestion, remove the handles, then post a further photograph of what can be seen.
8. If you know the make and model of the tap, look up the installation instructions which may give you a clearer view on how to change the cartridges.
I can easily get the bath panel off, but space beyond that is massively restricted as the bath is installed flush against the wall. I'll have a look and post back what I see.
Many many thanks
Sponsored Links
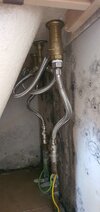
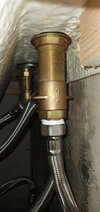
1. At least you have isolation valves fitted which should enable you to turn off the water. The chrome fittings just above the copper pipes. Turn the screwdriver slot in the centre. Slot at right angles across the valve = closed, parallel with the valve = open.
2. Then remove the handles, as above.
3. Post a further picture of what's underneath the handles.
4. With respect to access, seen much worse.
2. Then remove the handles, as above.
3. Post a further picture of what's underneath the handles.
4. With respect to access, seen much worse.
1. At least you have isolation valves fitted which should enable you to turn off the water. The chrome fittings just above the copper pipes. Turn the screwdriver slot in the centre. Slot at right angles across the valve = closed, parallel with the valve = open.
2. Then remove the handles, as above.
3. Post a further picture of what's underneath the handles.
4. With respect to access, seen much worse.
Thanks @oldbuffer.
Will try, but I can see big difficulties in getting my arm down that space with an appropriate tool, then being able to fit the tool to the screw, then being in a position to be apply to apply enough force to remove the taps!!!! Will try - lets see! Thanks again.
1. The taps will most probably be fixed from the top. Quite how you should be able to see with the handles removed.
2. With the top fixings removed you may have enough room to withdraw the mechanisms from underneath without undoing the flexi hoses, at least sufficiently to undo and remove the valves.
2. With the top fixings removed you may have enough room to withdraw the mechanisms from underneath without undoing the flexi hoses, at least sufficiently to undo and remove the valves.

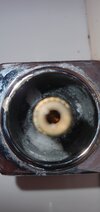
1. I can't see properly inside the square chromed shroud.
2. If there is a hexagon nut inside and you can get to it with a box type spanner, it maybe that it unscrews from the top and the body of each tap comes out from the underside of the bath.
3. If no hexagon inside the square shroud, you would have to disconnect all the flexis from the brass bodies of the taps (not the central part) and unscrew them from below.
4. Its possible that the shrouds screw onto the tap, but were perhaps installed before the quadrant beading which looks as if it would prevent their rotation.
5. If you can illuminate the interior of the shrouds and provide another photograph their interior, it may be possible to be more precise.
DIYnot Local
Staff member
If you need to find a tradesperson to get your job done, please try our local search below, or if you are doing it yourself you can find suppliers local to you.
Select the supplier or trade you require, enter your location to begin your search.
Please select a service and enter a location to continue...
Are you a trade or supplier? You can create your listing free at DIYnot Local
Sponsored Links
Similar threads
- Replies
- 5
- Views
- 9K
- Replies
- 8
- Views
- 5K
- Replies
- 9
- Views
- 8K
- Replies
- 5
- Views
- 1K
