
- Joined
- 8 Oct 2022
- Messages
- 1
- Reaction score
- 0
- Country

Hi all,
First post here!
We are partway through renovating a 30's semi. Back in January we had a log burner installed. We went to a "one stop shop" supply and fit company who quoted what we thought was a reasonable £2000odd for the job. We weren't thrilled with their workmanship, but kind of accepted that we got what we paid for in the end. Other quotes were much higher but we (foolishly) penny pinched and ultimately got what we deserved... Lesson learnt!
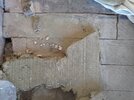
Not long after the fitting, we started to notice damp patches appearing either side of the fireplace recess low down on the walls. I did some reading and concluded that it was salts coming through and adsorbing moisture, showing up in the new (gypsum) plaster.
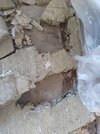
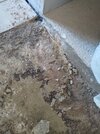
Fast-forward a few more months and we started to notice damp patches on the floorboards coming from under the new hearth stones they'd installed. We lifted one and discovered a soaking wet concrete hearth which they failed to mention at the time of install... Funny that!
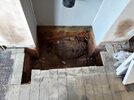
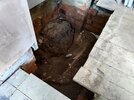
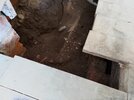
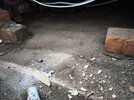
I found a couple of threads online so know this is quite common. Anyway, last weekend we decided to get rid of the hearth stones, pulled the log burner out and began excavating what turned out to be about a tonne-bag worth of bricks, rubble and dirt (for want of a better word). It was absolutely soaking wet and smelt (still does) like a mouldy-damp-cave! Obviously this had bridged the DPC in the walls. We now have a big wet hole in the lounge and are unsure what to do with it.
Do you think we should fill it in with ballast/concrete again or just put in some new joists/batons in and floorboard out the lot? We obviously want the log burner back in, but I'm hoping the floorboard option would be sufficient once we have put in a new hearth of either stone/tiles on top? My theory is that, by keeping it open down there, things might dry out over time?
Any advice would be much appreciated!
Thanks
P18
First post here!
We are partway through renovating a 30's semi. Back in January we had a log burner installed. We went to a "one stop shop" supply and fit company who quoted what we thought was a reasonable £2000odd for the job. We weren't thrilled with their workmanship, but kind of accepted that we got what we paid for in the end. Other quotes were much higher but we (foolishly) penny pinched and ultimately got what we deserved... Lesson learnt!
Not long after the fitting, we started to notice damp patches appearing either side of the fireplace recess low down on the walls. I did some reading and concluded that it was salts coming through and adsorbing moisture, showing up in the new (gypsum) plaster.
Fast-forward a few more months and we started to notice damp patches on the floorboards coming from under the new hearth stones they'd installed. We lifted one and discovered a soaking wet concrete hearth which they failed to mention at the time of install... Funny that!
I found a couple of threads online so know this is quite common. Anyway, last weekend we decided to get rid of the hearth stones, pulled the log burner out and began excavating what turned out to be about a tonne-bag worth of bricks, rubble and dirt (for want of a better word). It was absolutely soaking wet and smelt (still does) like a mouldy-damp-cave! Obviously this had bridged the DPC in the walls. We now have a big wet hole in the lounge and are unsure what to do with it.
Do you think we should fill it in with ballast/concrete again or just put in some new joists/batons in and floorboard out the lot? We obviously want the log burner back in, but I'm hoping the floorboard option would be sufficient once we have put in a new hearth of either stone/tiles on top? My theory is that, by keeping it open down there, things might dry out over time?
Any advice would be much appreciated!
Thanks
P18
Attachments
-
 P_20221001_092450.jpg420.4 KB · Views: 80
 -
 P_20221001_092457.jpg427.4 KB · Views: 73
 -
 P_20221001_092502.jpg377.1 KB · Views: 69
 -
 P_20221001_092521.jpg506.6 KB · Views: 65
 -
 P_20221001_124448.jpg396.3 KB · Views: 73
 -
 P_20221008_114132.jpg372 KB · Views: 68
 -
 P_20221008_114138.jpg354.1 KB · Views: 74
 -
 P_20221008_114141.jpg241.8 KB · Views: 76
 -
 P_20221008_114210.jpg353.2 KB · Views: 71
