

A few of us on here seem to be having to reply to the same questions on tiling over and over again. I had some time to spare so I knocked up this basic guide on tiling. This is by no means comprehensive but it does cover most basic questions asked. I hope it's of some use.
cheers,
gcol
28/09/09 - EDIT: I have decided that I shall no longer be posting on the tiling forum. This is primarily due to one member continually posting differing advice for no other reason than to annoy. This member knows that what he is posting is inferior advice yet he persists. Whilst I have no problem with anyone questioning my advice; when it is questioned as a matter of course then it becomes extremely time consuming for me to continually defend my advice and only (so it seems) for the amusement of this one member.
It's a shame it's come to this, but that's the way it is. As always, I hope this sticky is of some use, and I wish anyone reading it all the best.
gcol
Wall tiling
Deciding what tiles to get
How good is your wall? If it's uneven then the smaller the tile, the easier it will be to lay and the edges of the tiles won't kick up. However, the smaller the tile, the longer they take to fit. For large tiles you need very flat walls. You can easily test how flat your wall is by putting a 1 metre long straight piece of timber on it. You don't want any large gaps under the straight edge or you'll have to fill them with adhesive when you fix the tiles and this makes things difficult. If this is the case, getting a plasterer to skim the walls would be a good idea; tell him you want it flat enough for large tiles.
For tiling around a shower area, I'd recommend using large tiles for two reasons:
1. There are less grouted areas; so damage caused by water getting to the wall material will be greatly minimised. (see tanking)
2. Grouted areas in a shower can quickly become grotty; the less grout you have the less you have to scrub to get it clean.
How many tiles do I need? Measure the wall area (length x height) and add 10-15% for wastage. This should ensure you have a few left over to keep in case you ever damage a tile or two.
What adhesive/grout
It's always better to try and use a powdered adhesive to stick up your tiles; you generally get a better success rate. However, you have a short working time with powdered adhesive - usually about 30 mins, after which time you need to throw it away and mix up a new batch. If you decide to use pre-mixed tub adhesive then go for a decent brand like BAL. Whatever you do, do not use a cheap adhesive and grout in one. e.g. fix and grout it's hard to use and goes on like whipped cream.
If you've got porcelain tiles then you need to ensure that the adhesive is suitable for porcelain tiles - this is because porcelain doesn't absorb as much water as readily as an ordinary ceramic tile.
If you're using mosaic tiles then you'll need an adhesive specifically designed for that purpose or the tiles will slide down the wall.
A 20kg bag of adhesive will tile around 4-5 sq metres.
A 16kg tub of pre-mixed will tile around 3-4 sq metres.
Whether you decide to use powdered adhesive or pre-mixed adhesive you should ALWAYS use a powdered grout. Note: there is a popular misconception that grout is waterproof and that it will not let water through. This is generally incorrect (speciality grouts can be waterproof but for the general user grouts they're not), grouts for regular use may say "waterproof" or "water resistant", all this means is that, it is suitable for areas that get wet. It means that once wet the grout will not deteriorate into mush.
Grout usage will vary greatly depending on the grout joint width and the size of tile you are using. But as a rough estimate, work on 3.5m²/kg. So an area 20m² should need about 6kg of grout.
Primers and tanking
What primer do I use? You may or may not have heard some mixed opinions regarding PVA as a tiling primer. I don't intend to get into the ins and outs of it here but suffice to say, I have no problem with using PVA as a primer for tiles in a non water situation. For showers and bath areas (I mean immediately around a bath and not the rest of the bathroom) I wouldn't use it. ALWAYS read the instructions for the adhesive and follow them. If the instructions recommend a particular primer then you should use that. Around shower areas it's best to use aquapanel (water resistant plaster board) rather than just plasterboard. However, if you're using small tiles (6"x6" or less) or want extra peace of mind, then I'd recommend you use plasterboard AND a tanking product. This is a waterproof paint like substance that prevents any water that may pass through the grout from damaging the walls. BAL and Dunlop make tanking products.
Laying out
Find the centre of the wall you are tiling and mark it with a pencil line. Pick up a tile in each hand and working from the centre line, "walk" the tiles (hand over hand) to the edge of the wall. If the last tile is less than half a tile width, go back to the centre line and this time offer the first tile to the centre line so that the centre of the tile is on the line and walk the tiles again - you should now have a larger piece of tile at the edge.
Ok so now you have a start point to tile horizontally, you now need to sort out the vertical start point. Same again, measure the height of the area you want to tile and find the mid point. If you're tiling up to a ceiling then it's fine to end up with a cut tile at the top. If you're stopping at a certain height (and finishing with tile trim) then ideally you want to finish with a full tile at the top.
If you've got a bath to tile around, then see how the tiles fit - start with a full tile on the bath edge and walk the tiles up the wall. If you have a small piece at the top then you'll need to cut the tile down that sits on the bath. But try to keep this tile as full as possible (at least ¾ of a tile).
You've got a window to tile around? Make a centre line at the centre of the window cill and again and walk the tiles to the edge of the window from that line. If there are small slivers of tile at the edges then you need to move the first tile so that it's centre is on the centre line you made. You should now have larger cut tiles at the edge of the window. You need to ensure that working from this point will give you decent sized tiles at the wall edges too. It is not always possible to have both the window and the wall nicely spaced out so in this case you'll have to see which is the lesser of two evils and just go with that - usually you go with what catches your eye first.
Grout gaps
We have grout joints mainly for 2 reasons:
1. The tiles will, to a certain degree, expand and contract depending upon temperature and moisture. Grout is more compressible than your tile so will allow for this movement. If no (or very small) gap is left then you risk chipping to the tile edges or the tiles could even "tent" away from the wall.
2. When you buy a box of tiles, they will not all be exactly the same size. Leaving a gap allows the installer to allow for this irregularity. So, the more inconsistent the tile size is, the larger the grout gap should be to accomadate.
As a guide though, 2 or 3mm for wall tiles and 4 or 5mm for floor tiles (quarry tiles are usually 7mm).
Fixing tiles
Now the fun starts. You need a level base to start tiling from - you can nail a length of batten (length of wood around 34mm x 18mm x length will be fine) to the wall. Just make sure that it's straight and dead level.
If using powdered adhesive - mix up the adhesive in a bucket. Add about 2 ½" of water then add the powdered adhesive. Don't be frightened of adding quite a bit of powder in one go, it should mix in quite readily. You can pick up a small paddle mixer for a few pounds from a decent builders merchant - this makes mixing very easy. Just keep adding the adhesive and mix until it turns to a peanut butter consistency (the smooth kind not the lumpy).
Now apply adhesive (either pre-mixed tub adhesive or the stuff you've just mixed up) to the wall with a notched trowel (6mm square notched is standard) for regular wall tiles. A smaller notch is needed for mosaic tiles. Depending on how fast you can tile will depend on how much adhesive you should apply - if you're new to tiling and using large tiles (33cm x 33cm), I'd recommend applying enough to cover the tile height and maybe 3 tiles wide, if using smaller tiles then reduce the amount to suit. Pre-mixed tub adhesive can skin over quickly so once on the wall, don't hang about or your tiles will not stick properly.
You need to make sure that the ribs left by the trowel are horizontal and equal in size.
Ok now you can start fixing tiles. Sit the bottom of the tile on the batten and then stand the tile up so that it's parallel to the wall. Now apply moderate pressure evenly to the tile (don't go mad at it - just enough pressure to squash the adhesive behind so that the ribs flatten out and make a solid bed). Fit the next tile and stick one of the prongs of a tile spacer in the gap in between (don't leave the spacer in between the tiles as they are designed to do because they can show through). Wipe off any adhesive that's standing proud of the joint. Continue this process until you reach the last full tile before the edge of the wall. The last tile should be cut; adhesive should be applied to the back of it and then stuck to the wall.
There's not too much else to it - tiles should be cut around windows and other obstacles but fixing them is the same process. Tile edges can be finished off with tile trim. There are a few ways to fit the trim, but I generally cut it to size first, apply adhesive to the wall for the top row of tiles and roughly stick the trim to the adhesive a little higher than where it will finish up. Then fit the tile at either end, slide the trim down behind these two tiles, then fit the remaining tiles into the space left. I find that sliding the trim behind a row of tiles already in place can break the bond between the tile and the wall.
When the adhesive has gone off (set) you can carefully remove the batten that was supporting the tiles. To fill in the tiles below, you can apply adhesive to either the wall or the tile. To support the tile, stick gaffer tape to the front of it and attach it to the tile above until the adhesive sets. Decent gaffer tape will not stretch, so you should be able to keep the tile spacing correct.
Cutting tiles
Tiles can be quickly and easily cut using a tile cutter - you get what you pay for with a tile cutter (broken tiles cost money).
A useful way to cut shapes in tiles is by using an angle grinder with a diamond blade - this is fast and gives a good edge. Don't forget, you can cut the back face of the tile as well as the front to finish off cuts cleanly. With practice, cutting from the back you can make reasonably neat holes in tiles for pipes.
Grouting
Remove all the tile spacers that should be sticking out all over the walls. Using an old chisel (or similar tool) remove any lumps of adhesive that are proud of the joints.
Mixing is easy, get a tub (a paint kettle is ideal) pour just under an inch of water in the bottom, and then add the powder a bit at a time. Don't be frightened of adding quite a bit of powder in one go, it should mix in quite readily. You can pick up a small paddle mixer for a few pounds from a decent builders merchant - this makes mixing very easy. Just keep adding the grout powder and mix until it turns to a peanut butter consistency (the smooth kind not the lumpy).
Now you're ready to grout. You should get a grout float - Marshaltown make the best and a float will cost about £10 (trust me it's worth it). Pour the grout mix into a paint roller tray and work from that. Load an amount of grout on the float and apply it to the tile joints so that it goes right to the bottom of the joint. Your float should be held at around a 45° angle and you should apply the grout diagonally to the joints so that you only wipe off the excess. The tile face should be fairly free of grout at this stage, but if not it's not the end of the world. If after around 15 mins you haven't used all the grout, stop what you're doing and lightly wipe the face of the tiles with a damp sponge. (Wear gloves because it's hard on your hands) You'll need to keep rinsing the sponge often. The tiles you've grouted up to now should be free of any lumps of grout and reasonably clean. Expect a thin slurry of grout to remain on the tiles at this stage. Note: if you have plenty of money you can buy a Washboy that's specifically designed for cleaning off grout. These are excellent, but for a small job are not worth the expense.
Now continue to grout where you left off. Continue this process until you've done all the tiles (stopping every once in a while to clean the tiles. Give all the tiles a wipe over.). If you leave the grout on too long, you'll have a tough job to remove it. You've been warned!
You can give the tiles another light sponging now. Then leave alone for a couple of hours. A misty coat of grout will remain on the tiles - this can be dusted off when the grout is dry after around 5 hours. Wear a dust mask for this. You will probably have to dust/wipe the tiles a few times to remove the powder fully - this is quite normal.
Removing/applying silicone to joint of bath/shower and tiles
Removing silicone
Carefully use a sharp chisel and slide it along the bath/shower surface, then the tile surface at a shallow angle and the silicone will come off easy.
Applying silicone
Here's a fool-proof method that gives a perfect finish.
Clean and dry the area - use meths. Mask off a nice straight line (top and bottom of the joint) using either masking tape or electrical tape (electrical tape sticks to tile better than masking tape).
Fill the bath with cold water.
Apply a bead of sealant to the joint then run along the bead with your finger in one continuous movement. You now have the perfect amount of silicone for the seal.
Remove the tape as soon as you've done this. When removing the tape, you'll have pulled the edge of the seal a little, so you need to go over the whole seal again with a wet finger.
You should now have a perfect seal around your bath/shower.
Drain the water from the bath after around 4 hours when the sealant has gone off.
Most folks on here recommend Dow Corning 785
Floor tiling
Deciding what tiles to get
Solid floors - Concrete / Asphalt
How good is your floor? If it's uneven then the smaller the tile, the easier it will be to lay and the edges of the tiles won't kick up. However, the smaller the tile, the longer they take to fit. For large tiles you need a very flat floor. You can easily test how flat your wall is by putting a 1.5 metre long straight piece of timber on it. You don't want any large gaps under the straight edge or you'll have to fill them with adhesive when you fix the tiles. If this is the case, levelling the floor with self levelling compound is advisable.
If you're tiling outdoors, then you should use porcelain tiles because they don't absorb as much water as regular tiles, therefore, they aren't as susceptible to cracking at freezing temperatures.
Timber floors
If you have floorboards or chipboard down, no matter how level and flat they are, you still need to overboard them with WBP (exterior grade) plywood. (WBP stands for Water and Boil Proof or is sometimes referred to as Weather and Boil Proof.) For over-boarding you need 12mm thick ply and screw it down every 200mm all over the face of the board. Use 25mm screws if you have 18mm floorboards and 30mm screws if you have 22mm floorboards - this should ensure that the screws don't go through the floorboards and risk damaging pipes or cables. If you remove the floorboards to replace with ply then use 25mm ply. If replacing, you need to add extra support (noggins) in between the joists and under the joints in the ply.
A 20kg bag of adhesive will tile around 4 sq metres.
How many tiles do I need? Measure the floor area (length x width) and add 10-15% for wastage. This should ensure you have a few left over to keep in case you ever damage a tile or two. When tiling a bathroom, it's a good idea to leave the left over tiles under the bath - they'll be hidden by the bath panel and will be safe until they are needed by yourself or the next owner.
Laying out
Find the centre of the floor you are tiling and mark it with a marker pen. Pick up a tile in each hand and working from the centre line, walk the tiles (hand over hand) to the edge of the floor. If the last tile is less than half a tile width, go back to the centre line and this time offer the first tile to the centre line so that the centre of the tile is on the line and walk the tiles again - you should now have a larger piece of tile at the edges. Generally rooms are not perfectly square so you should measure the centre line at the other end of the room too. Once you're happy with that centre line for the whole room, you can mark it with some white tape.
Ok so now you have a start point in one direction you need to do the same in the other direction to give you a cross of white tape in the centre of the room. Once you have your start point and a cross of white tape, you can now start fitting the tiles. Starting from the middle of the room, you work outwards and in line with the tape to keep it square (see fixing tiles below).
Grout gaps
We have grout joints mainly for 2 reasons:
1. The tiles will, to a certain degree, expand and contract depending upon temperature and moisture. Grout is more compressible than your tile so will allow for this movement. If no (or very small) gap is left then you risk chipping to the tile edges or the tiles could even "tent" away from the wall.
2. When you buy a box of tiles, they will not all be exactly the same size. Leaving a gap allows the installer to allow for this irregularity. So, the more inconsistent the tile size is, the larger the grout gap should be to accomadate.
As a guide though, 2 or 3mm for wall tiles and 5mm for floor tiles (quarry tiles are usually 7mm).
What adhesive/grout
Solid floors - Concrete / Asphalt
The type of adhesive you use depends on the tiles you've selected. For regular ceramic tiles you can use a regular rapidset powdered adhesive. For porcelain tiles you need to ensure that the adhesive is suitable for use with porcelain tiles. You don't need any fancy adhesive for tiling onto solid floors - there's no reason to spend more than £10 for a 20kg bag. Feb fastset wall and floor tile adhesive is cheap and works very well.
Sweep, vacuum then mop the floor twice to ensure it's clean.
If the instructions on the adhesive recommend a primer then you should use it.
Powdered floor grout should be used - I recommend grey colour because most other colours look grubby quickly.
Timber floors
For timber floors you MUST use a decent flexible adhesive - I can't stress this enough. BAL do an excellent rapidset flexible adhesive - it is three times the price of regular non flexible adhesive but you really want to use the best for this application.
If the instructions on the adhesive recommend a primer then you should use it.
FLEXIBLE Powdered floor grout should be used - I recommend grey colour because most other colours look grubby quickly.
Fixing tiles
Mix up the adhesive in a bucket. Add about 2 ½" of water then add the powdered adhesive. Don't be frightened of adding quite a bit of powder in one go, it should mix in quite readily. You can pick up a small paddle mixer for a few pounds from a decent builders merchant - this makes mixing very easy. Just keep adding the adhesive and mix until it turns to a peanut butter consistency (the smooth kind not the lumpy).
Use a gauging trowel (flat wide trowel) to get some adhesive out of the bucket and put it on the floor. Spread the adhesive out with a half round notched trowel (20mm notches is standard). Make sure the adhesive is evenly spread then place the tile on the adhesive inline with the white tape you laid earlier. Apply moderate pressure so that the adhesive ridges underneath squash to become a solid bed. Then lay the next tile and use a spacer in between. Just stick one prong of the spacer into the join - don't sit the whole thing in or they'll show through in the future.
Tile the room in quarters and make sure you leave the quarter next to the outside door until last. Just put down the full tiles (leave the cut edges until last). Using a rapidset adhesive you will be able to walk on the tiles after about 3 hours. Now you can walk on the tiles, cut all the edge tiles, then mix up another batch of adhesive and lay them all.
Cutting tiles
Tiles can be quickly and easily cut using a tile cutter - you get what you pay for with a tile cutter (broken tiles cost money).
A useful way to cut shapes in tiles is by using an angle grinder with a diamond blade - this is fast and gives a good edge. Don't forget, you can cut the back face of the tile as well as the front to finish off cuts cleanly. With practice, cutting from the back you can make neat holes in tiles for pipes.
Note: Porcelain tiles are much harder to cut and drill than regular ceramic tiles. Bare this in mind if trying to use a cheap tile cutter with porcelain tiles.
Grouting
Remove all the tile spacers that should be sticking out all over the floor. Using an old chisel (or similar tool) remove any lumps of adhesive that are proud of the joints.
Mixing is easy, get a tub (a paint kettle is ideal) pour just under an inch of water in the bottom, and then add the powder a bit at a time. Don't be frightened of adding quite a bit of powder in one go, it should mix in quite readily. You can pick up a small paddle mixer for a few pounds from a decent builders merchant - this makes mixing very easy. Just keep adding the grout powder and mix until it turns to a peanut butter consistency (the smooth kind not the lumpy).
Now you're ready to grout. You should get a grout float - Marshaltown make the best and a float will cost about £10 (trust me it's worth it). Pour the grout mix into a paint roller tray and work from that. Scoop some grout onto the floor and work it into the joints so that it goes right to the bottom. Your float should be held at around a 45° angle and you should apply the grout diagonally to the joints so that you only wipe off the excess. The tile face should be fairly free of grout at this stage, but if not it's not the end of the world. If after around 15 mins you haven't used all the grout, stop what you're doing and lightly wipe the face of the tiles with a damp sponge. (Wear gloves because it's hard on your hands) You'll need to keep rinsing the sponge often. The tiles you've grouted up to now should be free of any lumps of grout and reasonably clean. Expect a thin slurry of grout to remain on the tiles at this stage. Note: if you have plenty of money you can buy a Washboy that's specifically designed for cleaning off grout. These are excellent, but for a small job are not worth the expense.
Now continue to grout where you left off. Continue this process until you've done all the tiles (stopping every once in a while to clean the tiles). If you leave the grout on too long, you'll have a tough job to remove it. You've been warned!
You can give the tiles another light sponging now. Then leave alone for a couple of hours. A misty coat of grout will remain on the tiles - this can be dusted off when the grout is dry after around 5 hours. Wear a dust mask for this. You will probably have to dust/mop the tiles a few times to remove the powder fully - this is quite normal.
Drilling tiles
Ok, so you have your nice new tiles firmly stuck to your walls and floors and now you want to start fitting things like soap dishes to walls and toilet pans to floors. So you'll need to drill some holes.
How you go about drilling holes depends on the type of tiles you have.
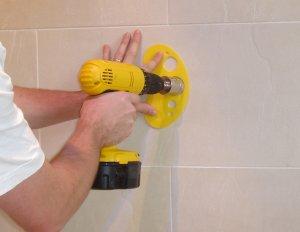
If you have regular ceramic tiles, you should have no problem using a masonry drill bit (preferrably one in good condition). Mark out where your hole needs to be, then put the drill onto the centre of the mark (the drill isn't spinning at this stage). It's important to ensure that the drill is square to the tile face or else it will wander when you start the drill spinning. Once you're happy that the drill is square, start the drill spinning (not on hammer action) but very slowly at first (so it's only just moving) - at this point you're just making sure that the drill is staying in one spot. If it starts moving about, stop and re-position it. Before long the drill will bite into the surface of the tile - at this point you can increase the speed. Once you are through the tile itself, you can if you wish, turn on the hammer action if you have a solid wall to drill into. Do not attempt to drill through tiles on hammer action.
If you have a harder tile such as porcelain then you're going to struggle with even the best masonry drill bit. They will go through, but the problem you have will be that the drill will overheat very quickly and will stop cutting. There is a way of using a masonry bit with porcelain tiles but it only really works on floor tiles - this involves building a small wall around the area (with plasticine) and filling it with water - you can then slowly drill your hole and the water will prevent the drill from overheating and "burning out". This is not the ideal way of doing it, but can get you out trouble if you've lost your diamond bit.
"A diamond bit" I hear you say! Ideally, for harder tiles, you want to be using a diamond drill bit - this is essentially a tube with crushed industrial diamonds stuck around one end. These can be quite expensive if you were to buy them at your local diy store, but the option to buy them cheaply from overseas is there. Some of the pro tilers on here use this site and say that you will receive them within the week.
For ease, you can get a guide that will allow for easier alignment of the hole. If you get someone to apply water to the drill bit while you drill, the bit will last longer. Be warned, you may only get a two or three holes out of a drill in very hard tiles.
Using wall fixings
You should have no problem just using a regular wall plug (rawl plug) - just make sure that when you push the plug into the hole that you use a hammer and a screw to tap the plug into the hole so that it's about half way through the tile. This will remove the risk of cracking.
cheers,
gcol
28/09/09 - EDIT: I have decided that I shall no longer be posting on the tiling forum. This is primarily due to one member continually posting differing advice for no other reason than to annoy. This member knows that what he is posting is inferior advice yet he persists. Whilst I have no problem with anyone questioning my advice; when it is questioned as a matter of course then it becomes extremely time consuming for me to continually defend my advice and only (so it seems) for the amusement of this one member.
It's a shame it's come to this, but that's the way it is. As always, I hope this sticky is of some use, and I wish anyone reading it all the best.
gcol
Wall tiling
Deciding what tiles to get
How good is your wall? If it's uneven then the smaller the tile, the easier it will be to lay and the edges of the tiles won't kick up. However, the smaller the tile, the longer they take to fit. For large tiles you need very flat walls. You can easily test how flat your wall is by putting a 1 metre long straight piece of timber on it. You don't want any large gaps under the straight edge or you'll have to fill them with adhesive when you fix the tiles and this makes things difficult. If this is the case, getting a plasterer to skim the walls would be a good idea; tell him you want it flat enough for large tiles.
For tiling around a shower area, I'd recommend using large tiles for two reasons:
1. There are less grouted areas; so damage caused by water getting to the wall material will be greatly minimised. (see tanking)
2. Grouted areas in a shower can quickly become grotty; the less grout you have the less you have to scrub to get it clean.
How many tiles do I need? Measure the wall area (length x height) and add 10-15% for wastage. This should ensure you have a few left over to keep in case you ever damage a tile or two.
What adhesive/grout
It's always better to try and use a powdered adhesive to stick up your tiles; you generally get a better success rate. However, you have a short working time with powdered adhesive - usually about 30 mins, after which time you need to throw it away and mix up a new batch. If you decide to use pre-mixed tub adhesive then go for a decent brand like BAL. Whatever you do, do not use a cheap adhesive and grout in one. e.g. fix and grout it's hard to use and goes on like whipped cream.
If you've got porcelain tiles then you need to ensure that the adhesive is suitable for porcelain tiles - this is because porcelain doesn't absorb as much water as readily as an ordinary ceramic tile.
If you're using mosaic tiles then you'll need an adhesive specifically designed for that purpose or the tiles will slide down the wall.
A 20kg bag of adhesive will tile around 4-5 sq metres.
A 16kg tub of pre-mixed will tile around 3-4 sq metres.
Whether you decide to use powdered adhesive or pre-mixed adhesive you should ALWAYS use a powdered grout. Note: there is a popular misconception that grout is waterproof and that it will not let water through. This is generally incorrect (speciality grouts can be waterproof but for the general user grouts they're not), grouts for regular use may say "waterproof" or "water resistant", all this means is that, it is suitable for areas that get wet. It means that once wet the grout will not deteriorate into mush.
Grout usage will vary greatly depending on the grout joint width and the size of tile you are using. But as a rough estimate, work on 3.5m²/kg. So an area 20m² should need about 6kg of grout.
Primers and tanking
What primer do I use? You may or may not have heard some mixed opinions regarding PVA as a tiling primer. I don't intend to get into the ins and outs of it here but suffice to say, I have no problem with using PVA as a primer for tiles in a non water situation. For showers and bath areas (I mean immediately around a bath and not the rest of the bathroom) I wouldn't use it. ALWAYS read the instructions for the adhesive and follow them. If the instructions recommend a particular primer then you should use that. Around shower areas it's best to use aquapanel (water resistant plaster board) rather than just plasterboard. However, if you're using small tiles (6"x6" or less) or want extra peace of mind, then I'd recommend you use plasterboard AND a tanking product. This is a waterproof paint like substance that prevents any water that may pass through the grout from damaging the walls. BAL and Dunlop make tanking products.
Laying out
Find the centre of the wall you are tiling and mark it with a pencil line. Pick up a tile in each hand and working from the centre line, "walk" the tiles (hand over hand) to the edge of the wall. If the last tile is less than half a tile width, go back to the centre line and this time offer the first tile to the centre line so that the centre of the tile is on the line and walk the tiles again - you should now have a larger piece of tile at the edge.
Ok so now you have a start point to tile horizontally, you now need to sort out the vertical start point. Same again, measure the height of the area you want to tile and find the mid point. If you're tiling up to a ceiling then it's fine to end up with a cut tile at the top. If you're stopping at a certain height (and finishing with tile trim) then ideally you want to finish with a full tile at the top.
If you've got a bath to tile around, then see how the tiles fit - start with a full tile on the bath edge and walk the tiles up the wall. If you have a small piece at the top then you'll need to cut the tile down that sits on the bath. But try to keep this tile as full as possible (at least ¾ of a tile).
You've got a window to tile around? Make a centre line at the centre of the window cill and again and walk the tiles to the edge of the window from that line. If there are small slivers of tile at the edges then you need to move the first tile so that it's centre is on the centre line you made. You should now have larger cut tiles at the edge of the window. You need to ensure that working from this point will give you decent sized tiles at the wall edges too. It is not always possible to have both the window and the wall nicely spaced out so in this case you'll have to see which is the lesser of two evils and just go with that - usually you go with what catches your eye first.
Grout gaps
We have grout joints mainly for 2 reasons:
1. The tiles will, to a certain degree, expand and contract depending upon temperature and moisture. Grout is more compressible than your tile so will allow for this movement. If no (or very small) gap is left then you risk chipping to the tile edges or the tiles could even "tent" away from the wall.
2. When you buy a box of tiles, they will not all be exactly the same size. Leaving a gap allows the installer to allow for this irregularity. So, the more inconsistent the tile size is, the larger the grout gap should be to accomadate.
As a guide though, 2 or 3mm for wall tiles and 4 or 5mm for floor tiles (quarry tiles are usually 7mm).
Fixing tiles
Now the fun starts. You need a level base to start tiling from - you can nail a length of batten (length of wood around 34mm x 18mm x length will be fine) to the wall. Just make sure that it's straight and dead level.
If using powdered adhesive - mix up the adhesive in a bucket. Add about 2 ½" of water then add the powdered adhesive. Don't be frightened of adding quite a bit of powder in one go, it should mix in quite readily. You can pick up a small paddle mixer for a few pounds from a decent builders merchant - this makes mixing very easy. Just keep adding the adhesive and mix until it turns to a peanut butter consistency (the smooth kind not the lumpy).
Now apply adhesive (either pre-mixed tub adhesive or the stuff you've just mixed up) to the wall with a notched trowel (6mm square notched is standard) for regular wall tiles. A smaller notch is needed for mosaic tiles. Depending on how fast you can tile will depend on how much adhesive you should apply - if you're new to tiling and using large tiles (33cm x 33cm), I'd recommend applying enough to cover the tile height and maybe 3 tiles wide, if using smaller tiles then reduce the amount to suit. Pre-mixed tub adhesive can skin over quickly so once on the wall, don't hang about or your tiles will not stick properly.
You need to make sure that the ribs left by the trowel are horizontal and equal in size.
Ok now you can start fixing tiles. Sit the bottom of the tile on the batten and then stand the tile up so that it's parallel to the wall. Now apply moderate pressure evenly to the tile (don't go mad at it - just enough pressure to squash the adhesive behind so that the ribs flatten out and make a solid bed). Fit the next tile and stick one of the prongs of a tile spacer in the gap in between (don't leave the spacer in between the tiles as they are designed to do because they can show through). Wipe off any adhesive that's standing proud of the joint. Continue this process until you reach the last full tile before the edge of the wall. The last tile should be cut; adhesive should be applied to the back of it and then stuck to the wall.
There's not too much else to it - tiles should be cut around windows and other obstacles but fixing them is the same process. Tile edges can be finished off with tile trim. There are a few ways to fit the trim, but I generally cut it to size first, apply adhesive to the wall for the top row of tiles and roughly stick the trim to the adhesive a little higher than where it will finish up. Then fit the tile at either end, slide the trim down behind these two tiles, then fit the remaining tiles into the space left. I find that sliding the trim behind a row of tiles already in place can break the bond between the tile and the wall.
When the adhesive has gone off (set) you can carefully remove the batten that was supporting the tiles. To fill in the tiles below, you can apply adhesive to either the wall or the tile. To support the tile, stick gaffer tape to the front of it and attach it to the tile above until the adhesive sets. Decent gaffer tape will not stretch, so you should be able to keep the tile spacing correct.
Cutting tiles
Tiles can be quickly and easily cut using a tile cutter - you get what you pay for with a tile cutter (broken tiles cost money).
A useful way to cut shapes in tiles is by using an angle grinder with a diamond blade - this is fast and gives a good edge. Don't forget, you can cut the back face of the tile as well as the front to finish off cuts cleanly. With practice, cutting from the back you can make reasonably neat holes in tiles for pipes.
Grouting
Remove all the tile spacers that should be sticking out all over the walls. Using an old chisel (or similar tool) remove any lumps of adhesive that are proud of the joints.
Mixing is easy, get a tub (a paint kettle is ideal) pour just under an inch of water in the bottom, and then add the powder a bit at a time. Don't be frightened of adding quite a bit of powder in one go, it should mix in quite readily. You can pick up a small paddle mixer for a few pounds from a decent builders merchant - this makes mixing very easy. Just keep adding the grout powder and mix until it turns to a peanut butter consistency (the smooth kind not the lumpy).
Now you're ready to grout. You should get a grout float - Marshaltown make the best and a float will cost about £10 (trust me it's worth it). Pour the grout mix into a paint roller tray and work from that. Load an amount of grout on the float and apply it to the tile joints so that it goes right to the bottom of the joint. Your float should be held at around a 45° angle and you should apply the grout diagonally to the joints so that you only wipe off the excess. The tile face should be fairly free of grout at this stage, but if not it's not the end of the world. If after around 15 mins you haven't used all the grout, stop what you're doing and lightly wipe the face of the tiles with a damp sponge. (Wear gloves because it's hard on your hands) You'll need to keep rinsing the sponge often. The tiles you've grouted up to now should be free of any lumps of grout and reasonably clean. Expect a thin slurry of grout to remain on the tiles at this stage. Note: if you have plenty of money you can buy a Washboy that's specifically designed for cleaning off grout. These are excellent, but for a small job are not worth the expense.
Now continue to grout where you left off. Continue this process until you've done all the tiles (stopping every once in a while to clean the tiles. Give all the tiles a wipe over.). If you leave the grout on too long, you'll have a tough job to remove it. You've been warned!
You can give the tiles another light sponging now. Then leave alone for a couple of hours. A misty coat of grout will remain on the tiles - this can be dusted off when the grout is dry after around 5 hours. Wear a dust mask for this. You will probably have to dust/wipe the tiles a few times to remove the powder fully - this is quite normal.
Removing/applying silicone to joint of bath/shower and tiles
Removing silicone
Carefully use a sharp chisel and slide it along the bath/shower surface, then the tile surface at a shallow angle and the silicone will come off easy.
Applying silicone
Here's a fool-proof method that gives a perfect finish.
Clean and dry the area - use meths. Mask off a nice straight line (top and bottom of the joint) using either masking tape or electrical tape (electrical tape sticks to tile better than masking tape).
Fill the bath with cold water.
Apply a bead of sealant to the joint then run along the bead with your finger in one continuous movement. You now have the perfect amount of silicone for the seal.
Remove the tape as soon as you've done this. When removing the tape, you'll have pulled the edge of the seal a little, so you need to go over the whole seal again with a wet finger.
You should now have a perfect seal around your bath/shower.
Drain the water from the bath after around 4 hours when the sealant has gone off.
Most folks on here recommend Dow Corning 785
Floor tiling
Deciding what tiles to get
Solid floors - Concrete / Asphalt
How good is your floor? If it's uneven then the smaller the tile, the easier it will be to lay and the edges of the tiles won't kick up. However, the smaller the tile, the longer they take to fit. For large tiles you need a very flat floor. You can easily test how flat your wall is by putting a 1.5 metre long straight piece of timber on it. You don't want any large gaps under the straight edge or you'll have to fill them with adhesive when you fix the tiles. If this is the case, levelling the floor with self levelling compound is advisable.
If you're tiling outdoors, then you should use porcelain tiles because they don't absorb as much water as regular tiles, therefore, they aren't as susceptible to cracking at freezing temperatures.
Timber floors
If you have floorboards or chipboard down, no matter how level and flat they are, you still need to overboard them with WBP (exterior grade) plywood. (WBP stands for Water and Boil Proof or is sometimes referred to as Weather and Boil Proof.) For over-boarding you need 12mm thick ply and screw it down every 200mm all over the face of the board. Use 25mm screws if you have 18mm floorboards and 30mm screws if you have 22mm floorboards - this should ensure that the screws don't go through the floorboards and risk damaging pipes or cables. If you remove the floorboards to replace with ply then use 25mm ply. If replacing, you need to add extra support (noggins) in between the joists and under the joints in the ply.
A 20kg bag of adhesive will tile around 4 sq metres.
How many tiles do I need? Measure the floor area (length x width) and add 10-15% for wastage. This should ensure you have a few left over to keep in case you ever damage a tile or two. When tiling a bathroom, it's a good idea to leave the left over tiles under the bath - they'll be hidden by the bath panel and will be safe until they are needed by yourself or the next owner.
Laying out
Find the centre of the floor you are tiling and mark it with a marker pen. Pick up a tile in each hand and working from the centre line, walk the tiles (hand over hand) to the edge of the floor. If the last tile is less than half a tile width, go back to the centre line and this time offer the first tile to the centre line so that the centre of the tile is on the line and walk the tiles again - you should now have a larger piece of tile at the edges. Generally rooms are not perfectly square so you should measure the centre line at the other end of the room too. Once you're happy with that centre line for the whole room, you can mark it with some white tape.
Ok so now you have a start point in one direction you need to do the same in the other direction to give you a cross of white tape in the centre of the room. Once you have your start point and a cross of white tape, you can now start fitting the tiles. Starting from the middle of the room, you work outwards and in line with the tape to keep it square (see fixing tiles below).
Grout gaps
We have grout joints mainly for 2 reasons:
1. The tiles will, to a certain degree, expand and contract depending upon temperature and moisture. Grout is more compressible than your tile so will allow for this movement. If no (or very small) gap is left then you risk chipping to the tile edges or the tiles could even "tent" away from the wall.
2. When you buy a box of tiles, they will not all be exactly the same size. Leaving a gap allows the installer to allow for this irregularity. So, the more inconsistent the tile size is, the larger the grout gap should be to accomadate.
As a guide though, 2 or 3mm for wall tiles and 5mm for floor tiles (quarry tiles are usually 7mm).
What adhesive/grout
Solid floors - Concrete / Asphalt
The type of adhesive you use depends on the tiles you've selected. For regular ceramic tiles you can use a regular rapidset powdered adhesive. For porcelain tiles you need to ensure that the adhesive is suitable for use with porcelain tiles. You don't need any fancy adhesive for tiling onto solid floors - there's no reason to spend more than £10 for a 20kg bag. Feb fastset wall and floor tile adhesive is cheap and works very well.
Sweep, vacuum then mop the floor twice to ensure it's clean.
If the instructions on the adhesive recommend a primer then you should use it.
Powdered floor grout should be used - I recommend grey colour because most other colours look grubby quickly.
Timber floors
For timber floors you MUST use a decent flexible adhesive - I can't stress this enough. BAL do an excellent rapidset flexible adhesive - it is three times the price of regular non flexible adhesive but you really want to use the best for this application.
If the instructions on the adhesive recommend a primer then you should use it.
FLEXIBLE Powdered floor grout should be used - I recommend grey colour because most other colours look grubby quickly.
Fixing tiles
Mix up the adhesive in a bucket. Add about 2 ½" of water then add the powdered adhesive. Don't be frightened of adding quite a bit of powder in one go, it should mix in quite readily. You can pick up a small paddle mixer for a few pounds from a decent builders merchant - this makes mixing very easy. Just keep adding the adhesive and mix until it turns to a peanut butter consistency (the smooth kind not the lumpy).
Use a gauging trowel (flat wide trowel) to get some adhesive out of the bucket and put it on the floor. Spread the adhesive out with a half round notched trowel (20mm notches is standard). Make sure the adhesive is evenly spread then place the tile on the adhesive inline with the white tape you laid earlier. Apply moderate pressure so that the adhesive ridges underneath squash to become a solid bed. Then lay the next tile and use a spacer in between. Just stick one prong of the spacer into the join - don't sit the whole thing in or they'll show through in the future.
Tile the room in quarters and make sure you leave the quarter next to the outside door until last. Just put down the full tiles (leave the cut edges until last). Using a rapidset adhesive you will be able to walk on the tiles after about 3 hours. Now you can walk on the tiles, cut all the edge tiles, then mix up another batch of adhesive and lay them all.
Cutting tiles
Tiles can be quickly and easily cut using a tile cutter - you get what you pay for with a tile cutter (broken tiles cost money).
A useful way to cut shapes in tiles is by using an angle grinder with a diamond blade - this is fast and gives a good edge. Don't forget, you can cut the back face of the tile as well as the front to finish off cuts cleanly. With practice, cutting from the back you can make neat holes in tiles for pipes.
Note: Porcelain tiles are much harder to cut and drill than regular ceramic tiles. Bare this in mind if trying to use a cheap tile cutter with porcelain tiles.
Grouting
Remove all the tile spacers that should be sticking out all over the floor. Using an old chisel (or similar tool) remove any lumps of adhesive that are proud of the joints.
Mixing is easy, get a tub (a paint kettle is ideal) pour just under an inch of water in the bottom, and then add the powder a bit at a time. Don't be frightened of adding quite a bit of powder in one go, it should mix in quite readily. You can pick up a small paddle mixer for a few pounds from a decent builders merchant - this makes mixing very easy. Just keep adding the grout powder and mix until it turns to a peanut butter consistency (the smooth kind not the lumpy).
Now you're ready to grout. You should get a grout float - Marshaltown make the best and a float will cost about £10 (trust me it's worth it). Pour the grout mix into a paint roller tray and work from that. Scoop some grout onto the floor and work it into the joints so that it goes right to the bottom. Your float should be held at around a 45° angle and you should apply the grout diagonally to the joints so that you only wipe off the excess. The tile face should be fairly free of grout at this stage, but if not it's not the end of the world. If after around 15 mins you haven't used all the grout, stop what you're doing and lightly wipe the face of the tiles with a damp sponge. (Wear gloves because it's hard on your hands) You'll need to keep rinsing the sponge often. The tiles you've grouted up to now should be free of any lumps of grout and reasonably clean. Expect a thin slurry of grout to remain on the tiles at this stage. Note: if you have plenty of money you can buy a Washboy that's specifically designed for cleaning off grout. These are excellent, but for a small job are not worth the expense.
Now continue to grout where you left off. Continue this process until you've done all the tiles (stopping every once in a while to clean the tiles). If you leave the grout on too long, you'll have a tough job to remove it. You've been warned!
You can give the tiles another light sponging now. Then leave alone for a couple of hours. A misty coat of grout will remain on the tiles - this can be dusted off when the grout is dry after around 5 hours. Wear a dust mask for this. You will probably have to dust/mop the tiles a few times to remove the powder fully - this is quite normal.
Drilling tiles
Ok, so you have your nice new tiles firmly stuck to your walls and floors and now you want to start fitting things like soap dishes to walls and toilet pans to floors. So you'll need to drill some holes.
How you go about drilling holes depends on the type of tiles you have.
If you have regular ceramic tiles, you should have no problem using a masonry drill bit (preferrably one in good condition). Mark out where your hole needs to be, then put the drill onto the centre of the mark (the drill isn't spinning at this stage). It's important to ensure that the drill is square to the tile face or else it will wander when you start the drill spinning. Once you're happy that the drill is square, start the drill spinning (not on hammer action) but very slowly at first (so it's only just moving) - at this point you're just making sure that the drill is staying in one spot. If it starts moving about, stop and re-position it. Before long the drill will bite into the surface of the tile - at this point you can increase the speed. Once you are through the tile itself, you can if you wish, turn on the hammer action if you have a solid wall to drill into. Do not attempt to drill through tiles on hammer action.
If you have a harder tile such as porcelain then you're going to struggle with even the best masonry drill bit. They will go through, but the problem you have will be that the drill will overheat very quickly and will stop cutting. There is a way of using a masonry bit with porcelain tiles but it only really works on floor tiles - this involves building a small wall around the area (with plasticine) and filling it with water - you can then slowly drill your hole and the water will prevent the drill from overheating and "burning out". This is not the ideal way of doing it, but can get you out trouble if you've lost your diamond bit.
"A diamond bit" I hear you say! Ideally, for harder tiles, you want to be using a diamond drill bit - this is essentially a tube with crushed industrial diamonds stuck around one end. These can be quite expensive if you were to buy them at your local diy store, but the option to buy them cheaply from overseas is there. Some of the pro tilers on here use this site and say that you will receive them within the week.
For ease, you can get a guide that will allow for easier alignment of the hole. If you get someone to apply water to the drill bit while you drill, the bit will last longer. Be warned, you may only get a two or three holes out of a drill in very hard tiles.
Using wall fixings
You should have no problem just using a regular wall plug (rawl plug) - just make sure that when you push the plug into the hole that you use a hammer and a screw to tap the plug into the hole so that it's about half way through the tile. This will remove the risk of cracking.