Drop/stud ceilings.

Joined
25 Jan 2006
Messages
492
Reaction score
1
Location
Manchester
Country
United Kingdom
Hi all,

Currently going through a bit of a refurb and employing a few techniques designs I've never before attempted.
A couple of these are drop down ceilings/floating walls.

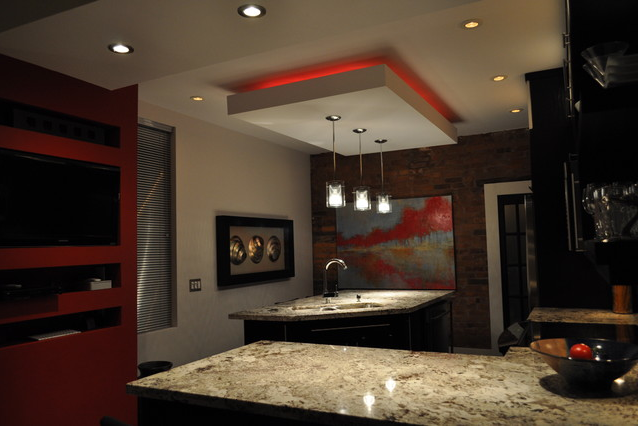
There's a couple of pics below for another couple of types of design I want to create. One is the partial drop down ceiling (the image is almost exactly the same as I want in my dining room, if not a little smaller/thinner). I guess I could build a frame on the floor for this and then hoist it up - it's only going to be holding the plasterboard. Have searched high and low for advice on this, but nothing has returned...it's usually tips on those metal panel drop down ceiling you get in offices.

This is going to hang several inches (depending) below the actual ceiling and mirror (in a way) the dining table below - roughly 3' x 6'.
Directly above are two joists (happily in the right place...) 560mm apart - I'll use these to hang the frame but then I'll need to overhang a little on each side - perhaps 6" each side. I could probably work through this via trial and error, but if anyone has any tips on this (thinking 2x2 timber?) I'd be most grateful.

Droppedceiling1.png


The other is the 'double' ceiling I'd like in the hall.
I presume I'd have to attach a thin border (I only want it going down one side of the hall 2.5 metres or so) then add a frame to the rest and attach the 'dropped' ceiling below this (overlapping slightly - then adding rope/LED strip lighting for that 'hidden glow' appearance).

Hallway_Lighting_Shadowgap_Grid%20Fittings.jpg


Is this fairly straightforward - any construction linkies...google isn't my friend on this one!?

Many thanks.
 
Sponsored Links
I should've added that I don't currently have any ceilings downstairs (in any rooms), which makes it easier to attach to joists!
 
The first ceiling used to be reasonably common in restaurant/hotel installations. I think you're going in the right direction - build a frame from something like 2 x 2s at floor level, add some drops from your existing joists then haul the frame up and fix to the drops. A laser level is invaluable for setting the levels and I wouldn't attempt the job without one these days. A couple of tips about the drops - leave them over length and mark the bottom frame levels using the laser. You can trim to length afterwards. You'll need a second body to do the lift - or hire a Genie lift. Clad off with something like 6mm MDF afterwards (lighter than PB).

The second ceiling was popular in Germany in the 90s and their name for is a shadow gap ceiling. We used to put them in by fixing 3 x 2s edge on to the existing ceiling joists at 300mm centres then fixing 12mm MDF sheets onto the joists. The edgesare sawn in situ by running the circular saw fence against the wall as a guide. To do this you need a small saw with a double stem fence (Festools and Mafells have them). Sometimes we'd use T&G planking in which case the outer pieces had to be ripped to look identical (not possible on narrow passageways if the walls aren't parallel - they just end up looking wierd). The trick is to get the gap bang on visually. Not always possible in older buildings - in fact for both of these techniques your walls and ceilings need to be pretty good

BTW neither of these techniques is rocket science - but they can be hard work. If the ceilings are tall I'd recommend hiring a scaffolding tower because trying this sort of stuff on top of a ladder is going to be a nightmare

Fantastic - I think I understand techniques you are describing (although I'm no joiner...so it's a bit of a learning curve - please bear with me regarding the following queries!).

First Ceiling:

When you say drops - do you mean short baton's (at an approx length at this stage as per your instruction) i.e. an 8" 2x2 piece of timber hanging every 300mm screwed (bolted?) to the inside (so the 'proper' ceiling can be fitted over the joists snugly) of the joists above, then hoist up the built frame (which may overlap the drops by 6-8"'s or so)?

I have two joists (7x2) to work with, if that makes any odds structure wise?
This first ceiling is a must - and actually that image I posted is almost exactly the same as I had envisaged (incl the lighting). The reason I was thinking plasterboard was so I'd get the nice square angles (the rectangle box shape) once skimmed. Easy enough to achieve via MDF (which if lighter would be better).
I will most likely pick up the wood from a local timber merchant this weekend - I'd like to start this asap - I have heck of a lot of renovations to do in this house (we moved in around the new year) and an extraordinarily tight budget and lack of experience!)

Second ceiling:

I'd still like to give this a whirl but this seems a little more trickier.
Bit of an issue as the hall (L shaped) leads into the stairs - not much too play with in regard to dropping the ceiling - conscious lowering it would cause someone to bump their head! I'll measure out a template and attach to the exposed joist...I think it will be ok however (see pic below):

You can see the stair incline on the top right, and the left hand side where the 'shadow' part will go (the pic was taken at the end of the run where the hall meets the kitchen - not a particularly long run). I guess I'll box in the drop part of the ceiling where the stairs are, otherwise the view will when coming down the stairs will be right into the dropped part - sure it will look fine.
Worried about the sawing bit - no budget for purching new tools now, I have a circular saw, but if it requires the 'double stem fence' I may have to try and hire.
I'd have to use plasterboard I think, or do you think MDF is essential (having never seen a MDF ceiling, in a domestic setting at least) - should add that fire rated spots will be going in to this ceiling also - problem with MDF (possibly use LED's however)?
3x2 essential (again, showing my lack of knowledge here, the 3" would be the vertical and 2" the horizontal, as per joists?)

Photo1.jpg


Many thanks for that post - couple of things I need to get my head around, but wonderfully described and very helpful.

Cheers.
 
Sponsored Links
I don't think I'll be able to go down the MDF route for the shadowgap ceiling (I plan on using halogen downlights, though fire rated ones I'm not too keen on putting them in MDF).

What if I used the manufactured edge of the plasterboard (i.e. non cut) all the way along the hall (it's only around 3 metres long) but only securing (I'll need a helper) once the measured gap is spot on (using a measured guide).

Obviously the other end will need cutting, but this is the same in any new ceiling and this will be fitted right up to the wall and eventually skimmed to finish. Any idea how large the gap should/has to be? I was thinking about 50mm, enough to fit a strip of LED lighting (of that 'halo' type glow).

Also - will I need these (and I'm not entirely sure how they work/fit):

813.jpg


http://buildingmaterials.co.uk/Alum...0-x-20-Shadow-Gap-20mm-Angle-Trim-x-3000.html

Many thanks.
 
Hi, I'll try to answer your questions as best I can....

First Ceiling:

When you say drops - do you mean short baton's (at an approx length at this stage as per your instruction) i.e. an 8" 2x2 piece of timber hanging every 300mm screwed (bolted?) to the inside (so the 'proper' ceiling can be fitted over the joists snugly) of the joists above, then hoist up the built frame (which may overlap the drops by 6-8"'s or so)?
Yes. The spacing isn't that important and 2 x 2in rough sawn (R/S) screwed through with 4in screws will do fine. Main thing is to get a good fix into the joists above so that the weight will be properly supported. 300mm? 400 to 600mm will be good enough for most purposes and the drops could even be 2 x 1s at a pinch. The frame isn't structural and you aren't going to be swinging from it (I hope)

I suggested MDF for a few reasons: firstly MDF doesn't require the services of a plasterer, if you plaster the ceiling then the frame and evertyhing else will have to be that much more rigid (and heavier) to withstand the extra weight and the amount of pushing and shoving a plasterer will subject the frame to when applying the skim, in any case 12mm MDF is lighter than 12mm plasterboard PLUS skim. For those reasons (and speed - no waiting for the plaster to dry out before painting it) MDF skins are often a preferred option in shop and bar fitting. Main thing to watch with MDF is getting the joints so they aren't obvious

Second ceiling:

....not much too play with in regard to dropping the ceiling - conscious lowering it would cause someone to bump their head! I'll measure out a template and attach to the exposed joist...I think it will be ok however
I'd still recommend boarding out this ceiling with 12mm PB before doing any other work as that will give you better insulation (sound and heat) between floors as well as being a better fire barrier. If you go for taper edge boards then the joints can be skimmed and sanded (note: not the whole ceiling) then the ceiling margins could be painted matt black, 2 x 1 slate battens applied ti the boards, flat on and a 12mm MDF panel (or panels) fixed to the battens. That way you loose just 1-1/2in (38mm) of ceiling clearance. Matt black paint is often applied to the shadow battens around the edges of modern grid-type drop ceilings

I have to agree tha cutting in situ is difficult if you don't have the correct kit. When we used to do it we had a special small lightweight saw (135mm blade) kept just for that task. Haven't seen that saw for years, now. What type of saw do you own? It might still be OK

I'd have to use plasterboard I think, or do you think MDF is essential (having never seen a MDF ceiling, in a domestic setting at least) - should add that fire rated spots will be going in to this ceiling also - problem with MDF (possibly use LED's however)?
3x2 essential (again, showing my lack of knowledge here, the 3" would be the vertical and 2" the horizontal, as per joists?)
Fire rating? Well you could always try to get fire rated (red) MDF which we sometimes use in shops, but I doubt that it will be needed - your lighting should have intumescent hoods (like miniature plant pots) over the top of them (ask the sparkies - OI'm not a spark!), but wouldn't LEDs be better in any case - less heat, less electricity used and therefore more environmentally acceptable?

Having seen the site see my comments above about shadows and alternatives
 
What if I used the manufactured edge of the plasterboard (i.e. non cut) all the way along the hall (it's only around 3 metres long) but only securing (I'll need a helper) once the measured gap is spot on (using a measured guide).
The problem with plasterboard is disguising the joints - that and the weight. The profiles you show are the sort used to fit industrial dropped ceilings - the sort of thing you see in offices, modern schools, etc these days. The metal comes in a limited range of colours (powder coated) and they look what they are - industrial IMHO

Any idea how large the gap should/has to be? I was thinking about 50mm, enough to fit a strip of LED lighting (of that 'halo' type glow).]
Not too large, say 35 to 50mm. It might be worth mocking-up a small section (say 2 ft long) and playing about with the gap/drop to see what combination you like best
 
I suggested MDF for a few reasons: firstly MDF doesn't require the services of a plasterer, if you plaster the ceiling then the frame and evertyhing else will have to be that much more rigid (and heavier) to withstand the extra weight and the amount of pushing and shoving a plasterer will subject the frame to when applying the skim, in any case 12mm MDF is lighter than 12mm plasterboard PLUS skim. For those reasons (and speed - no waiting for the plaster to dry out before painting it) MDF skins are often a preferred option in shop and bar fitting. Main thing to watch with MDF is getting the joints so they aren't obvious

Sounds like the better option. Worried I won't get the joins/joints right though - looking at it now (in my head) I'm assuming it will be like a rectangle box (like a sandpit box for example) which I'll then fit over the frame.

A bit like this (sorry - best picture I could find to illustrate!):

HEPA-Filter-with-MDF-Frame.jpg


I'm guessing I'll then fix it to the frame with countersunk screws which I can fill later. Any joins can also be filled, sanded smooth (like you would do to a MDF floating wall) and then painted. I think this would be the ideal option. Again, issues over getting straight cuts - I have a jigsaw (useless for straights) and a bog standard B & D circular saw (has measure/guide so possible contender!).
 
Sounds like the better option. Worried I won't get the joins/joints right though - looking at it now (in my head) I'm assuming it will be like a rectangle box (like a sandpit box for example) which I'll then fit over the frame.
Vaguely. You'd need to apply the MDF upstands around all four sides but leave the bottom of the frame open so that you can hang it first. The MDF fascia then goes on using countersunk screws - I'd tend to make mine slightly oversize (a few mm only) then trim it back with a laminate trimmer and bearing guided trim bit - it;'s really awful trying to correct a fascia that's a couple of mm shy, so..... Oh yes, and I'nm supposing that you know how to check if your frame is square once you've made it, and then after it's fixed to the ceiling. Do you? One tip about joints in MDF - where you are jointing MDF that is going to be finished like a wall chamfer edge the joint edges lightly, assemble and then overfill/sand back with 2-pack filler. this may need 2 "coats" but creates a good joint (and if needs be I can point you to a couple of shops in Manchester where I've done this). Screwheads are always sunk-in below the surface and 2-packed (flexible car body filler!). make sure that you seal and fill end grain before painting, if you don't it will look rubbish

Again, issues over getting straight cuts.
You do need the ability to make dead straight cuts to get this to work for you. Your saw will need a fairly fine tooth TCT sawblade and you can probably make -up a straight edge "system" by fixing a 2 x 1in PSE softwood batten to the edge of an 8ft length of 6mm plywood or MDF (either sawn straight by the timber yard or ripped off the edge by yourself)
 
Vaguely. You'd need to apply the MDF upstands around all four sides but leave the bottom of the frame open so that you can hang it first. The MDF fascia then goes on using countersunk screws - I'd tend to make mine slightly oversize (a few mm only) then trim it back with a laminate trimmer and bearing guided trim bit - it;'s really awful trying to correct a fascia that's a couple of mm shy, so..... Oh yes, and I'nm supposing that you know how to check if your frame is square once you've made it, and then after it's fixed to the ceiling. Do you?

Nope! Do I heck! :)

Is the reason you don't measure and cut the bottom MDF frame before installing the 4 sides is that the sides 'bend' (for want of a better word) once attached to the hanging battons? Skewing it ever so? Waht on earth is a laminate trimmer?! I can't actually see how I would hold the bottom piece in whilst marking where is need to cut, unless it's held in place either with assitance or other means.

You do need the ability to make dead straight cuts to get this to work for you. Your saw will need a fairly fine tooth TCT sawblade and you can probably make -up a straight edge "system" by fixing a 2 x 1in PSE softwood batten to the edge of an 8ft length of 6mm plywood or MDF (either sawn straight by the timber yard or ripped off the edge by yourself).[//QUOTE]

I can't recall the model of my circular saw (i'll find it out) but it had a fairly large tooth saw blade with it...possible I can purchase a much finer one, but I'd have to check. I'm struggling to see how that 'system' works too - is there a reason it has to be 8 foot - have you taken my 6' longer side frame into account? I think I understand how that would work...I'll let it work around my brain for a bit!

Many thanks for this - I will get round to the other bit of advice shortly (the shadow gap).
 
I'd still recommend boarding out this ceiling with 12mm PB before doing any other work as that will give you better insulation (sound and heat) between floors as well as being a better fire barrier. If you go for taper edge boards then the joints can be skimmed and sanded (note: not the whole ceiling) then the ceiling margins could be painted matt black, 2 x 1 slate battens applied ti the boards, flat on and a 12mm MDF panel (or panels) fixed to the battens. That way you loose just 1-1/2in (38mm) of ceiling clearance. Matt black paint is often applied to the shadow battens around the edges of modern grid-type drop ceilings

I have to agree tha cutting in situ is difficult if you don't have the correct kit. When we used to do it we had a special small lightweight saw (135mm blade) kept just for that task. Haven't seen that saw for years, now. What type of saw do you own? It might still be OK

Not sure if I made this bit clear - I'm only have the gap on one side, rather than all the way around (you may have already worked that out!).

So, the way I've (mis)understood your new method:

*plasterboard up as if final ceiling, the one side where the gap will be, can be skimmed and sanded neatly. Then add the 2x1 battens (rather than the 3x2 from the previous method) - these will be spaced as before (right angle to the joists). I'll leave a small gap from the last batten to the end of the MDF - this is where I'm thinking of adding the LED strip light for the aforementioned glow look (as in the pic above). I'll then leave a 'shadow gap' of 50mm to the end of the wall. Not quite clear on painting the battens black (wouldn't this be just the last batten if I'm fixing them at 90 degree angles to the joists?). At as guess...so this batten (or battens if they're fixed along the same lines as the joists) they're painted so they don't reflect any of the light?...remain better hidden?

Tell me I'm close to understanding!!

I have to agree tha cutting in situ is difficult if you don't have the correct kit. When we used to do it we had a special small lightweight saw (135mm blade) kept just for that task. Haven't seen that saw for years, now. What type of saw do you own? It might still be OK.

Again, I'll drop that saw info on here when I grab that info. If I'm cutting it whilst the MDF is up on the ceiling, I can't imagine a blade that will go as tight as 50mm from the wall (as the line guide). Again, I've probably misunderstood what you've posted.
What happens on the other side of the wall as the MDF hits the wall - use the mentioned filler?

Many thanks!!
 
I made a couple of suspended ceilings, used timber and plasterboard for a kitchen ceiling, quite large at 2.4 X 4.8 metres, used chains to suspend from joists, chains set back from edge are almost invisable [but depends on ceiling height]. A simpler method was a 8X4 pine boards with halogen downlighters installed , again held with chain, cut chain much longer than required and fitted one side to ceiling and then swung the other side up, moving round each anchor point one at a time lifting a few links at a time.
 
Not sure if I made this bit clear - I'm only have the gap on one side, rather than all the way around (you may have already worked that out!).
Nope. I was still thinking about a shadow gap all round. Won't it look a bit odd with a gap down one side? Two or three sides, yes, but one seems a bit, well, unusual. But then, I'm not the one with the vision

The photo you posted shows the joists - you've clearly removed the existing ceiling cladding (lath and plaster?). If you don't reclad there are a couple of issues; firstly you'll get draughts under the floors upstairs, noise transmission to upstairs will be greater, you'll get more heat loss from downstairs to upstairs and finally there will be less fire protection for the timber joists/flooring. plasterboard is both an insulator (heat and sound) as well as a fire retarder.

Because you stated that headroom in this area is limited I suggested reducing the depth of the false ceiling. The battens you attach the false ceiling panel to need to run along the length of the hallway, at right angles to the joists, so that you can give a decent amount of support to the MDF. Running at right angles to the joists also means that you can more easily take out an unevenness in the joists (and believe me there will probably be some) - going across the hallway in the same direction as the joists could end up giving you a a "rolling seas" effect when you fix the MDF on top if the bottoms of the joists aren't level. I've done ceilings like that, but I don't think that's the effect you're after. You will need to check straightness with a string line and pack out as needed between the battens and the ceiling to get the battens dead level. On the exposed (shadow) edge(s) the battens need to be set back from the edges by 25 to 50mm so that they won't be seen. In order to further hide them I suggested painting them matt black so that they'll just "disappear" in the shadow, although that obviously depends on how much you want showing, etc. Whatever you do this area will be awkward to paint in the future

What happens on the other side of the wall as the MDF hits the wall - use the mentioned filler?
No. 2-pack is used for MDF to MDF joints. Where the wall touches the MDF I'd recommend a flexible decorator's caulk.

Because there seems to be an issue with getting the shadow gap right I'll suggest an alternative which means an extra joint to hide, but isn't quite so scary. Rip your 12mm MDF into 2 wide strips - make sure that the joint lands dead in the middle of a batten - if necessary by adding an extra batten. Chamfer the edge where the MDF strips will be jointed. Fix one strip to the battens leaving the shadow gap you require (cut a couple of spacer blocks to set this gap - don't use a tape measure as they don't work anywhere near as well (because they can be difficult to read when trying to hold one end of a celiling up and standing at the top of a ladder....). Scribe the remaining piece of MDF to the wall. Fix the second piece of MDF in place on the battens. Fill and sand the butt joint with 2-pack. It saves you having to worry about sawing above your head (something I'd use my cordless saw for these days) - but, you'll still need some way to saw a dead straight edge so that the joints are near perfect.

If you message me I might be able to sort a few of these detals out as I live just outside Mancland. Sorry, but I won't post a mobile number on here.....
 
Not sure if I made this bit clear - I'm only have the gap on one side, rather than all the way around (you may have already worked that out!).
Nope. I was still thinking about a shadow gap all round. Won't it look a bit odd with a gap down one side? Two or three sides, yes, but one seems a bit, well, unusual. But then, I'm not the one with the vision

The photo you posted shows the joists - you've clearly removed the existing ceiling cladding (lath and plaster?). If you don't reclad there are a couple of issues; firstly you'll get draughts under the floors upstairs, noise transmission to upstairs will be greater, you'll get more heat loss from downstairs to upstairs and finally there will be less fire protection for the timber joists/flooring. plasterboard is both an insulator (heat and sound) as well as a fire retarder.

Because you stated that headroom in this area is limited I suggested reducing the depth of the false ceiling. The battens you attach the false ceiling panel to need to run along the length of the hallway, at right angles to the joists, so that you can give a decent amount of support to the MDF. Running at right angles to the joists also means that you can more easily take out an unevenness in the joists (and believe me there will probably be some) - going across the hallway in the same direction as the joists could end up giving you a a "rolling seas" effect when you fix the MDF on top if the bottoms of the joists aren't level. I've done ceilings like that, but I don't think that's the effect you're after. You will need to check straightness with a string line and pack out as needed between the battens and the ceiling to get the battens dead level. On the exposed (shadow) edge(s) the battens need to be set back from the edges by 25 to 50mm so that they won't be seen. In order to further hide them I suggested painting them matt black so that they'll just "disappear" in the shadow, although that obviously depends on how much you want showing, etc. Whatever you do this area will be awkward to paint in the future

I've just read this first bit of your post, but will finish the second portion after I've replied here.

Perfectly understand now. You may have already clarified this, but with the 2x1's, the 1 inch will be for the vertical (i.e. one inch below the PB rather than 2 inch which will be along the horizontal)?

Agree on right angle battens, and the gap between the edge of the false ceiling and the battens (wasn't sure how much you could leave without the end of the ceiling sagging). It's also now clear why (and which part) of the battens you paint matt black - genius!

Yes - one side...although there maybe scope to do at least one (if not both) of the shorter sides of the all (one is just a short run across the door to the kitchen). I suppose this makes little difference work wise.
The other long side (you can see on the right of the picture which leads to the stairs) might be a problem - in the corner to the right of the front door, I'm building/purchasing a cabinet/wardrobe the top portion which will house the new Junction Box for the electrics (the reason the ceilings have been taken down) and a cloak cupboard. The small section on the diagonal as you walk down the stairs (will get a pic) I suppose can be just made flush with a 1.5" (approx) pice of the MDF/PB (otherwise you'd be looking at the 'undercarriage' of the new false ceiling (that make sense?).

Lighting - I do use LED's and will so in the future (I've just installed two up and downlights outside, both using LED's. Not 100% sure of them in a main room yet, and there's the issue of cost and dimmable options (require even more expensive LED's and dimmable modules). With that in mind, I *may* be using halogen's for the time being. Do you think the added weight of PB for the false ceiling will be an issue?

Right....onto the second part - huge thanks for this help job...
 
No. 2-pack is used for MDF to MDF joints. Where the wall touches the MDF I'd recommend a flexible decorator's caulk.

Because there seems to be an issue with getting the shadow gap right I'll suggest an alternative which means an extra joint to hide, but isn't quite so scary. Rip your 12mm MDF into 2 wide strips - make sure that the joint lands dead in the middle of a batten - if necessary by adding an extra batten. Chamfer the edge where the MDF strips will be jointed. Fix one strip to the battens leaving the shadow gap you require (cut a couple of spacer blocks to set this gap - don't use a tape measure as they don't work anywhere near as well (because they can be difficult to read when trying to hold one end of a celiling up and standing at the top of a ladder....). Scribe the remaining piece of MDF to the wall. Fix the second piece of MDF in place on the battens. Fill and sand the butt joint with 2-pack. It saves you having to worry about sawing above your head (something I'd use my cordless saw for these days) - but, you'll still need some way to saw a dead straight edge so that the joints are near perfect.

If you message me I might be able to sort a few of these detals out as I live just outside Mancland. Sorry, but I won't post a mobile number on here.....

Sorry - job - been away from the t'interweb for a while.
Right...where was I....

Flexing my brain a little more this on job, but I'm not quite getting this part.

Ok - first PB ceiling is down. I've now placed 2x1 battens across the entire length(?) of the hall, at right angles to the joists?
You say rip the two sheets into two wide strips? Why two - have you taken into account the length of the hall? By rip do you mean cut in two? Do these pieces join at cross ways to the battens?
Chamfer (again, some of these terms I'm not particularly knowledgeable on) - sand down the edges slightly (slight curve) so the 2-pack has something better to 'nestle' in? Not even sure how I would scribe the other piece/s to the wall job...sorry...I'm not quite getting this bit (although I'm bang on up to this point).

BTW - my circular saw is almost identical (if not identical) to this one:

41gOF4L%2BL5L.jpg


I'll drop you a PM - thanks for the offer and the help so far.

Many thanks.
 

DIYnot Local

Staff member

If you need to find a tradesperson to get your job done, please try our local search below, or if you are doing it yourself you can find suppliers local to you.

Select the supplier or trade you require, enter your location to begin your search.


Are you a trade or supplier? You can create your listing free at DIYnot Local

 
Sponsored Links
Back
Top