Is this frame strong enough for plasterboard?

Sponsored Links
Quite simply yes. You'll have to fit dwangs (noggins) where each of the boards in a run meet. I'm assuming if your using 8' x 4' plasterboard? and that the ceiling battens are spaced at the correct (600 mm) spacing??
Now comes the difficult bit, if that is your a novice - the working platform - placing the boards correctly for ease of lifting above your head(s) in the right direction for any service cut outs, wall ends and scribing etc. How you hold it in place (a hard hat with a very short on no visor is good) soldiers etc. all help, good luck...pinenot :)

Thanks for your reply.

The timber structure was already there when I removed a slatted roof.
Does it have to be 600mm apart?


Thanks
I was thinking of putting up the boards in 4 pieces. Each being 1.2m long and 85cm wide.

I have got plasterboard screws to fit them to the batons. Do I Need to use any adhesive atall for further support or are the screws suffice?
 
You might find the timber a little narrow for joining the boards on, you will need to fit accurately. Span should not be more than about 1.2m without support .
 
Sponsored Links
You might find the timber a little narrow for joining the boards on, you will need to fit accurately. Span should not be more than about 1.2m without support .

If I fit the boards ACROSS the timber support (ie. the smallest width of the room) would this be suitable? I can then fit it in one board across, being 175cm, in which case my thought of putting up 4 boards cut down is out the window. Thanks.
 
Yes across will do it but you should dwang (noggin) down the length - start of wall and at each side joint, between each batten. Cut each board length to achieve lapping halfway onto each batten, then start the next board hard against this. You must get the cut ends square to the sides so that the next board (factory ends)fits up snug. You get 900 x 1800 mm boards which may be easier for you handle...pinenot :)
 
Yes across will do it but you should dwang (noggin) down the length - start of wall and at each side joint, between each batten. Cut each board length to achieve lapping halfway onto each batten, then start the next board hard against this. You must get the cut ends square to the sides so that the next board (factory ends)fits up snug. You get 900 x 1800 mm boards which may be easier for you handle...pinenot :)

Okay. Just trying to picture it.

My room width is 170cm and the length is 230cm.

There is one baton on each wall for the structure (one each end, one each side) and 3 more beams across the length (230cm) of the room to provide the support to the middle of the frame.

If i get 900 x 1800 boards I can fit each board across the room (170cm). This means that I will need 3 boards that size to make up the length of the room (90cm x 3 boards = 270cm so will have a bit spare.

will I need straight edge or tapered boards for the ceiling?

The width between the batons working from one side wall (230cm) to the other side wall (230cm) are: 27cm, 41cm, 47cm, 39cm.

So whoever put them up first of all didn't even them out obviously! Will this matter when putting the boarding up?

As you mention having to overlap, as I am putting the boards ACROSS the beams, does this still apply or should I just fit them as close as possible?
Sorry for long winded question, first time at this so want to give it a good go. Thanks.
 
Are the three batons across the middle of the image referred to a noggins?


If so, am I right in saying that I need to put this noggin between the long beams across the length of the room, covering 88cm to 92cm if I were getting a 90cm board? - so that the edge of each board will have 2cm on the beam to screw in to?
 
OK, now that I know the ceiling dimensions, personally I would buy one 2400 x 1200 board, now you have a choice - cut it across (make sure the cut measures the correct length from your start end wall to the middle batten) this will make both cuts approx 700 x 1150, fairly easy to handle. -
The alternative, cut down the (middle side wall to middle of dwang row) reverse one of the cuts, now you will have a taper edge to taper edge joint down the middle (easy to tape and fill) both cuts will be easy to handle with two people and if you hold the cuts at each end, the held cut will bend down in the centre and shorten the overall length allowing it to be positioned almost to fit and when the bend is pushed up, both ends should end up firm to the wall ends (no gaps) Second cut goes up the same but the meeting taper edge is held down as well, this allows it when pushed up to see if it's hard to the side and end walls (no gaps) or the cut edge requires a scribe to fit. Hope that's all clear...pinenot :)

Thanks for your very in depth response. Before your response I just got back from b and q and have already bought 4 x boards 1800mm by 900mm. I however had to cut them down to 1500mm x 900mm to fit in car.

I was thinking of splitting the ceiling in to 4 quarters.
Each board being 115cm x 85cm. The boards are square edge and will have tape at the joints.

Really sorry for using your time up - I appreciate the help

Thanks
 
Yes, in fact it's the same only adding a cross joint (central batten) to the longitudinal one. Try to keep the butting ends of the p/board together (no gaps) this should give you a straight taper edge joint to work with, tape and joint the cross joint first allowing the dip to form where it crosses the longitudinal joint, this tends to make them less noticeable...pinenot :)
 
Thanks for your reply again mate :)

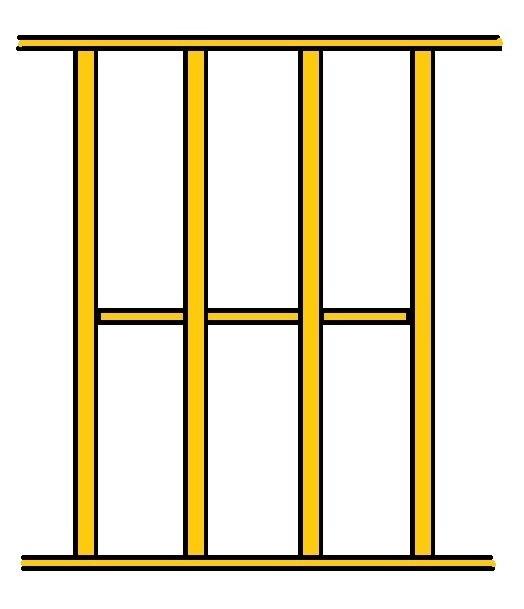
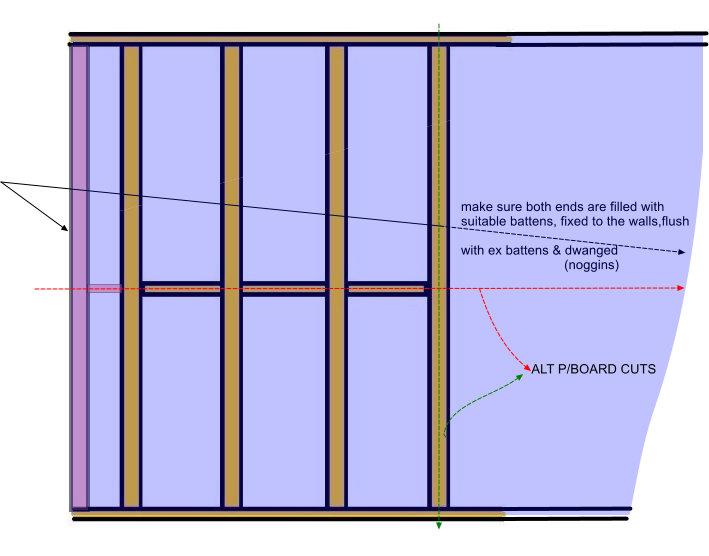
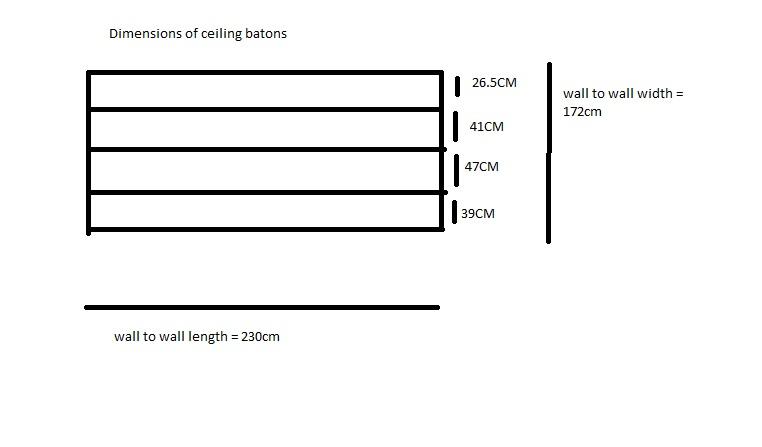
I have now drawn up a final diagram of the ceiling batons for you to have a look at (please see image below)


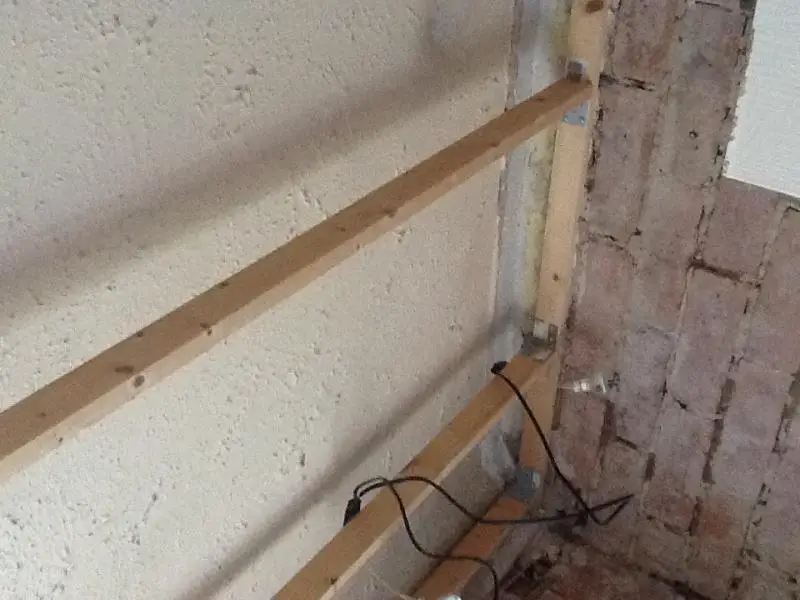
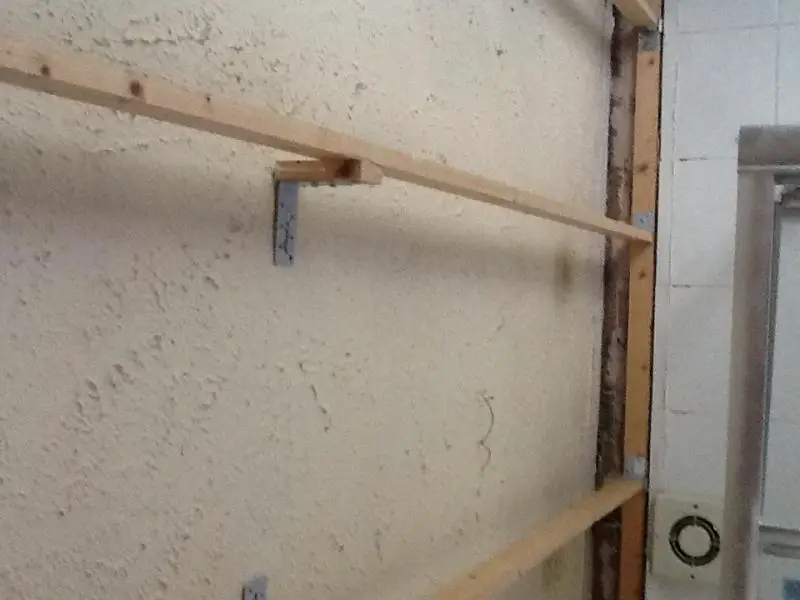
I have purchased 3 more batons measuring 2300mm x 25mm x 39mm, which i intend to use for fixing across the framework, providing the support. is it best to nail the support batons in?

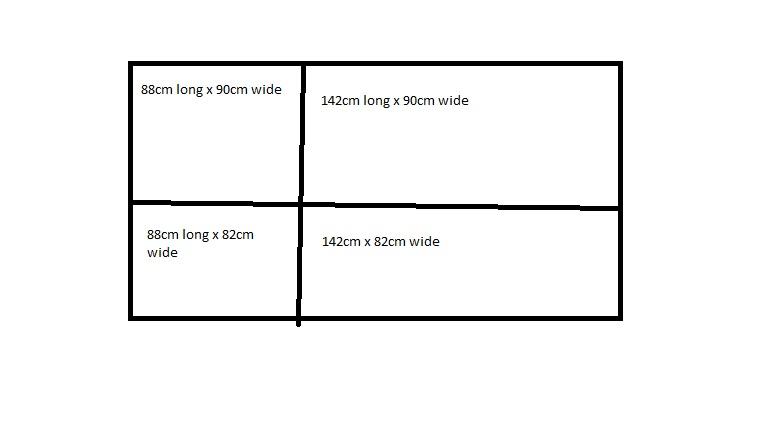
my plasterboard sheets had to be cut to 142cm long x 90cm wide. I have 4 of these sheets (all are square edge, 12.5mm thick).

what i plan to do in terms of putting the plasterboard up is as follows:


Does this plan look okay?

Last bit of help then i'm done - am i right in saying that the baton to go ACROSS the beams, should be spaced at the points where the two boards meet? So in my case i make this at 140cm - 144cm, to allow for 2cm of each board to be on the baton for screwing.

Im going to have to put another baton in across the middle of the room (length ways - 230cm) at 88cm - 92cm distance from the wall so that the boards can each rest on the edge of the baton and be screwed in.

And once all of the plasterboard is screwed in to the ceiling, i will put tape over the joints. I intend to be painting this plasterboard, so will the tape alone be suffice or will i have to get it skimmed? If i need to fill the joints aswell, do i do this AFTER i have put the tape on? (if so, is plaster finish okay to use, or just any gap filler?)

Bare in mind this board is on the BATHROOM CEILING, will i need to put a primer on to prevent any moisture damage? Any suggestions on what to use that wont break the bank?

I have probably made it too complicated but that because ive never done it before, so many thanks for your help.

I will be ready to crack on with this soon!

will let you know how it all goes aswell

Cheers
 
Right, bit like pulling teeth in some ways, but I suppose I'm the guilty one here, not asking the right questions that is.
So it's a bathroom ceiling your doing, did you buy the green moisture resistant boards or ordinary white ones? it' academic really, as both will perform well enough.
OK, going back to your original post and in particular the photo of the existing joists/battens, there are 4 in number running the length of the room, so forget everything I've said/sketched so far, the procedure for you should be as follows :-
Ensurer each room end of joists are in filled with dwangs (3 each end = 6 in total) each cut to fit it's particular gap/spacing, only one other row of dwangs is required across the room, between the joist and in line with the p/board cuts running across the room. You can put another row in which would help stiffen the framework, but is not really ness. But I would cushion using 25 x 39 mm as dwangs, 50 x 50 mm would be my choice, but if you intend going ahead with the thinner material, I would pre-drill these on the skew and screw them into the ex joists, bearing in mind everything I've said above, here's a sketch -
[I've overlaid your p/board sketch onto the assumed ex frame set up colouring the ex joists green and an extra one (if it's actually required?) to catch the central cut! and coloured this blue. But i wonder whether you cant twin this with one of the ex, to give you a wider fixing to the central cut(s)] ...pinenot :)
 

DIYnot Local

Staff member

If you need to find a tradesperson to get your job done, please try our local search below, or if you are doing it yourself you can find suppliers local to you.

Select the supplier or trade you require, enter your location to begin your search.


Are you a trade or supplier? You can create your listing free at DIYnot Local

 
Sponsored Links
Back
Top