Laminate - the edgy bits

Joined
18 May 2008
Messages
23
Reaction score
0
Location
Bedfordshire
Country
United Kingdom
Hi all,

Having quite successfully finished my Decking project thanks to some great advice on Diynot I only thought it wise to get some info on laminate.

Right, Im alright with wood but am a laminate virgin, I understand the concept of click laminate the process to put it down etc, its the edges.

Some sites say to put a 5mm cork expansion gap around the edges and push the laminate up against it. Which confused me as if the laminate is up against cork which is up against wall where is the seasonall room for expansion? unless the cork has some give? confused.com there.

Some sites say to leave the 5mm gap by use of the gappy spacers (forgot technical term) all round then remove and cover gap with edging. Sounds cool but wouldnt the laminate move as its not fixed to floor? or am i thinking too much into it?

If someone could educate me It would be much appreciated.

Cheers
Wallicio
 
Sponsored Links
Some sites say to put a 5mm cork expansion gap around the edges and push the laminate up against it.
Those sites should get their heads examined! Never, ever fill your expansion gap

We normally leave a minimum of 10mm all around the perimeter of the floor and indeed cover that gap with a flat beading which is pinned (or with double sided tape) to the floor. When the floor expands so far the pressure will push up the beading first (also an early warning system ;)) but won't harm the floor itself
 
Right 10mm cool, and you attach the edging to the floor and not the wall/existing skirting? right...
Whats the point in the cork expansion strips then are they just a cheap version of spacers? to allow for your 10mm away from the wall?
 
Originally the cork strips were used as divider between design parquet pattern and block-border.

Somehow someone got things mixed up and the cork strips 'moved' into the expansion gap between wood floor and wall (or skirting). Leave the gaps open so the wood can fill it ;)
 
Sponsored Links
cork is adviced by certain manufactories. There logic behind it is that is forces you to leave 12mm or so expansion around the edge or you wont get the cork to fit in. This will help them on a complaint to see if the expansion was left in the first place and you cant argue that you left more when we really know that you didn't if you know what i mean.

Cork will crush to about 3/4 of its thicknes so you end up with say 7-8 mm expansion when leaving 12mm for your cork. To accomadate the less expansion they will also tell you the maximum width of flooring you can fit with cork in place is less. So lets say you can fit upto 8 meters wide of flooring with no cork, this will be reduced to say 5 meters for example!

ANYWAY!, dont bother putting cork in there! Its a waste of time and asking for trouble in my eyes!

Also woody, how come your pinning your beading to the floor?
 
Matty, where else would we pin it to????
We're talking 5mm thick flat beading (28 - 35mm wide) here, not scotia or quandrants
 
This is the way i do it. I also use this method against fire places etc. With this method you wont have worry of the floor shrinking and leaving a gap at the edge or vice versa and poping the pins out. Or even causing a expansion issue.

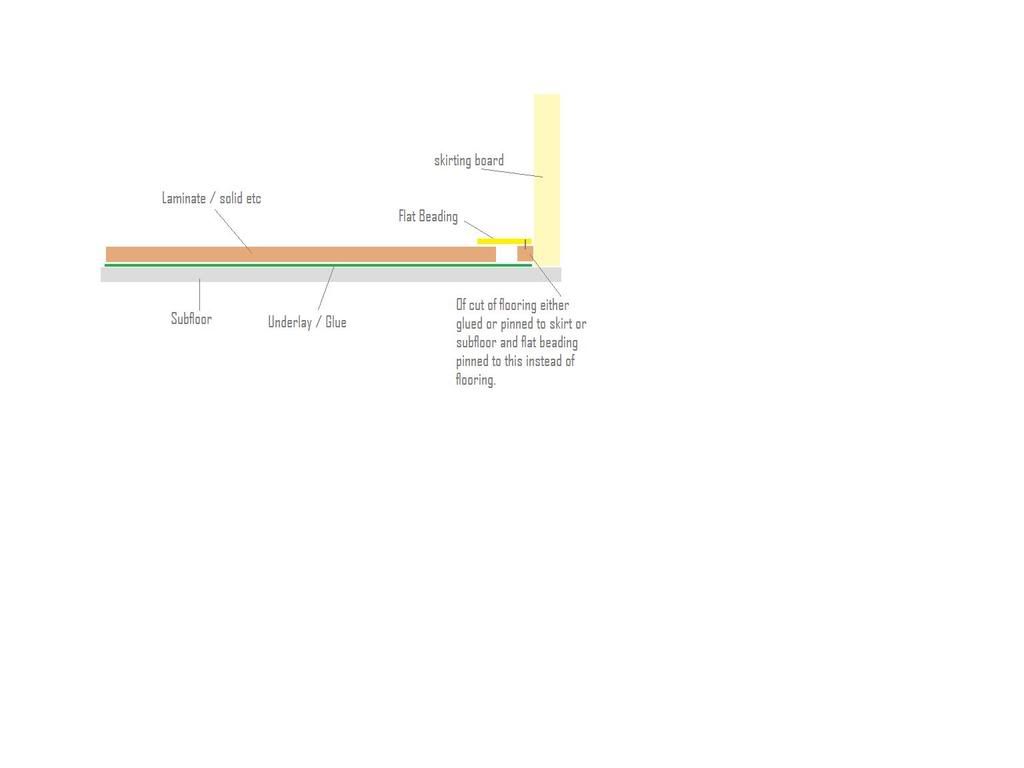
I always use the flooring im fitting to secure to the wall so it stays the same height.

Here you go..............


expansiongap.jpg
 
Oh sure, in those places.
Normal beading in front of 'normal' skirtingboards, patios doors etc rather difficult ;)

We nor our clients have problems with pinning the beading to the floor it self. When the floor does expand the beading will lift off - an early warning system too - because of the tiny pin we use (although, one DIY clients used rather thick nails and that really didn't help ;))
 
You can save the hassle of having beading etc popping off when you use this method. ;)

Plus you shouldn't need a warning system if correct expansion is there :idea:

Thats my method anyway!
 
Matty, you pin offcut laminate to the skirting then leave a gap then put the laminate down? seems an awful lot of offcut to use? how thick is the offcut you use?

Also wouldulike, quick one, if the edging is pinned/glued to the floor and the laminate expands, wouldnt that break the edging? and if it contracts wouldnt it leave a gap between skirting and subfloor expansion gap? Wouldnt it be better to attach the edging to the skirting that way the laminate can move freely underneath?

Just a thought? am i wrong?

A slightly bewildered Wallicio
 
the off cut is cut at about 10mm thick, so one board will do a 4x4m room. If you use waste to do this then it wont cost you a penny! However, most will just use beading and pin direct to the skirts so no need for the method that i have done the diagram for!

if for some reason you want to use flat beading, then follow my diagram or woody way! As you stated, there is a chance of a gap or popping up of the flat beading if attached to the flooring.

However, woody seems happy with the way they do it! everyone to there own :)
 
Laminate (the melamine plastic stuff) doesn't expand/shrink that much. If it does, it is very easy to re-pin the beading.
We only ever have to go back to clients who have solid wood installed to do this, with wood-engineered floors it hardly ever happens. Hence our preference for this method - we and our clients like flat beading much more than those scotias or quadrants
 
when you say pin.. do you mean to nail with small pins? wouldnt that ruin the effect wouldnt glue look better? i reckon pinning would be easier but with glue you wouldnt see any nails?
 
you can glue if you like. Its hard work tho. And you can only glue to the method i showed in the diagram. If you plan on glueing to the floor (that i would never recommed) you will need 'sega tape' or something simular that will allow sideways movement.

I have a brad gun that shoots fine nails that are almost invisible to the eye. Once filled the only way you will find them is with a magnet.
 

DIYnot Local

Staff member

If you need to find a tradesperson to get your job done, please try our local search below, or if you are doing it yourself you can find suppliers local to you.

Select the supplier or trade you require, enter your location to begin your search.


Are you a trade or supplier? You can create your listing free at DIYnot Local

 
Sponsored Links
Back
Top